In part two of this task, you improved the to-do list app so that it became interactive.
However, the app has two obvious flaws at present:
- The text of a to-do item cannot be modified.
- When the app is force-quit and re-opened, any to-do items that were created are lost.
Today you will learn how to correct these issues.
Allowing a to-do item to be modified
At present, your to-do list app should have this functionality:

You can add a to-do item, delete a to-do item, and mark an item as complete.
IMPORTANT
If your to-do list app cannot do these things yet, please return to part 2 of this tutorial series.
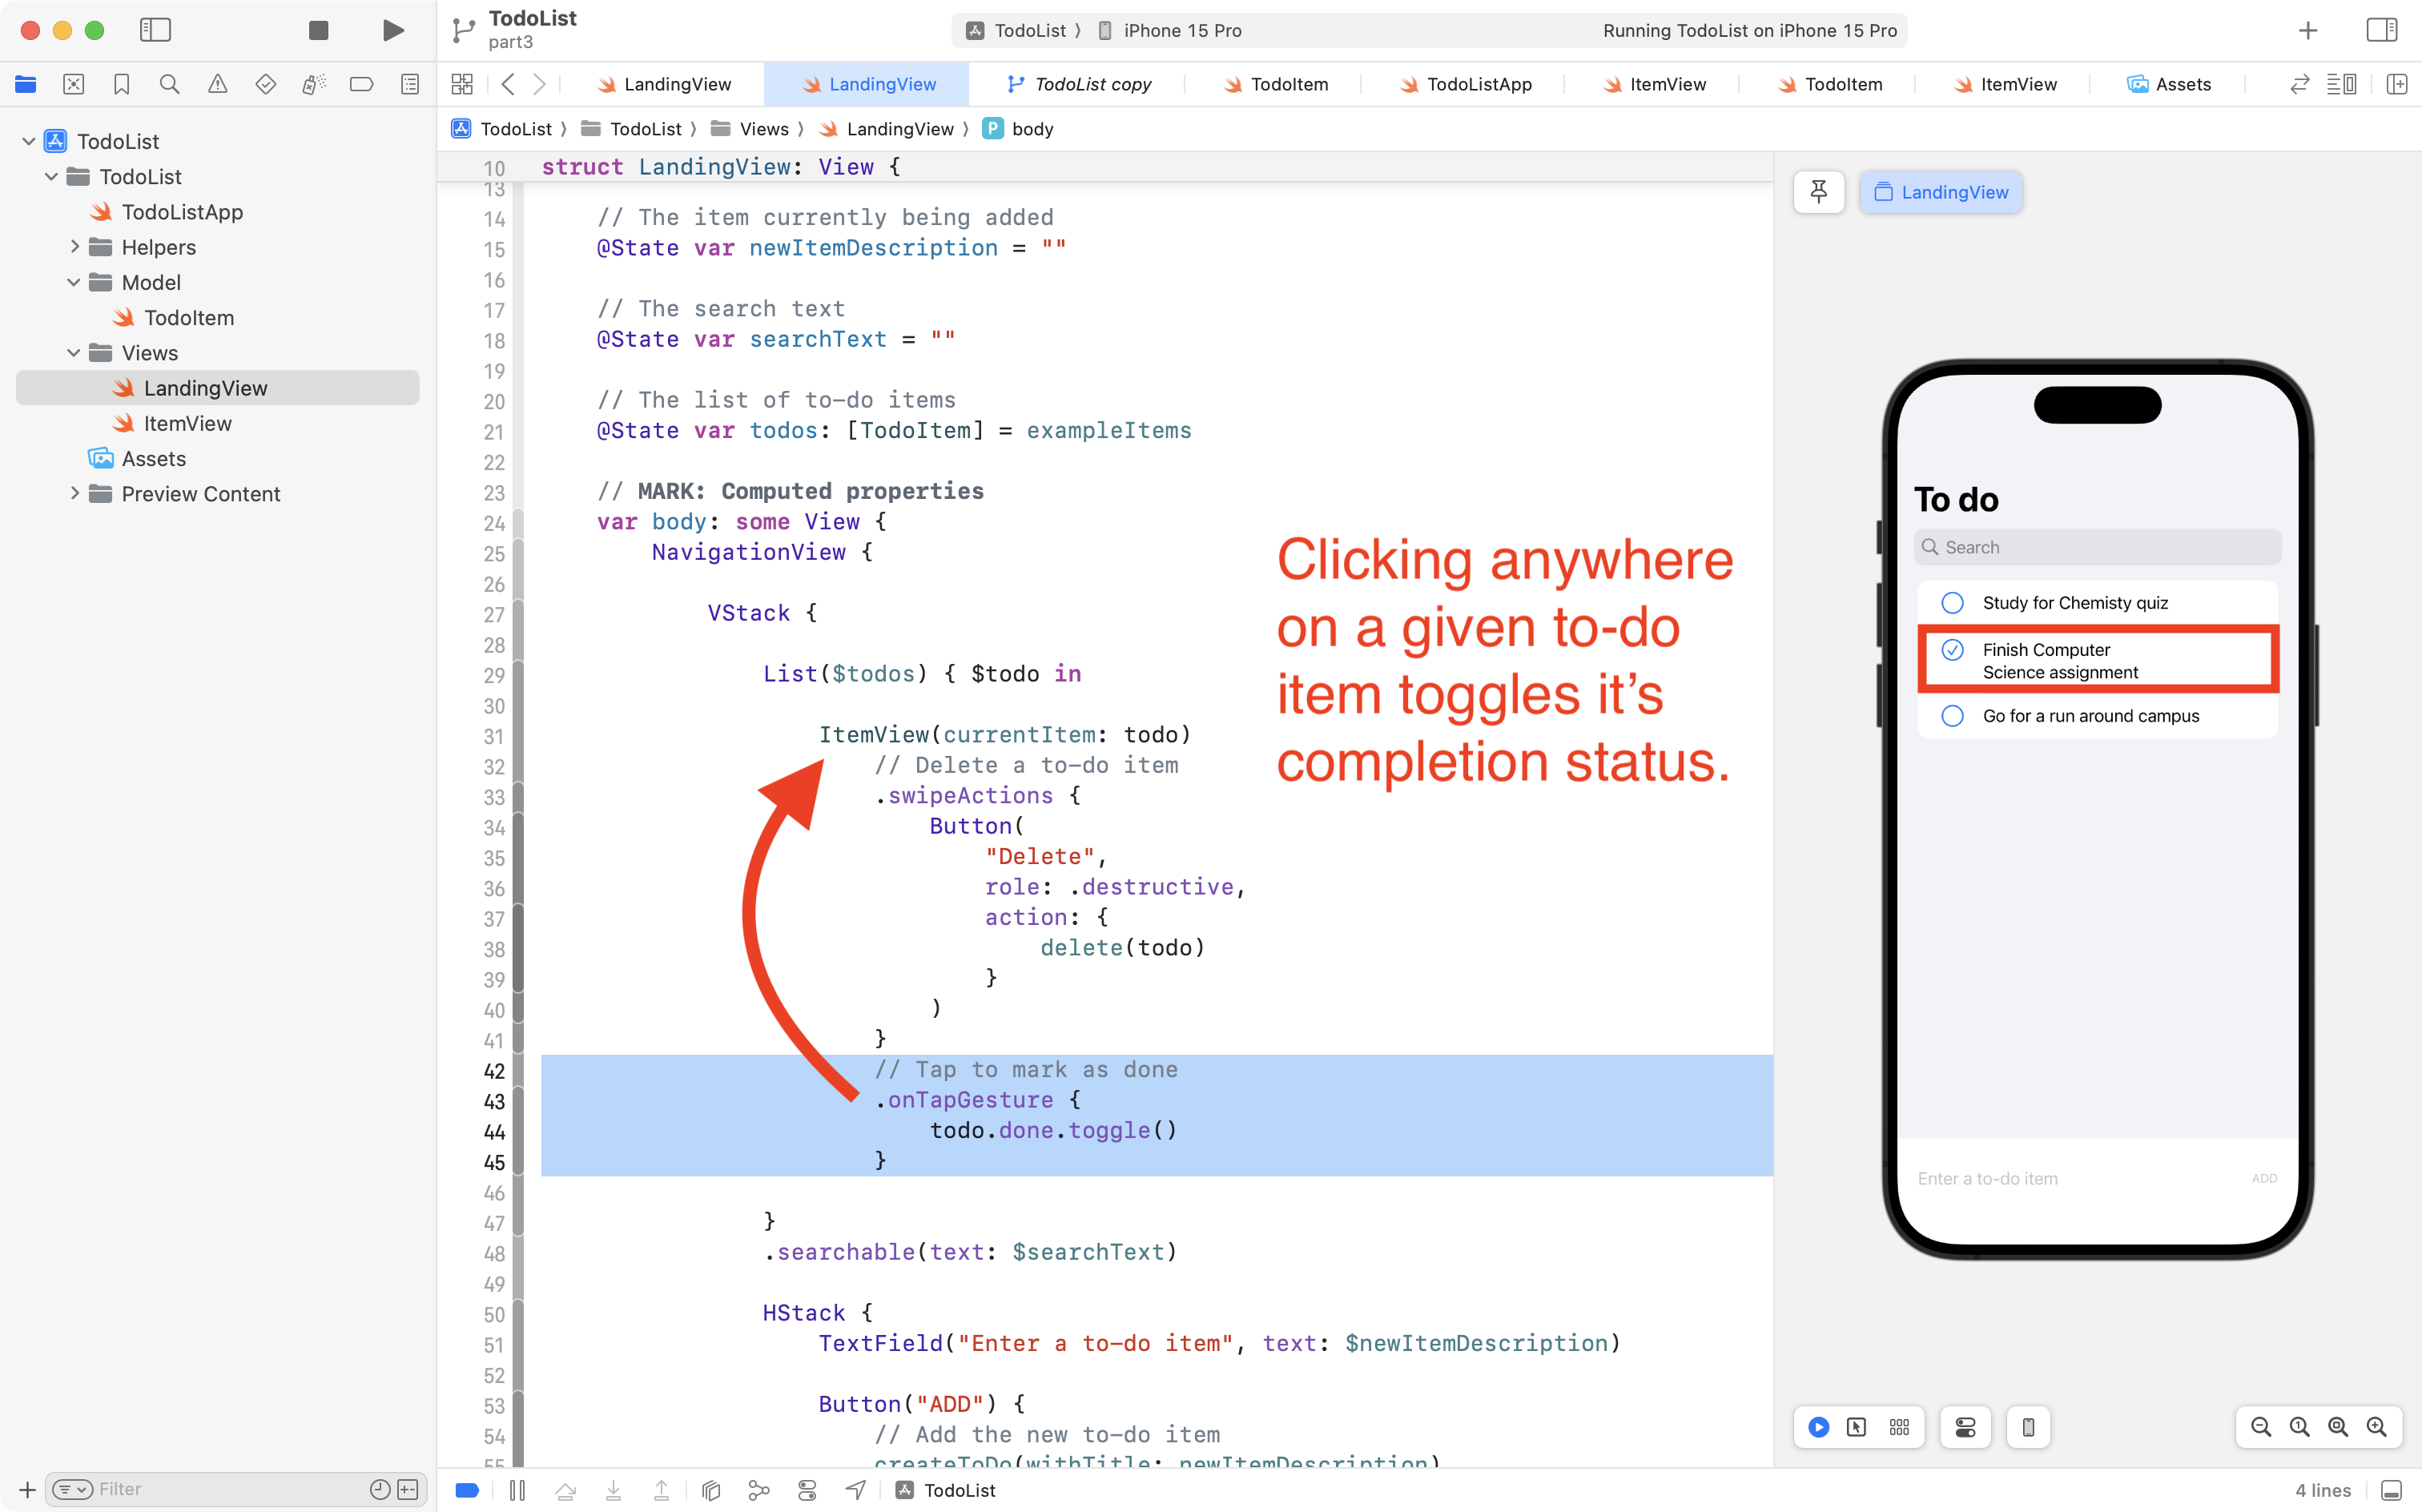
Try running your app again. Notice that if you tap anywhere on a row for a to-do item, the completion status is toggled:

This is a bit of a problem.
What if we wanted the user to be able to modify, or edit, the text of a to-do item?
Where would they click?
How could we tell if they were trying to toggle the completion status of a to-do item, as compared to clicking the text to change it?
Toggling a to-do item by tapping just the image
The reason a to-do item is toggled by tapping anywhere on a given to-do item is because the .onTapGesture view modifier is attached to the entire ItemView helper view.
To be able to toggle an item by tapping only on the circle image, we need to move that view modifier inside the ItemView helper.
So, first, highlight the code shown here in LandingView, and cut it into your clipboard using Command-X:
Now switch to ItemView:
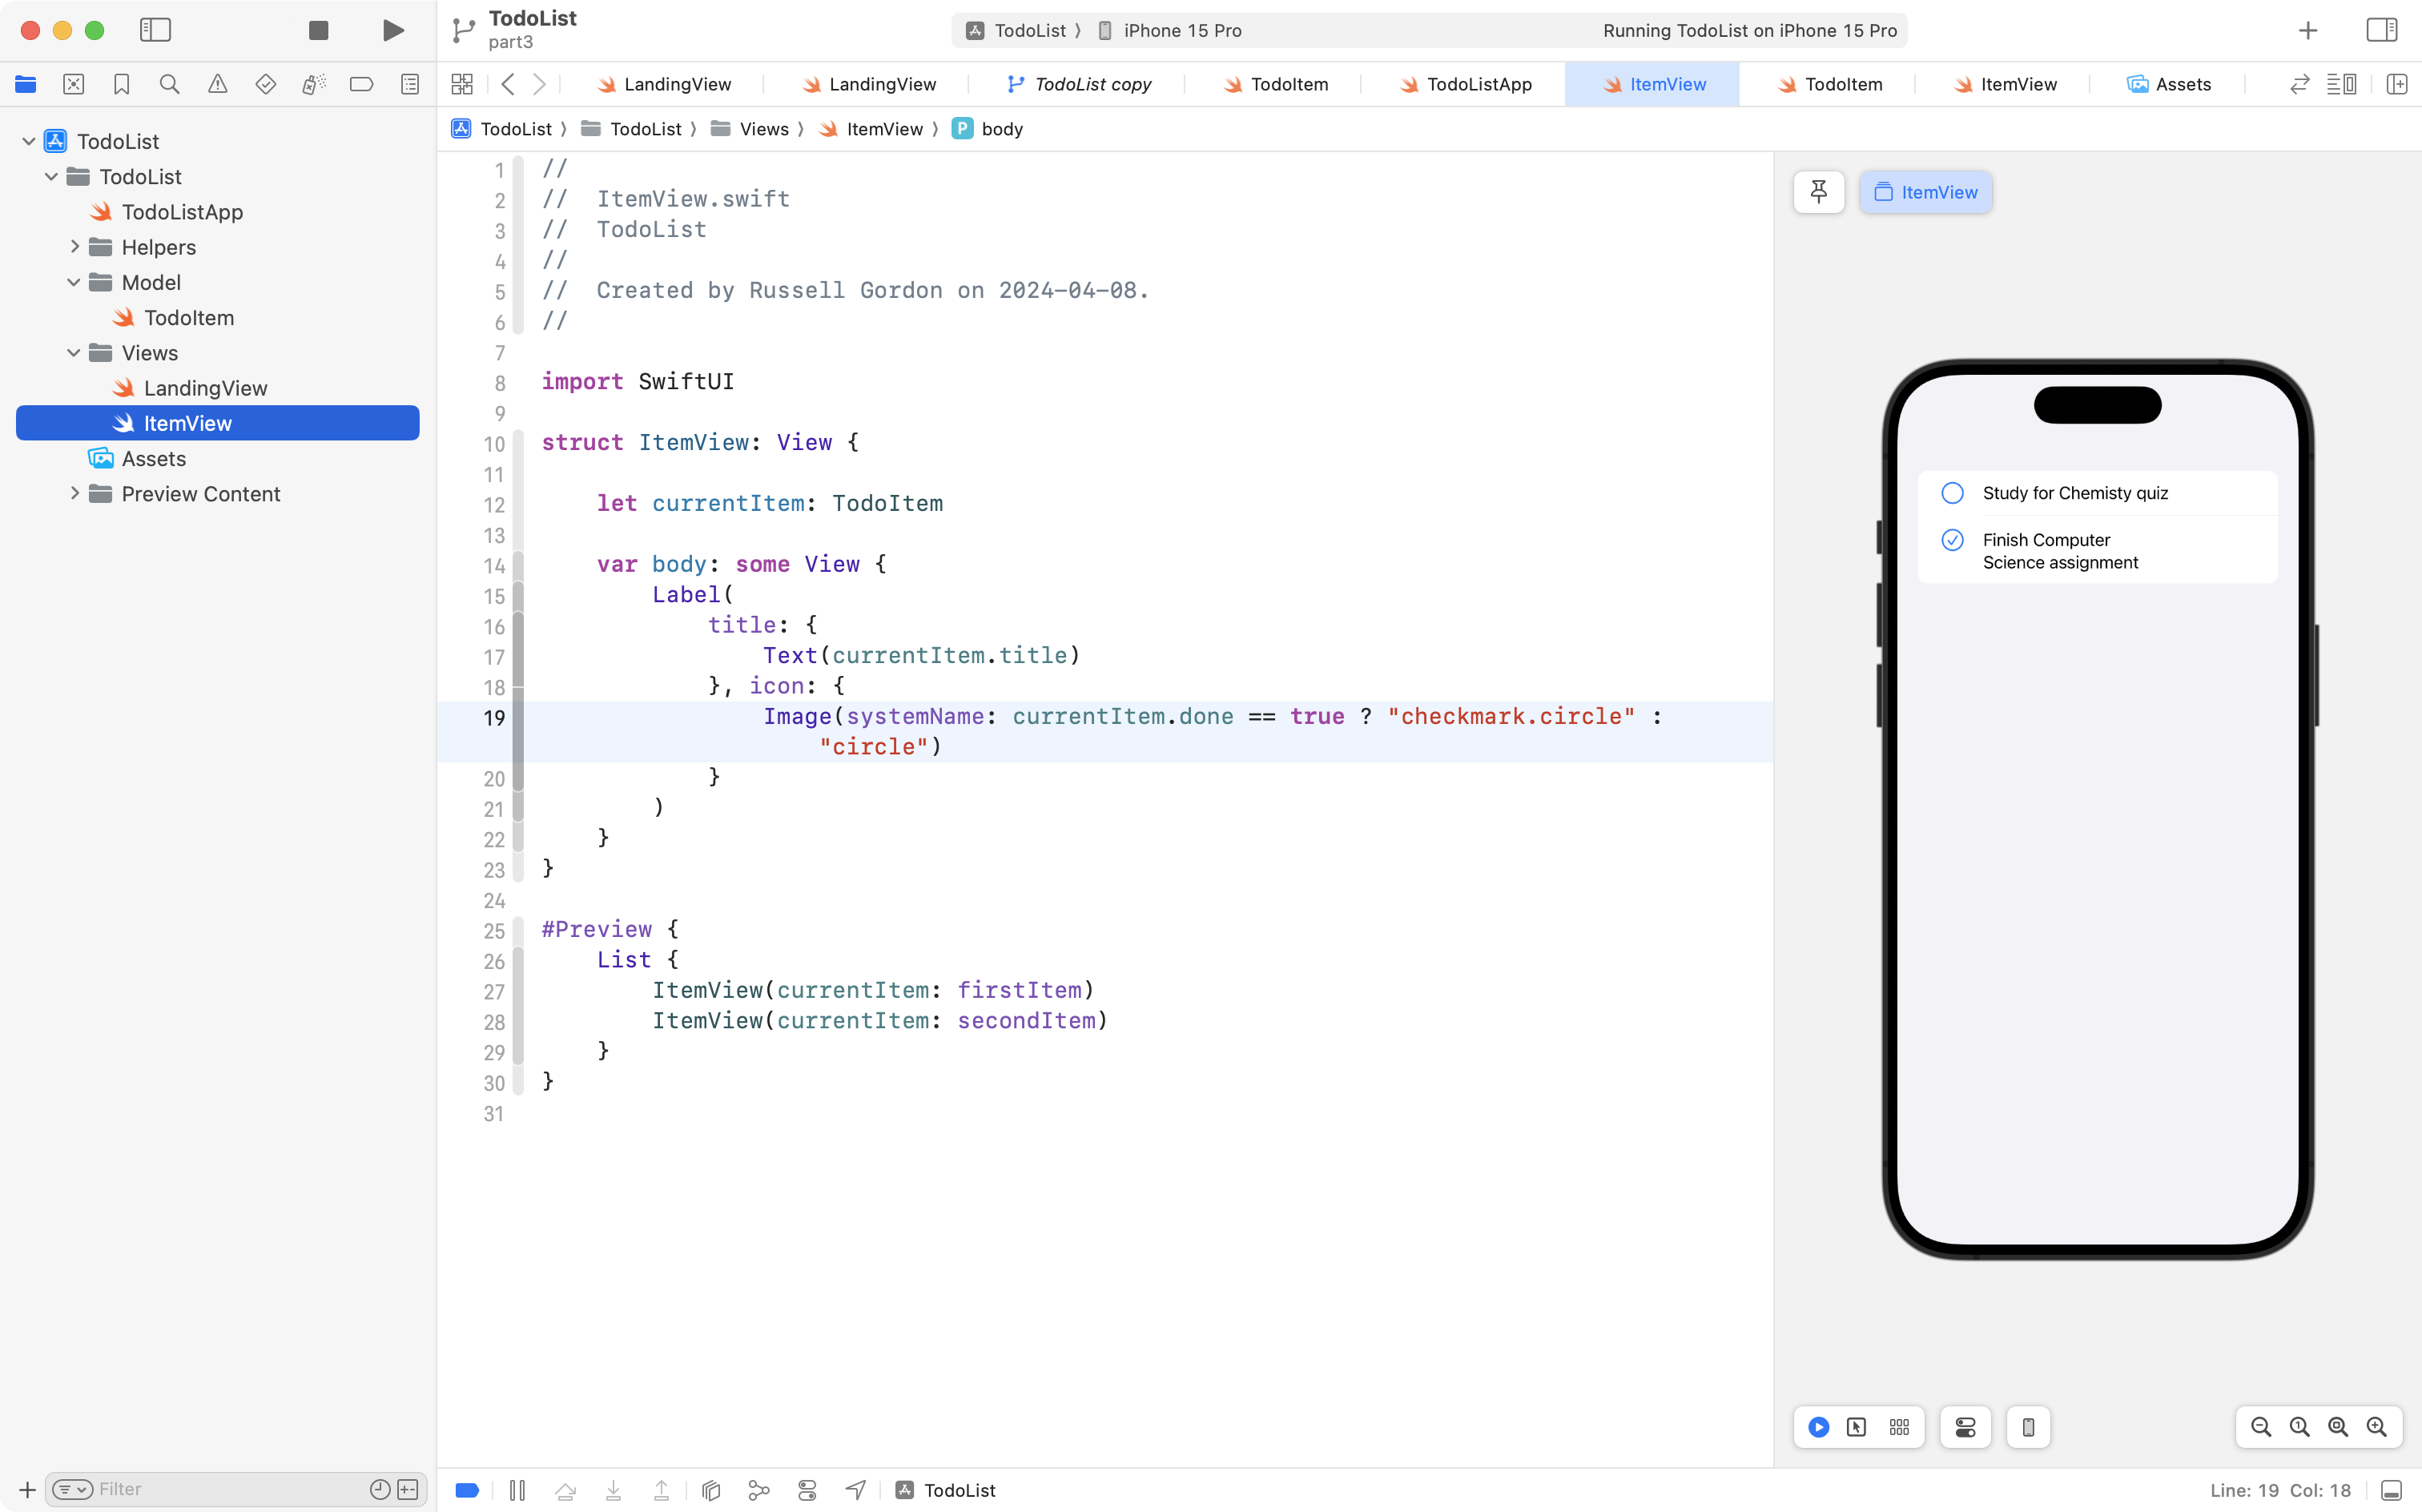
Paste the code right below the Image structure that is serving as the icon for the Label:
This creates a few problems we need to fix.
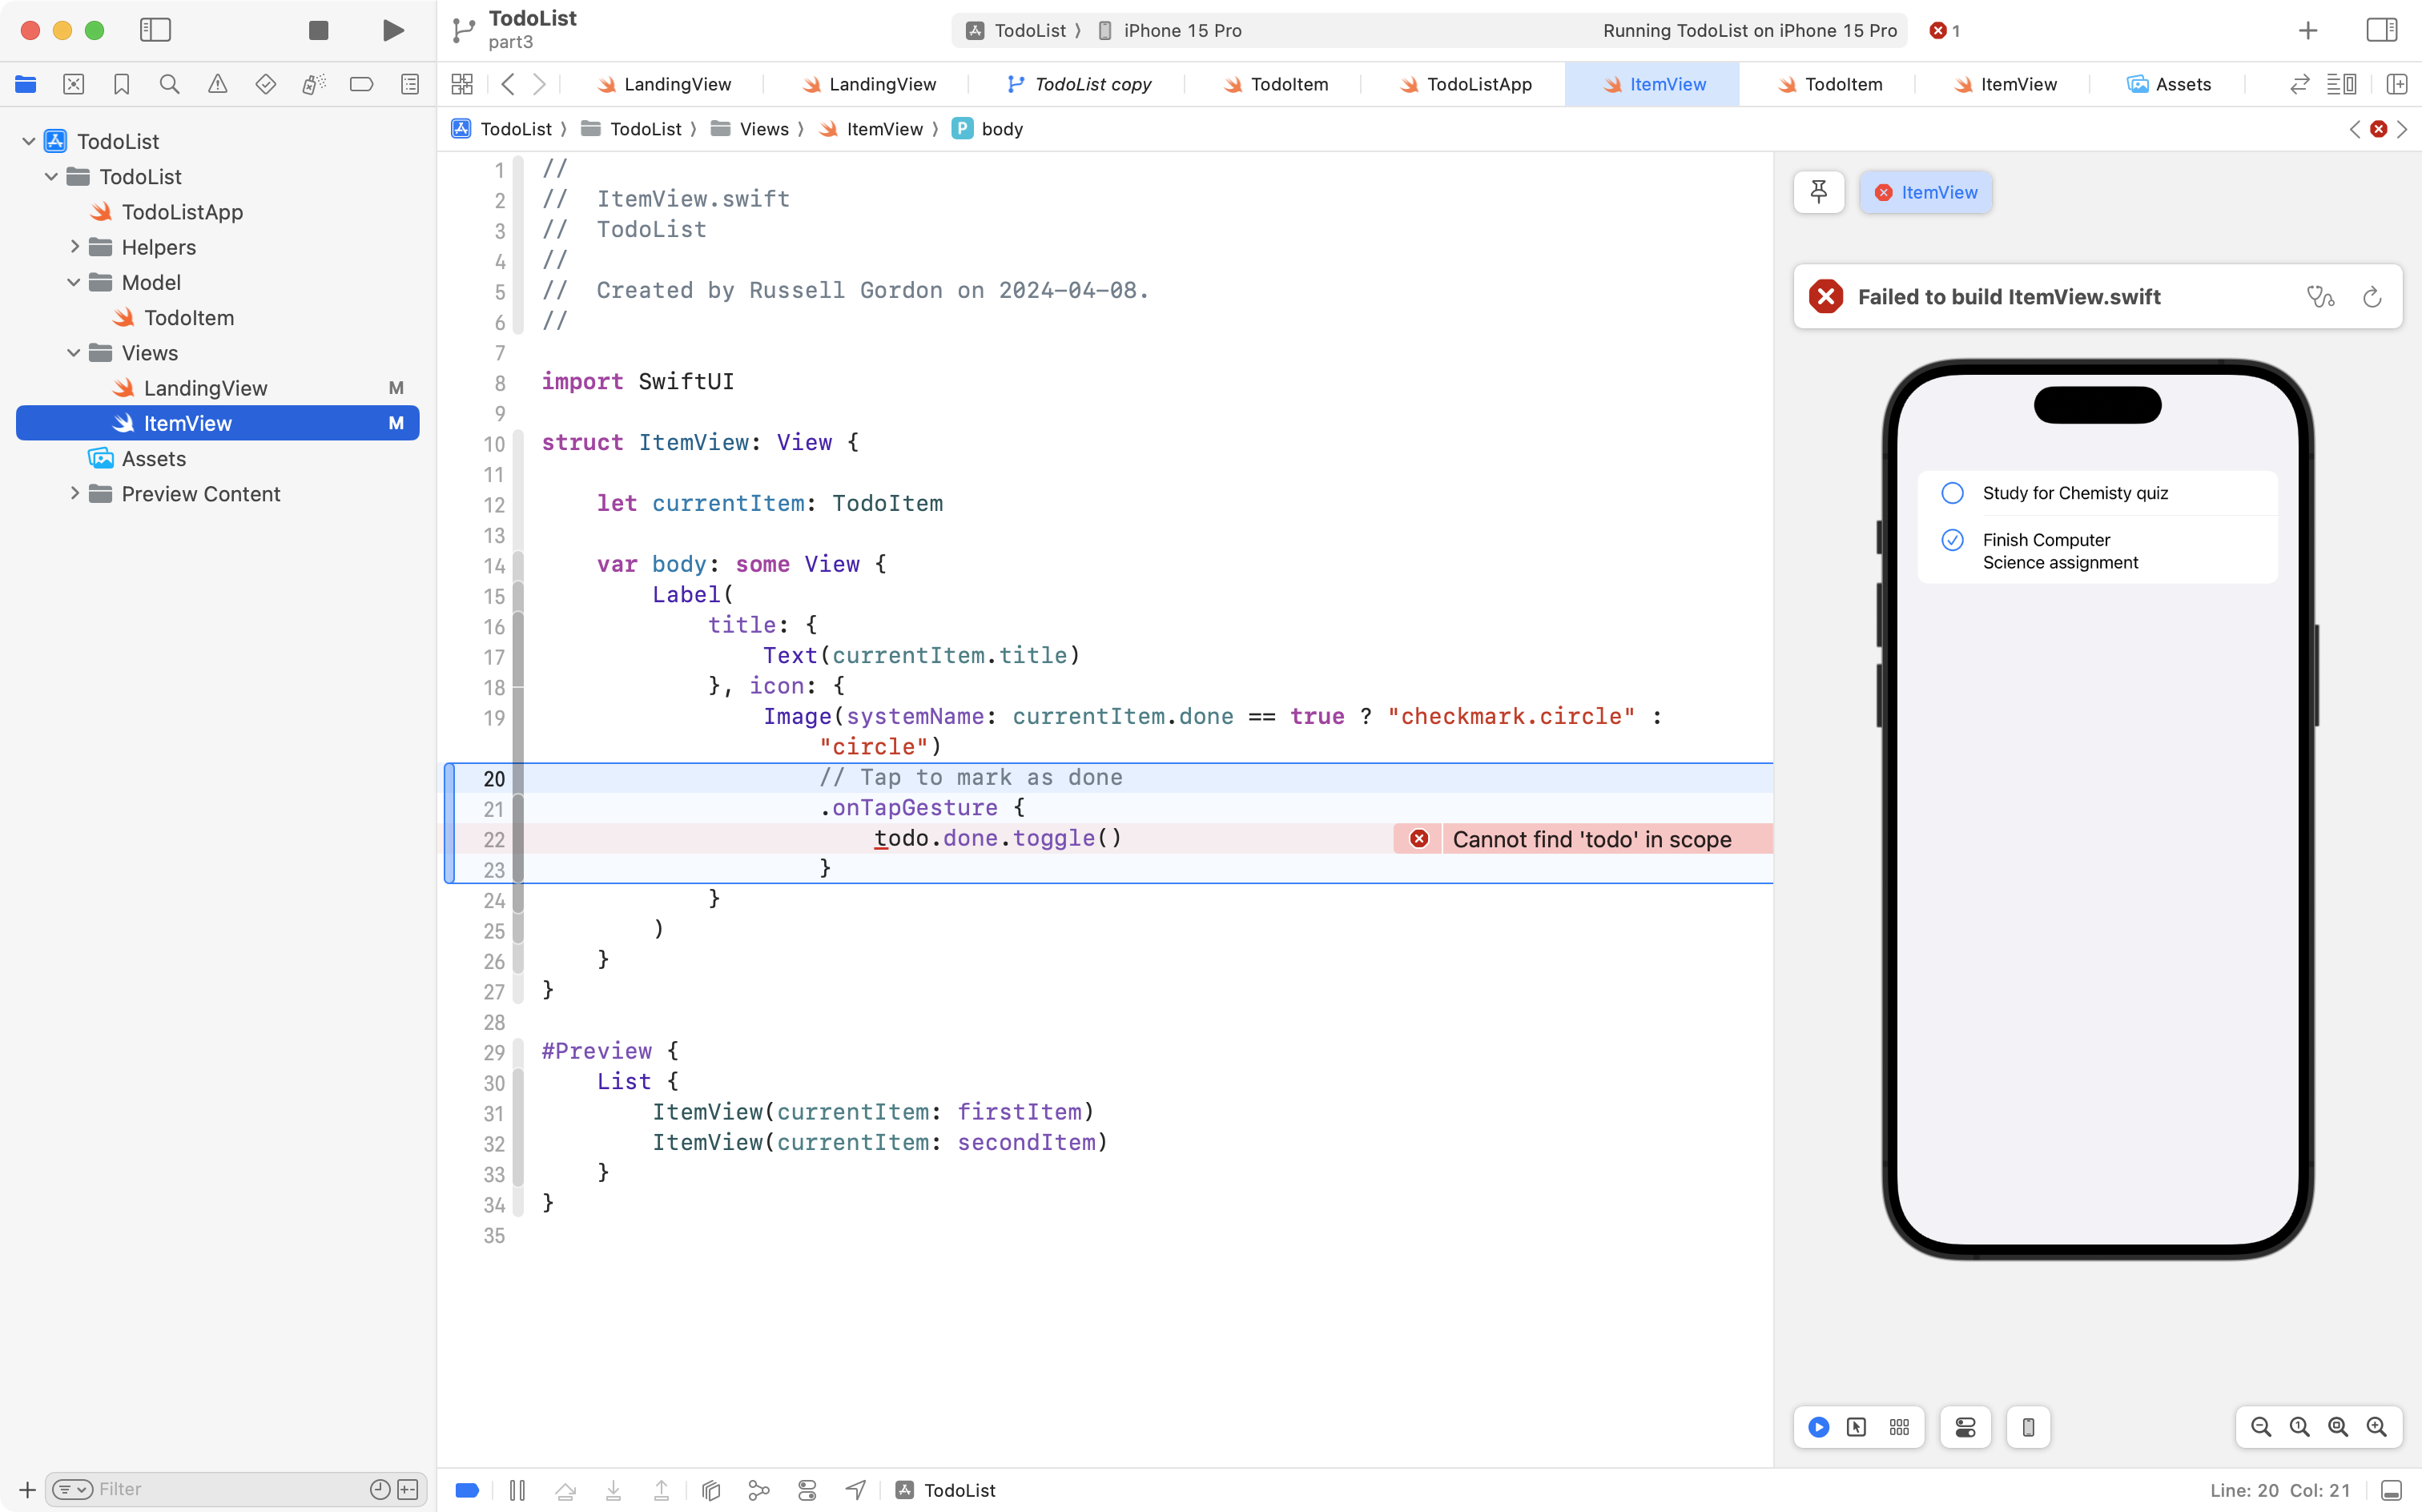
First, within the ItemView structure, a given to-do item has the name currentItem instead of todo.
So, on line 22, change:
todo.done.toggle()…to:
currentItem.done.toggle()… like this:
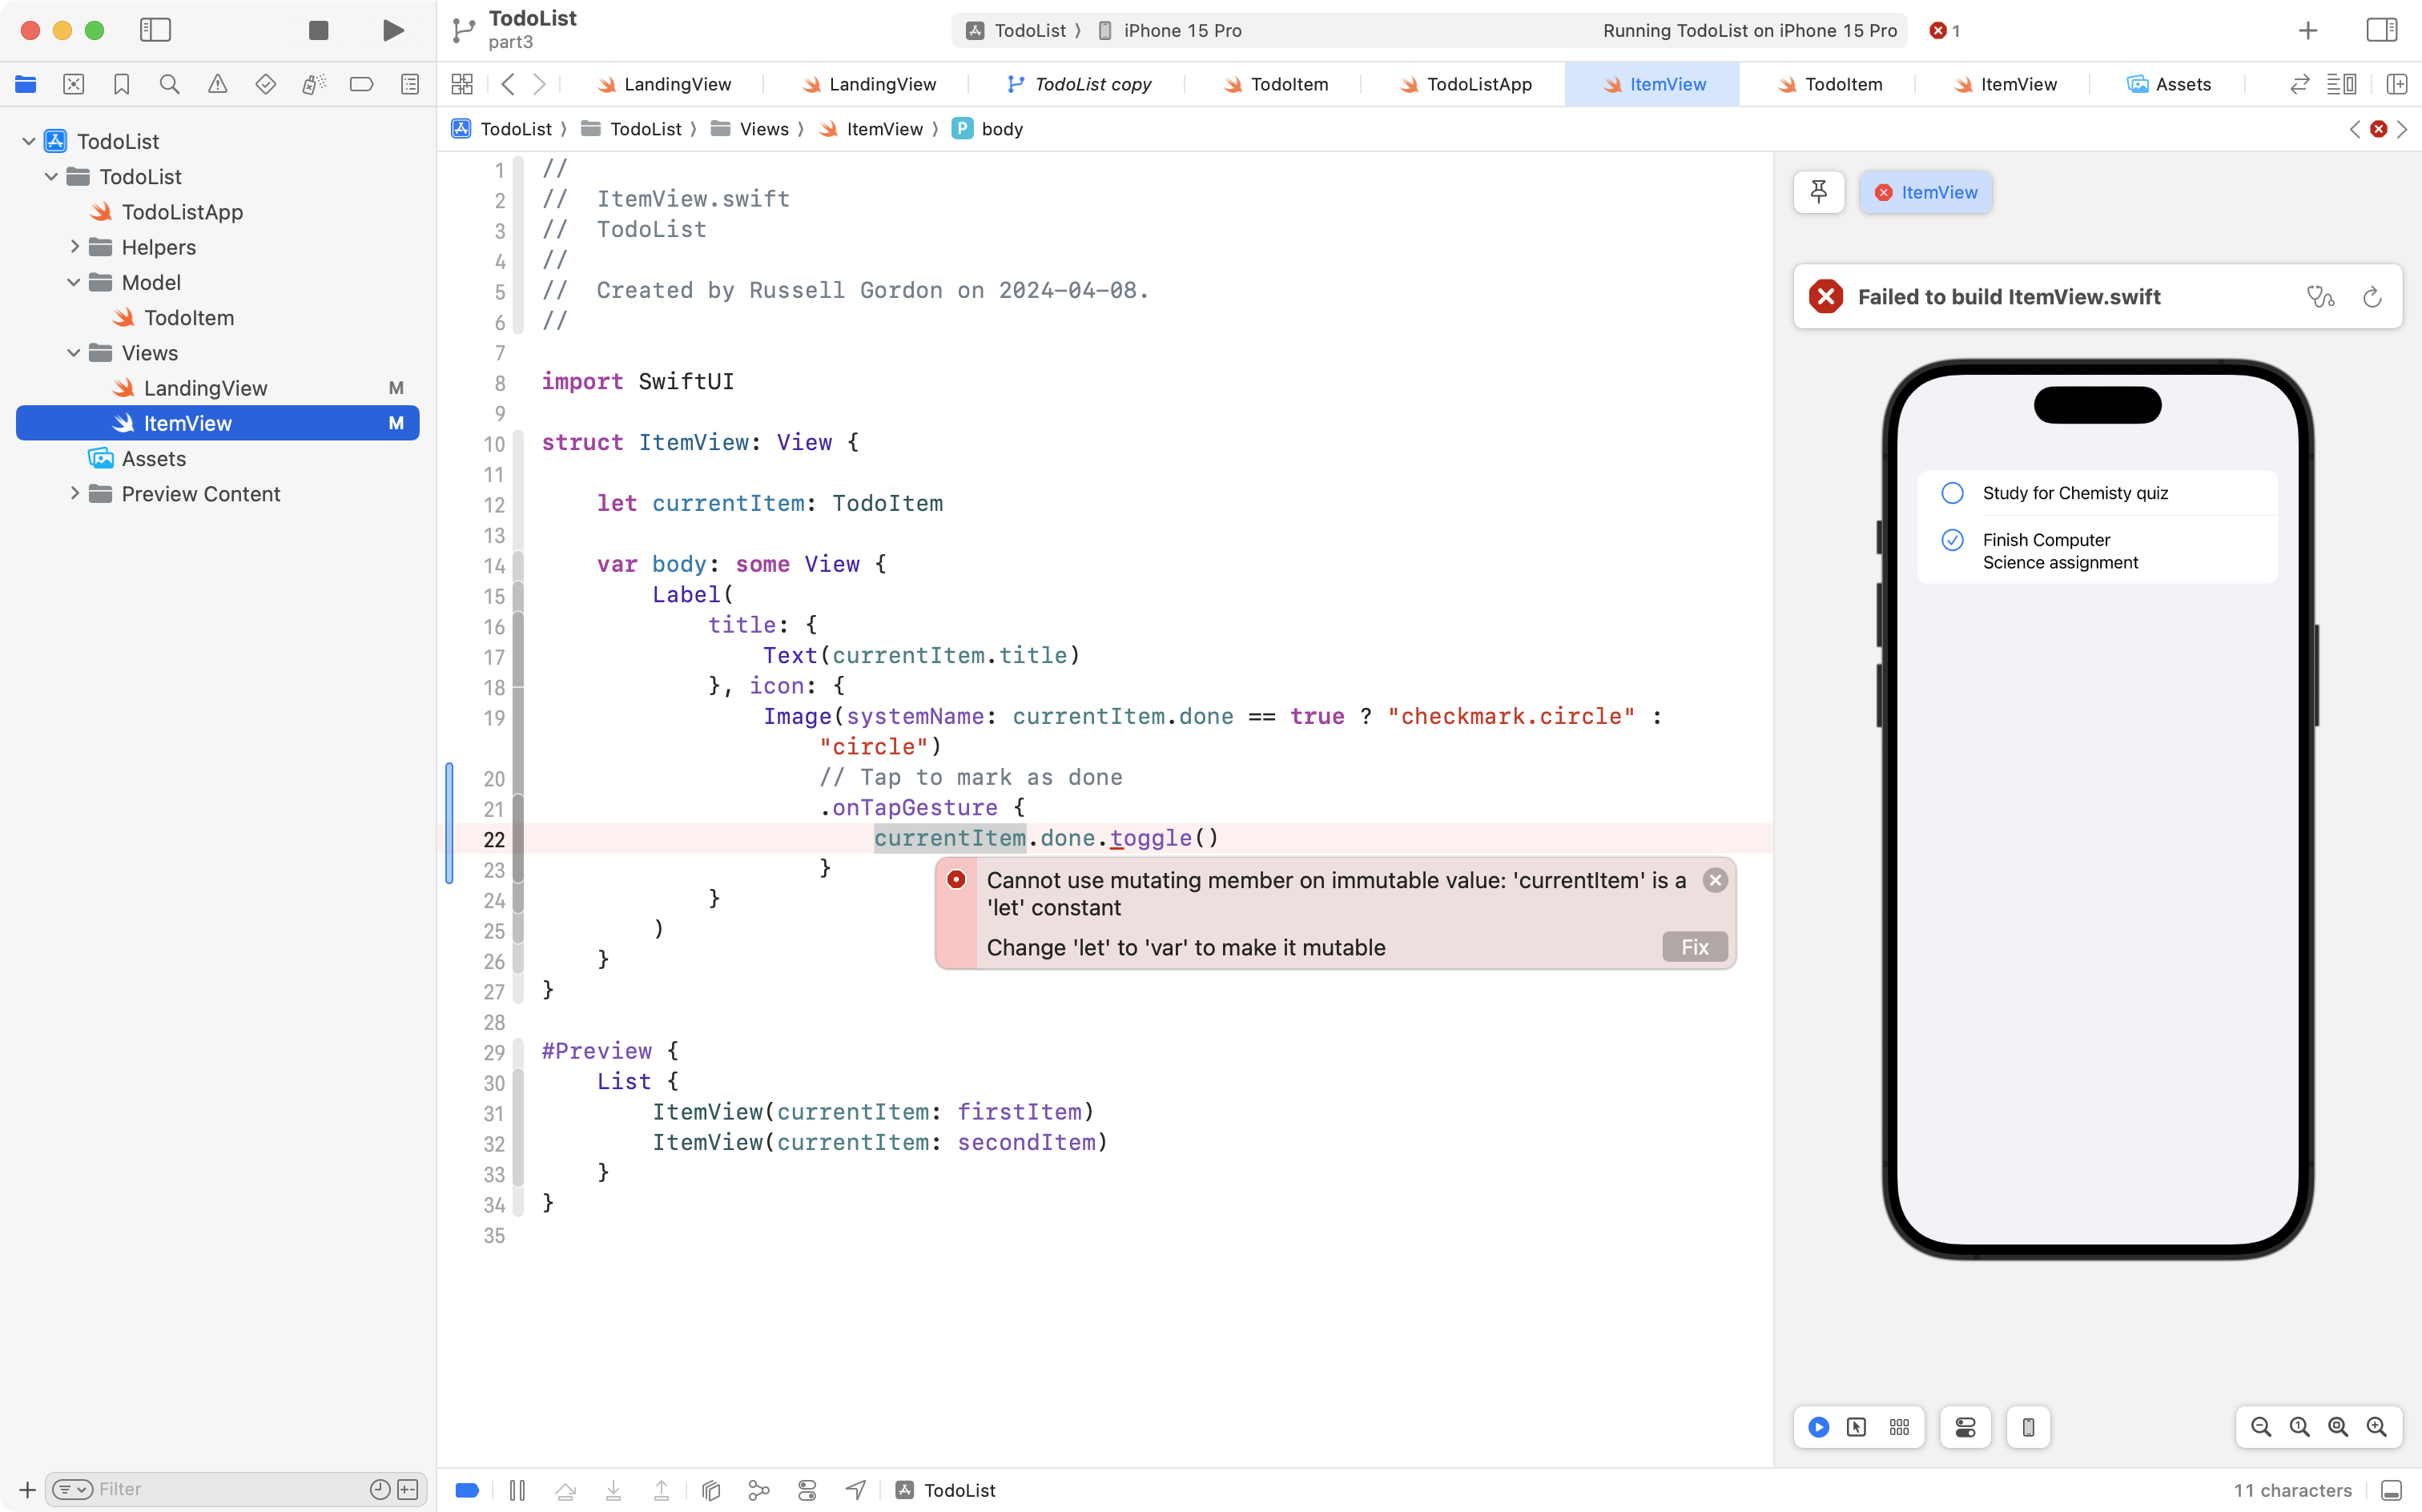
A new problem presents itself.
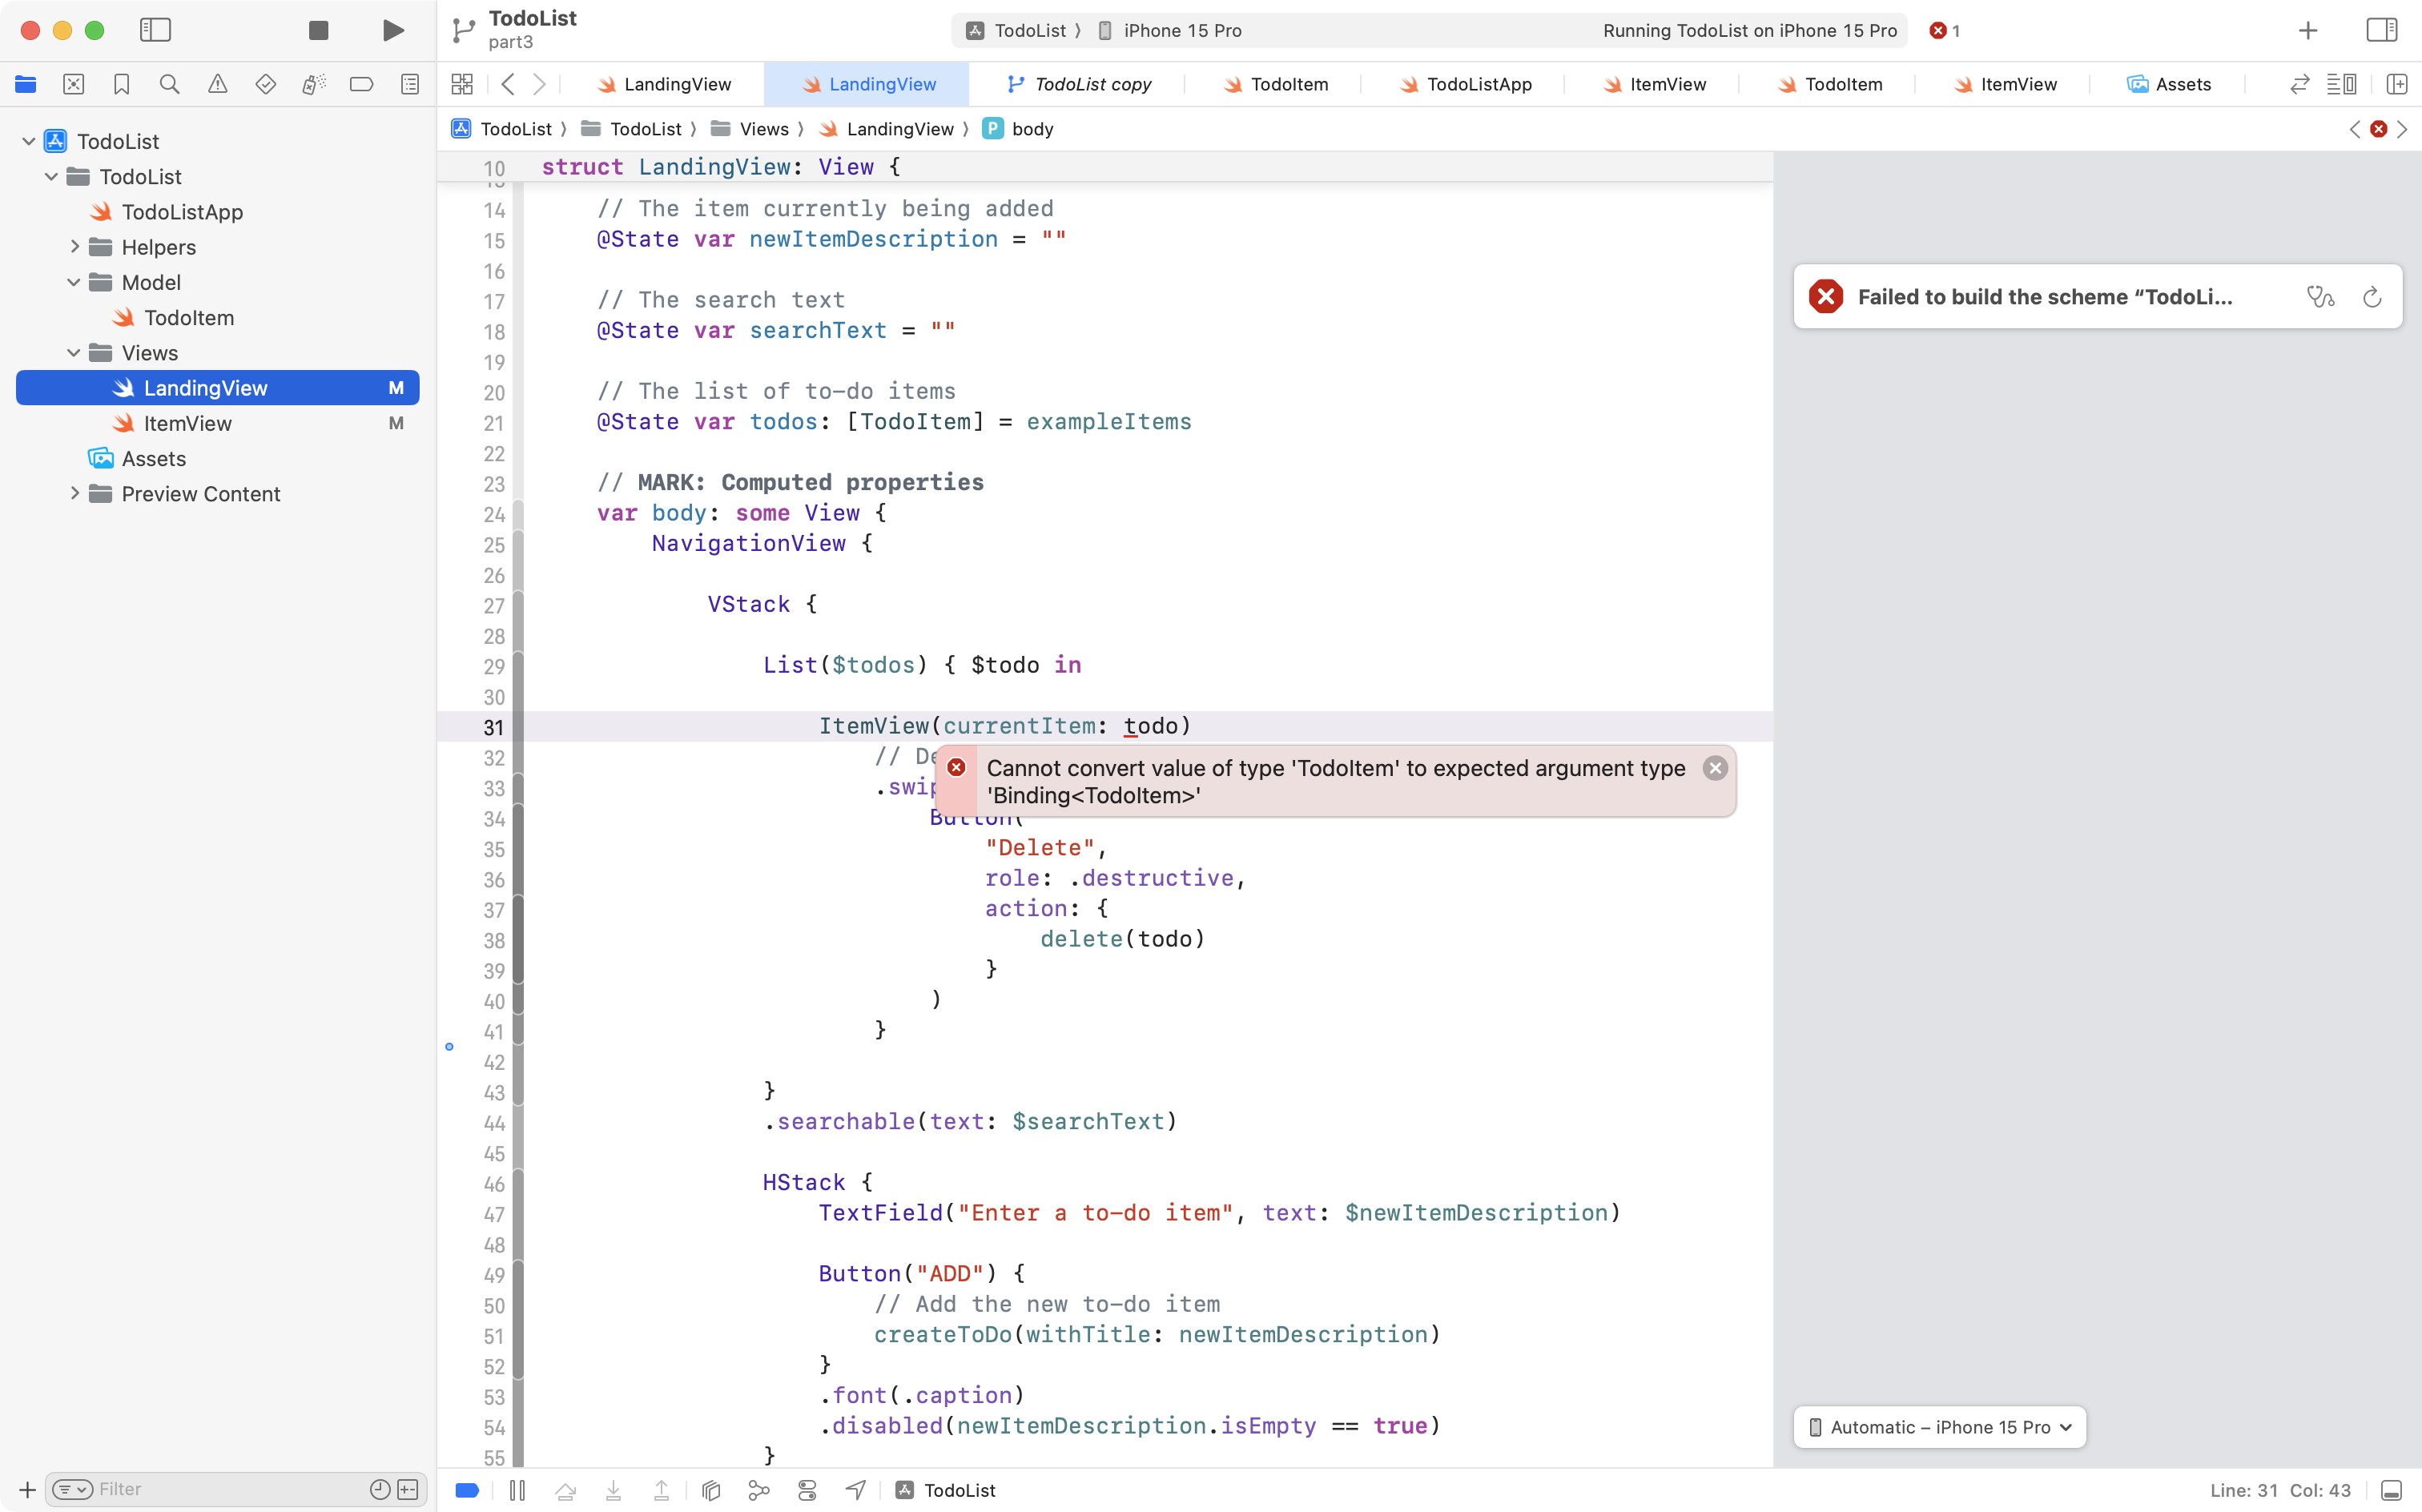
The stored property named currentItem, representing a single to-do item, is passed to ItemView as a constant.
That means we cannot change anything related to the to-do item.
To fix this, we must make another edit, this time on line 12.
Change:
let currentItem: TodoItem…to:
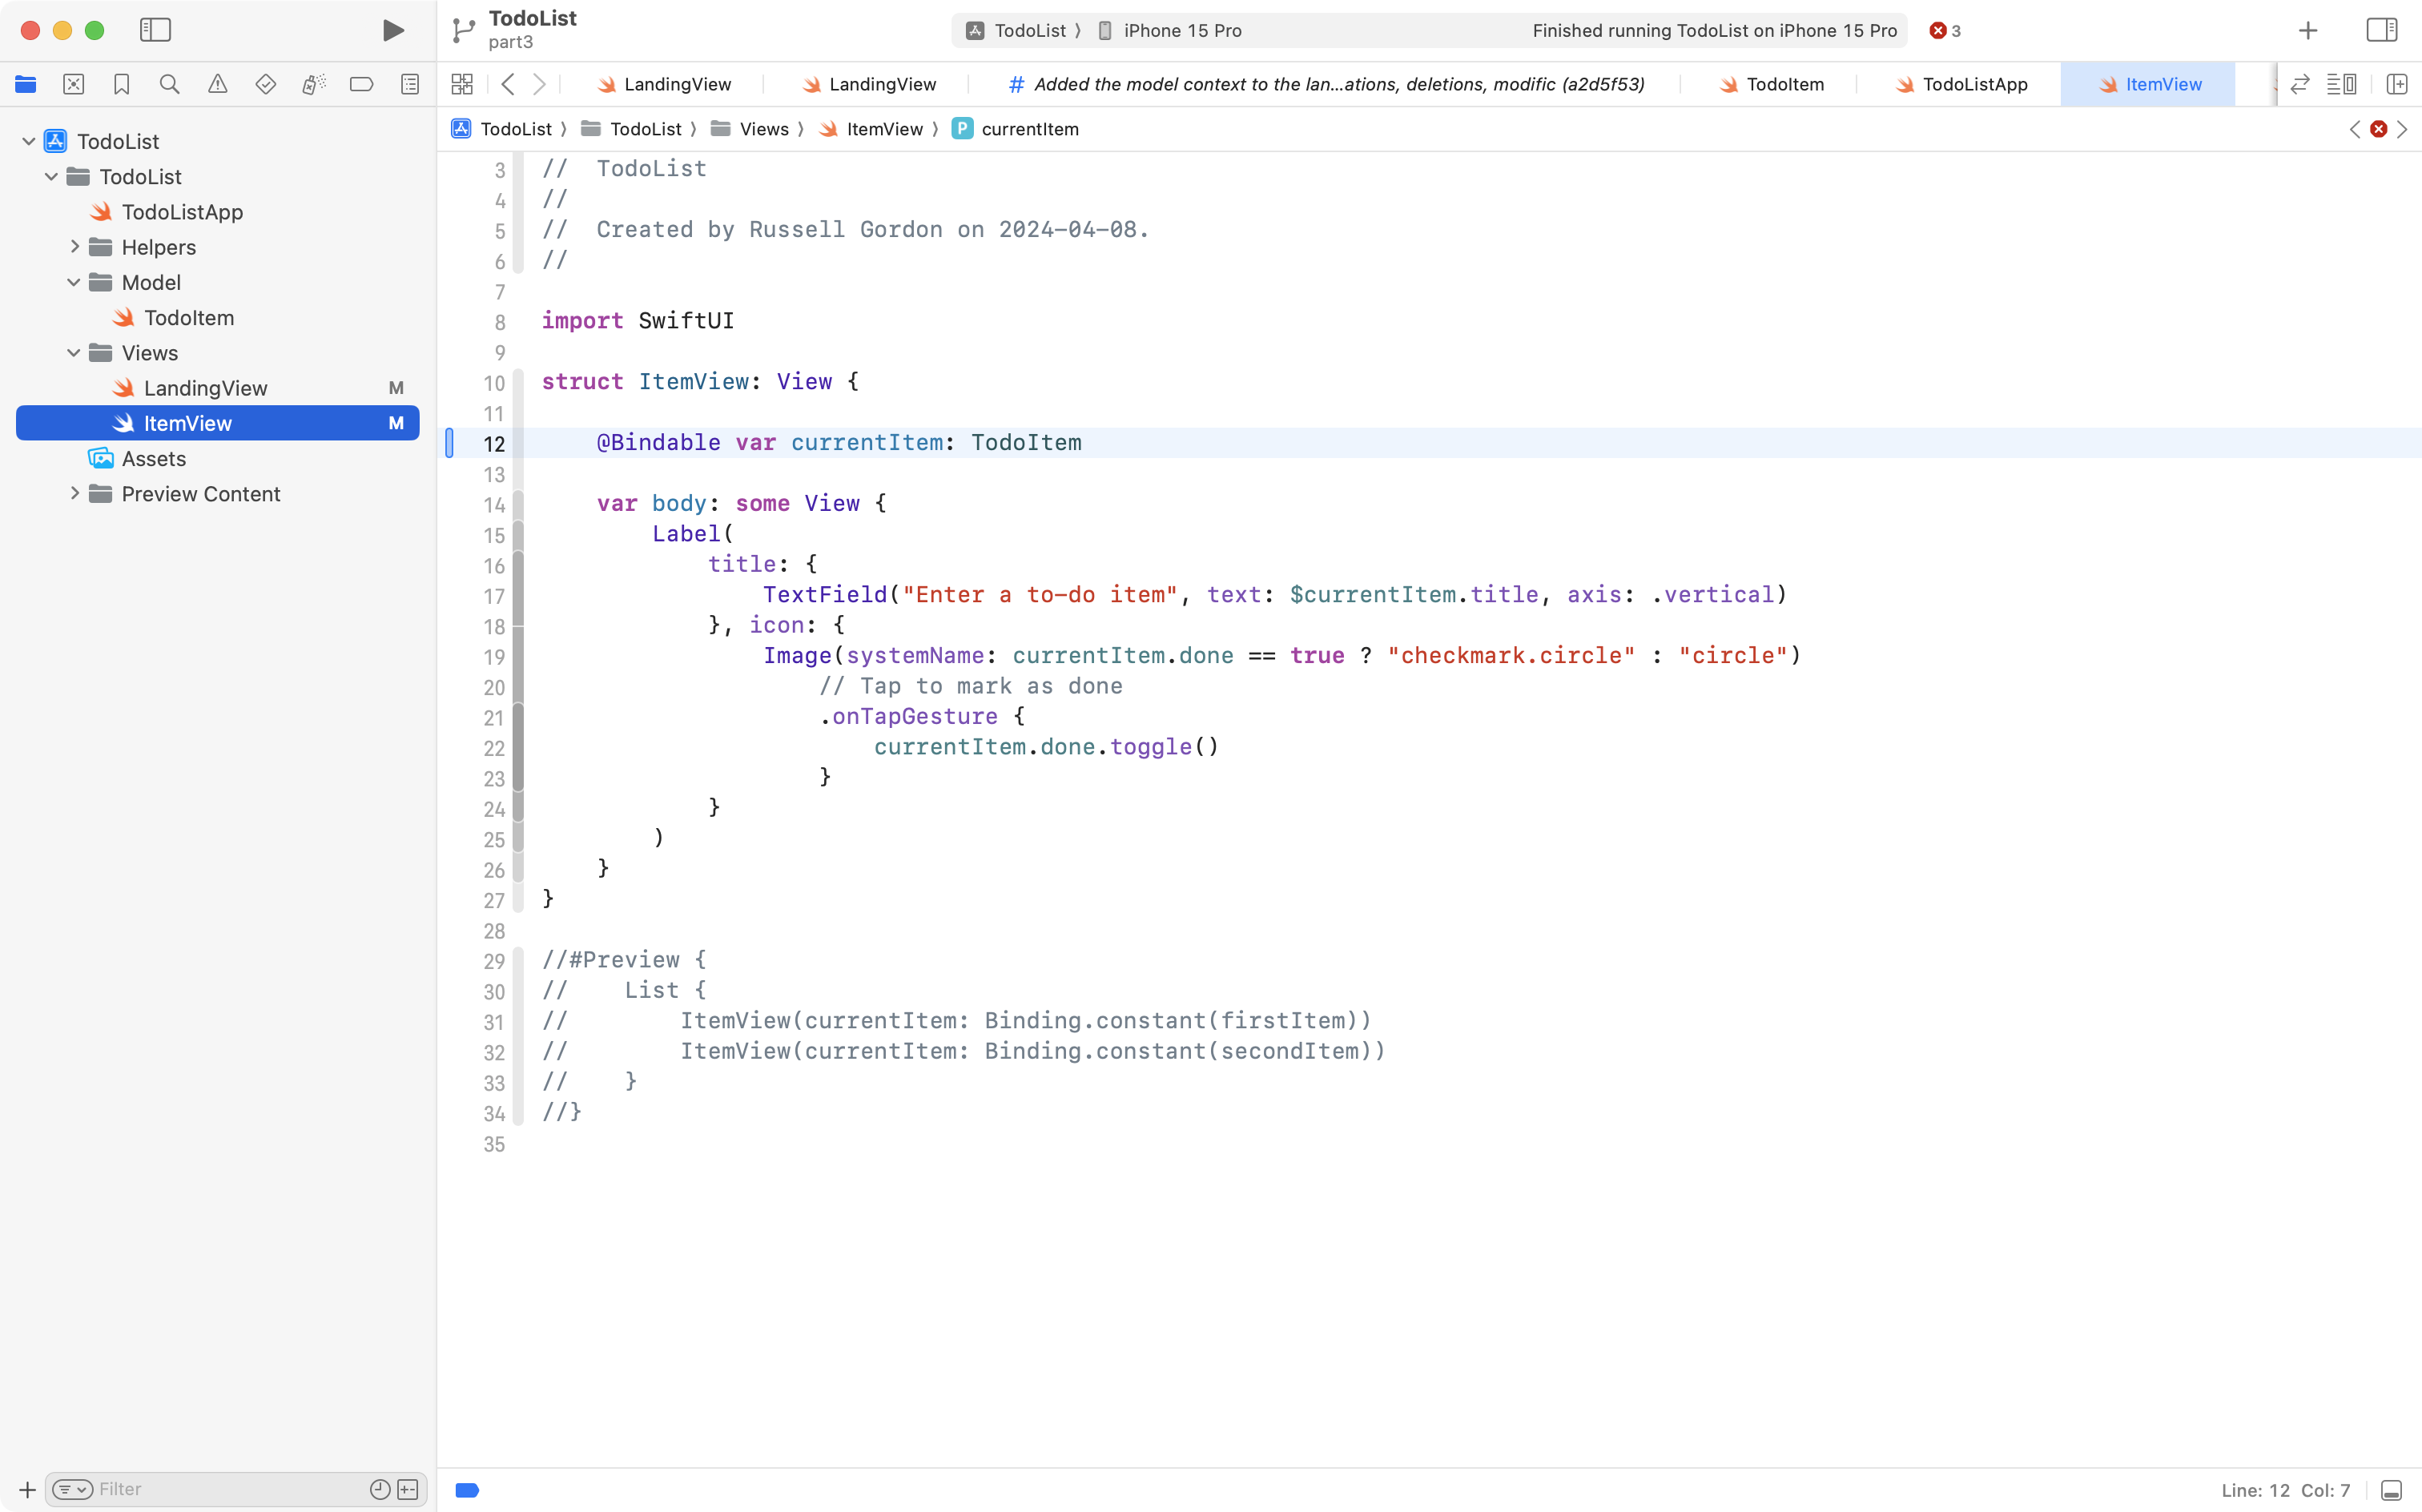
@Binding var currentItem: TodoItem… like this:
The var keyword means currentItem will be a variable, so we can change values stored within that instance of the TodoItem type.
The @Binding property wrapper means that the currentItem stored property is bound to the source of truth (the original source of the data) back on LandingView – recall that we iterate over the array of to-do items using the List structure, and create bindings to each to-do item:
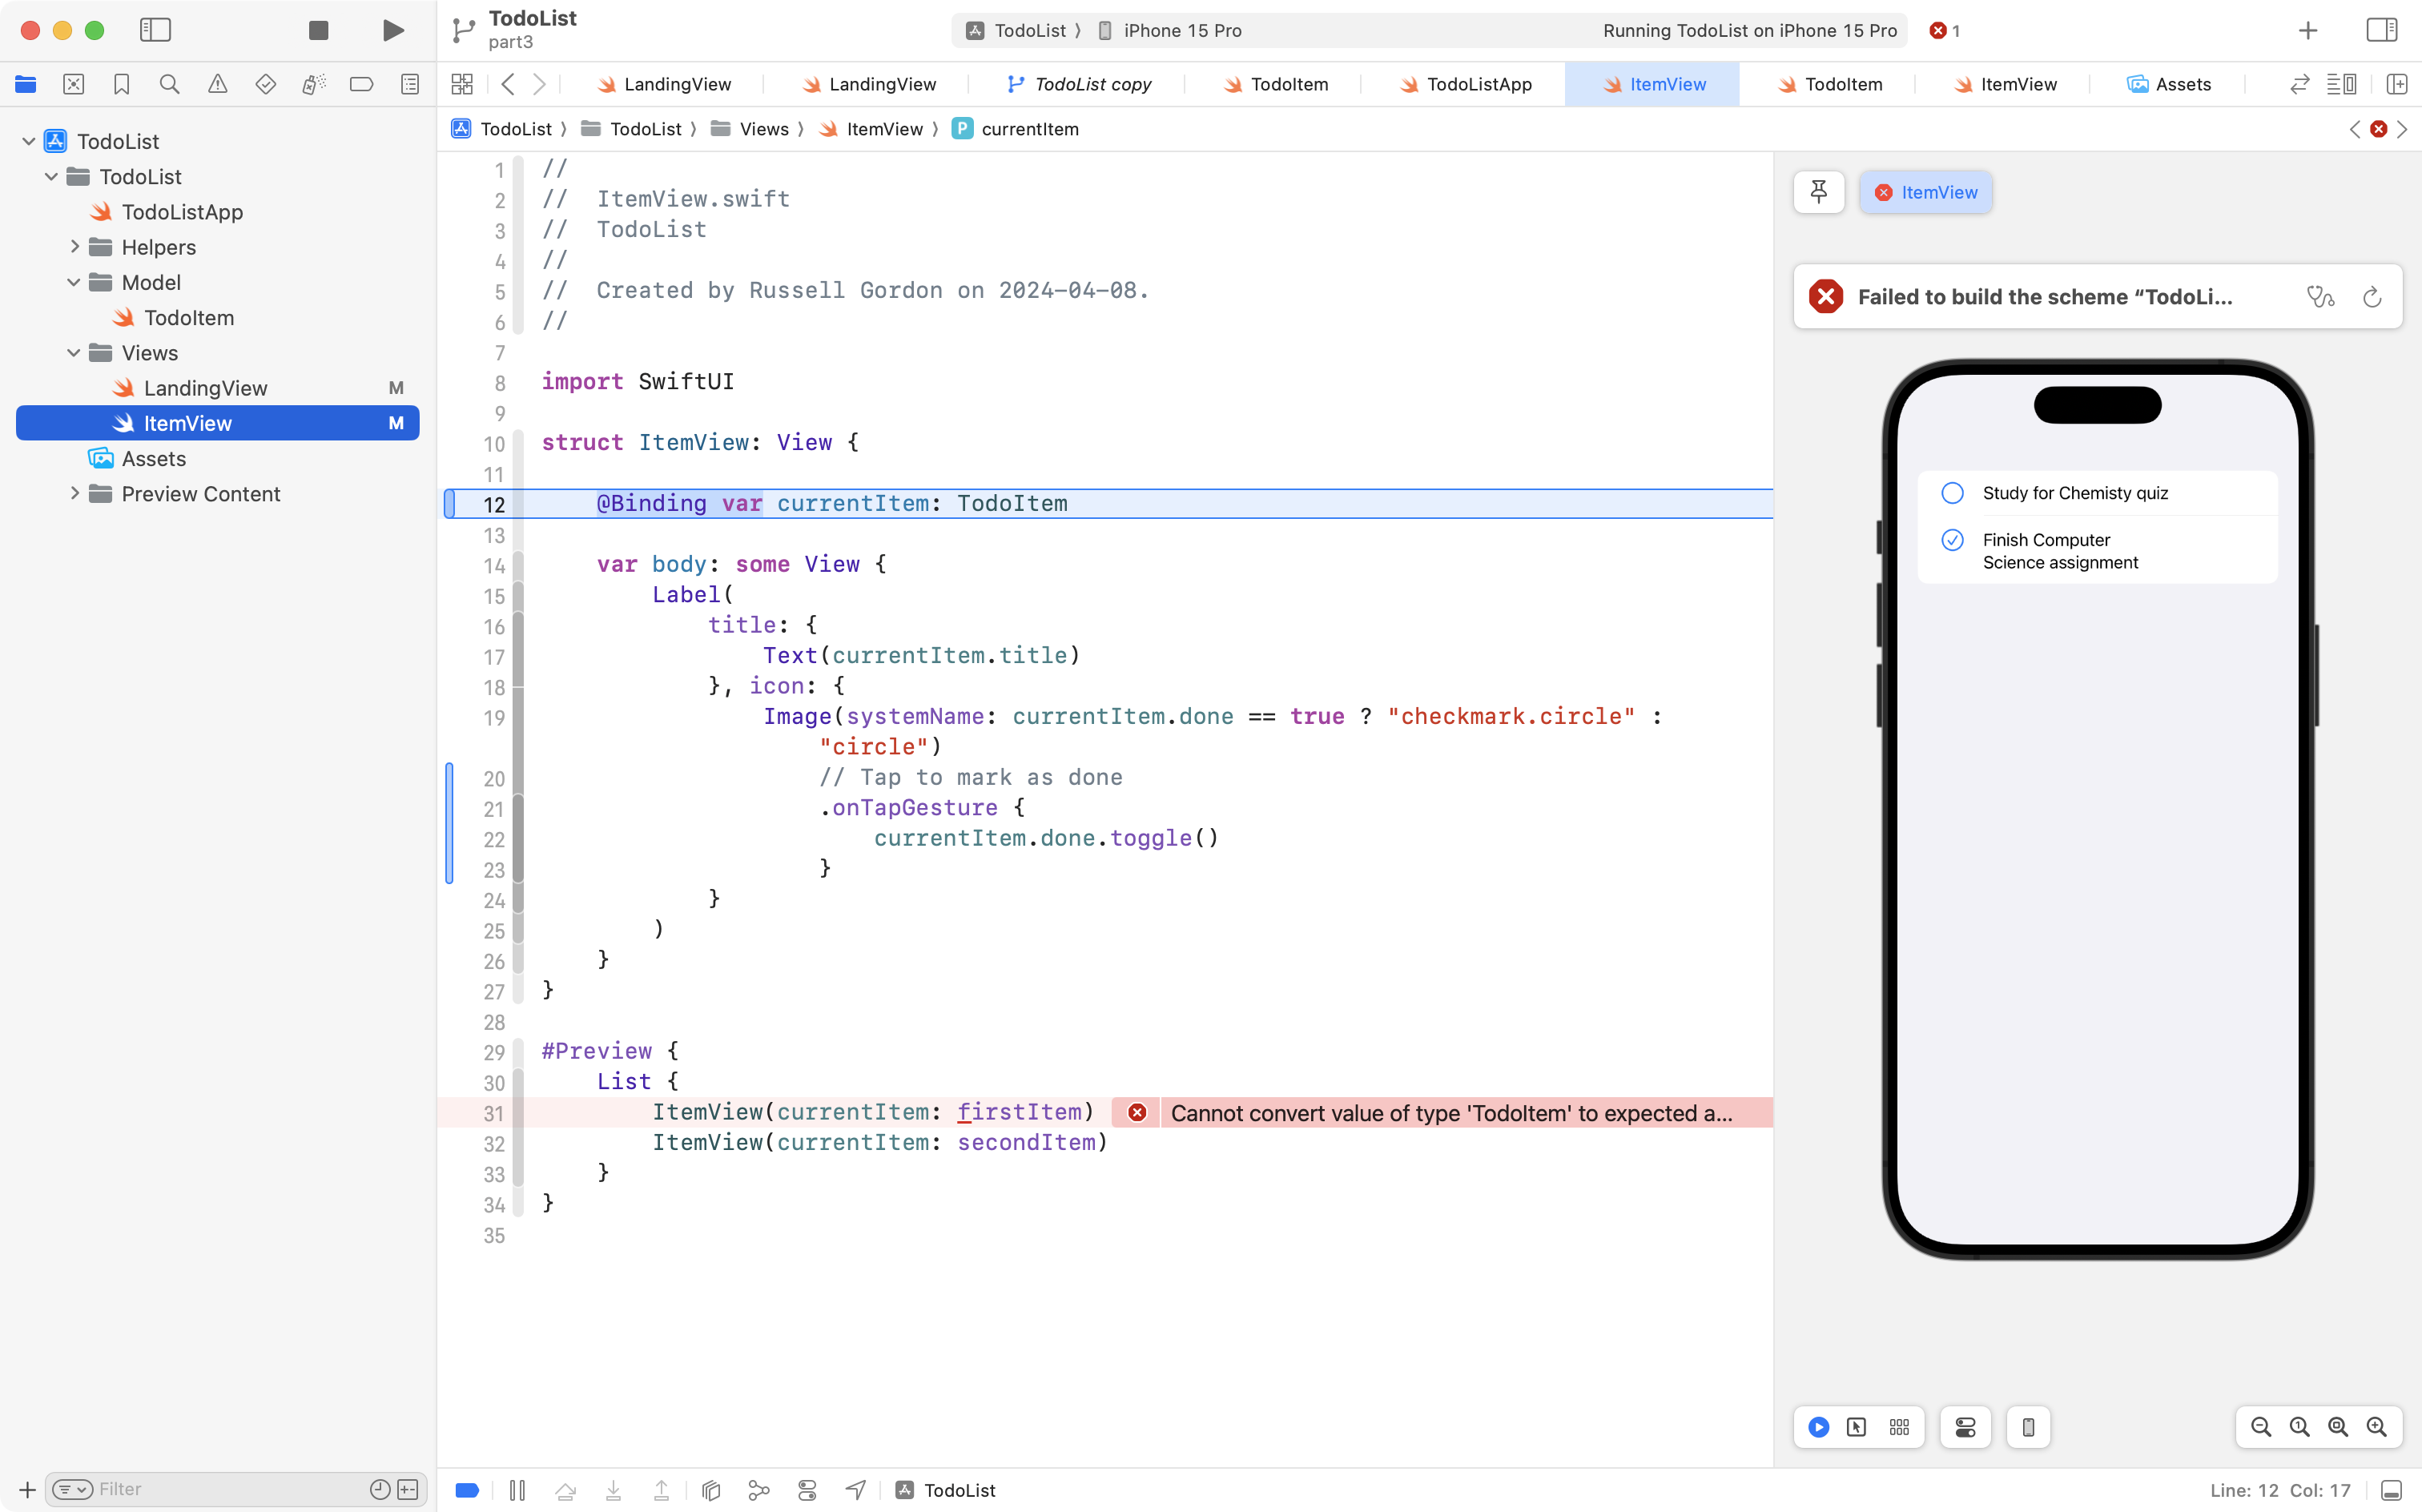
List($todos) { $todo inFinally, since we have now declared currentItem as a var using the @Binding property wrapper, we have changed the type of information we are asking to be provided by any code that creates instances of ItemView:
So… a couple more edits are required.
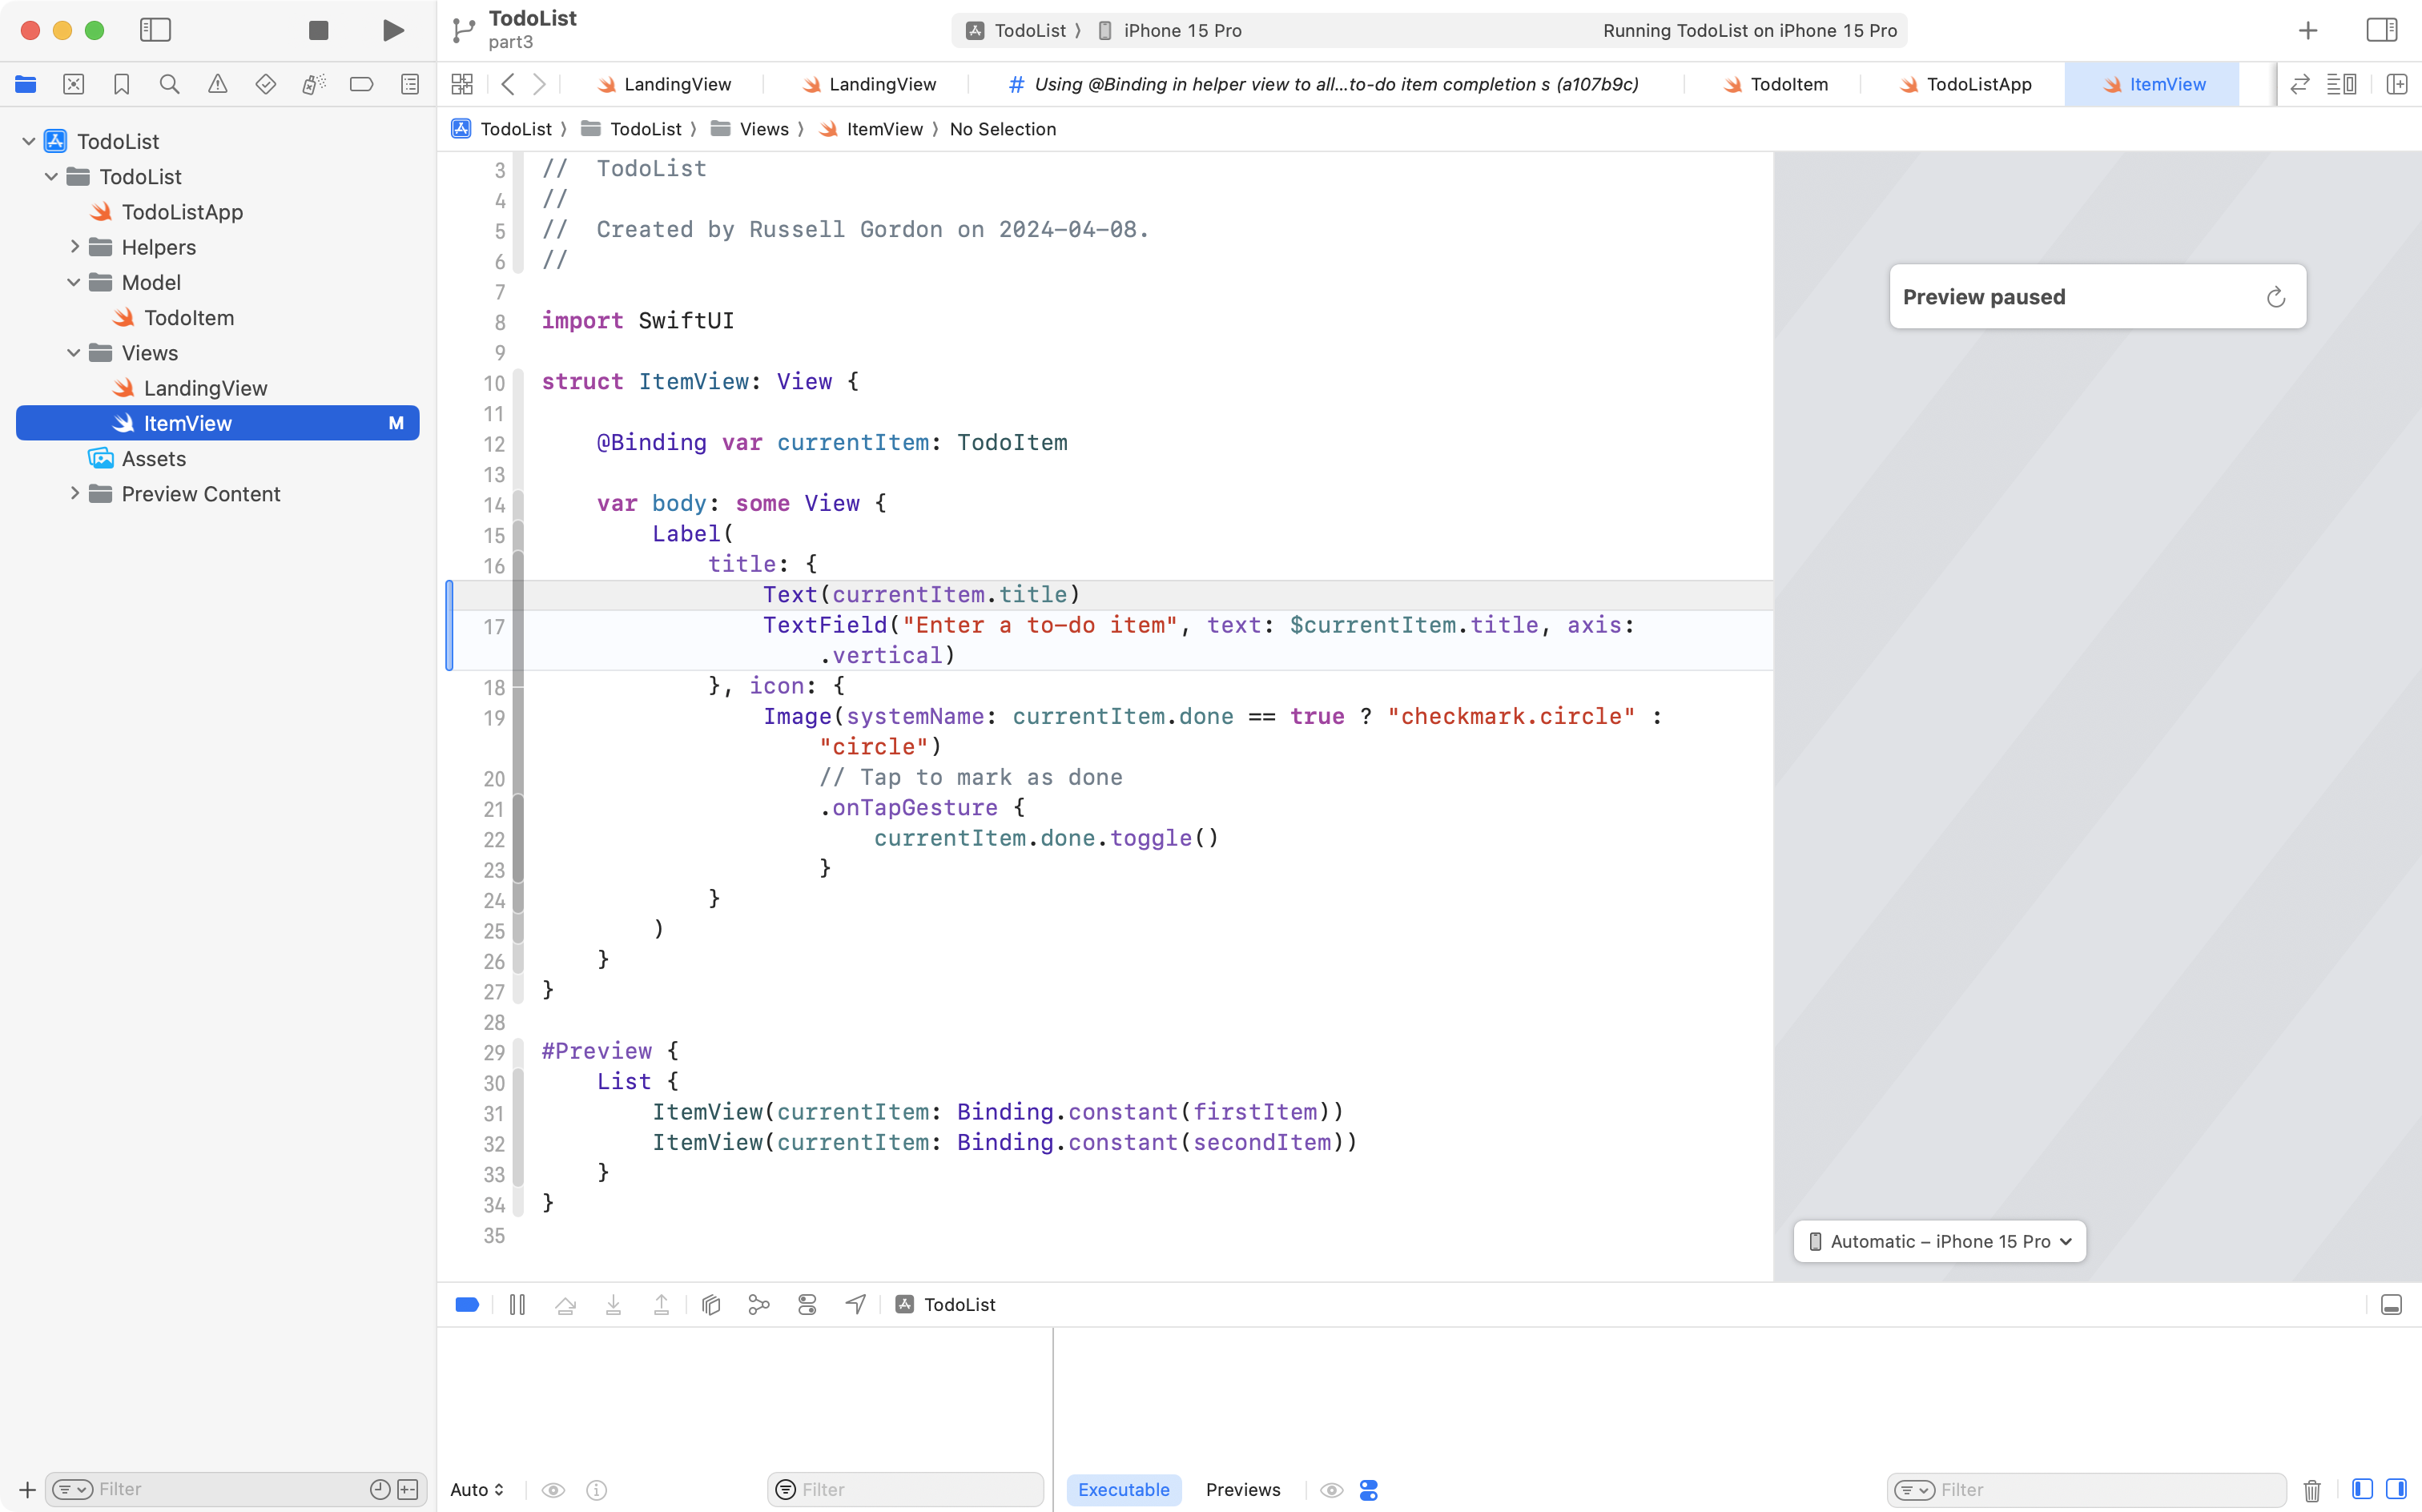
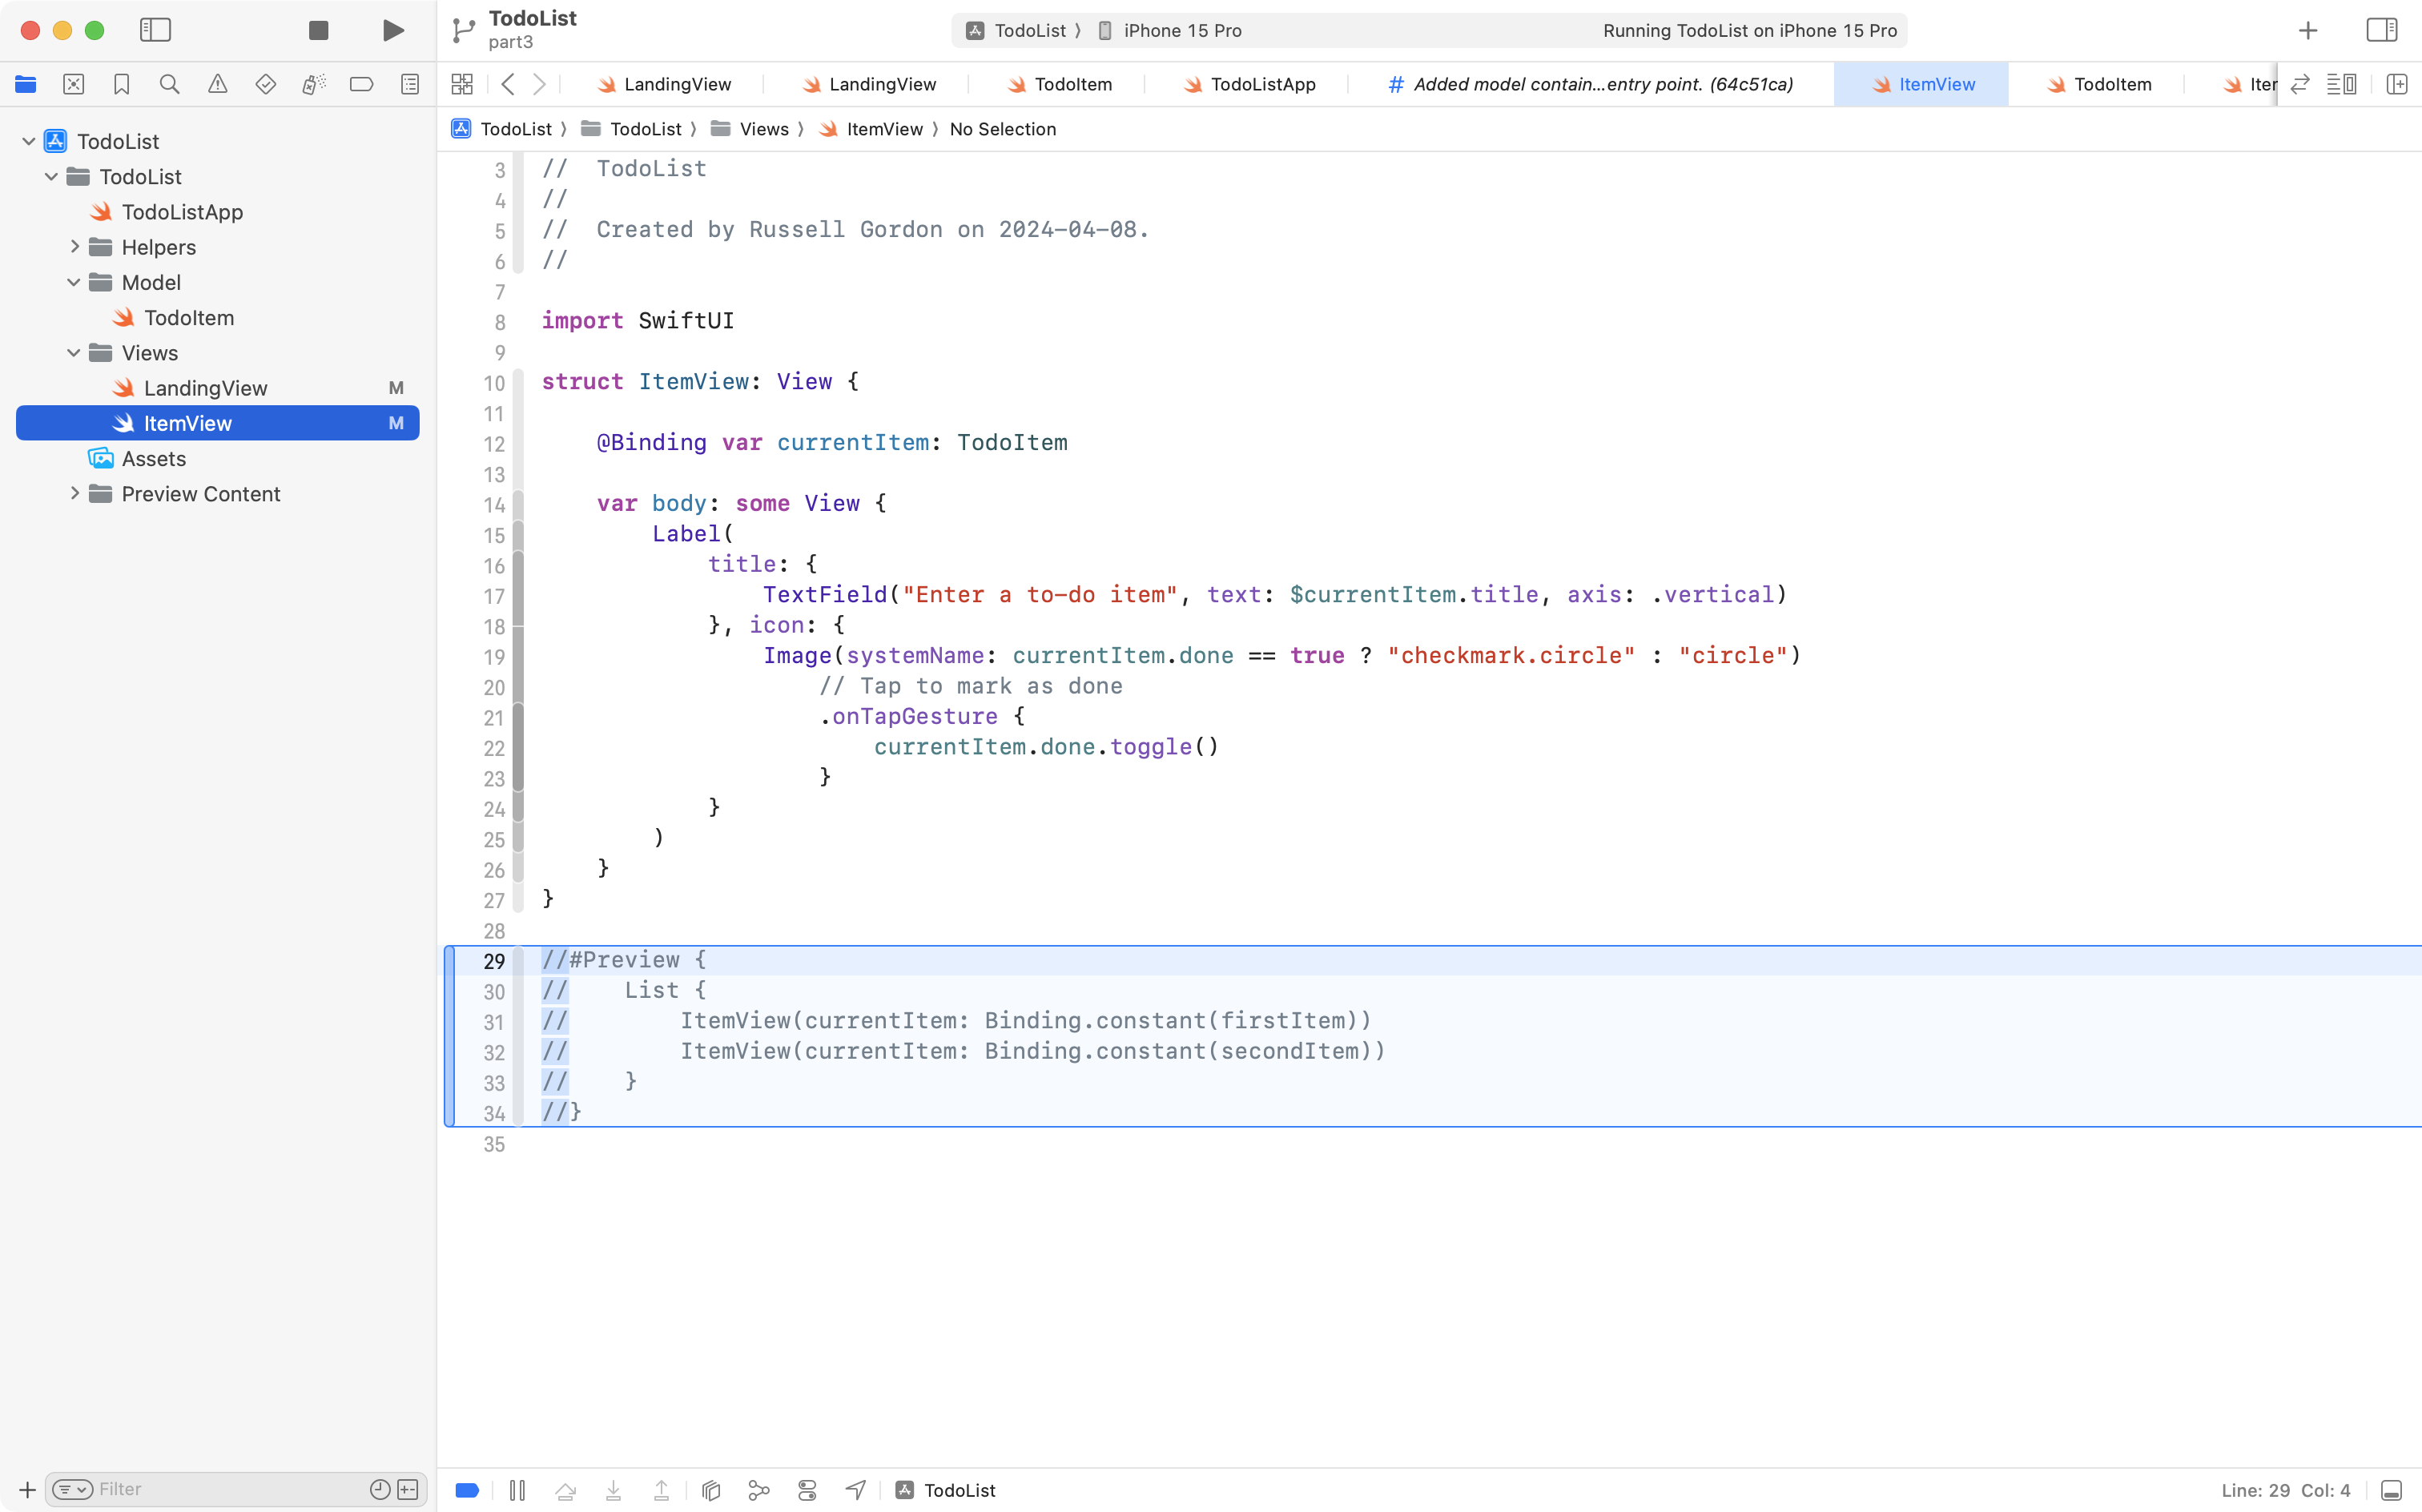
Scroll down in ItemView to the #Preview section and adjust the code as follows – old code is in grey, new code is in blue:
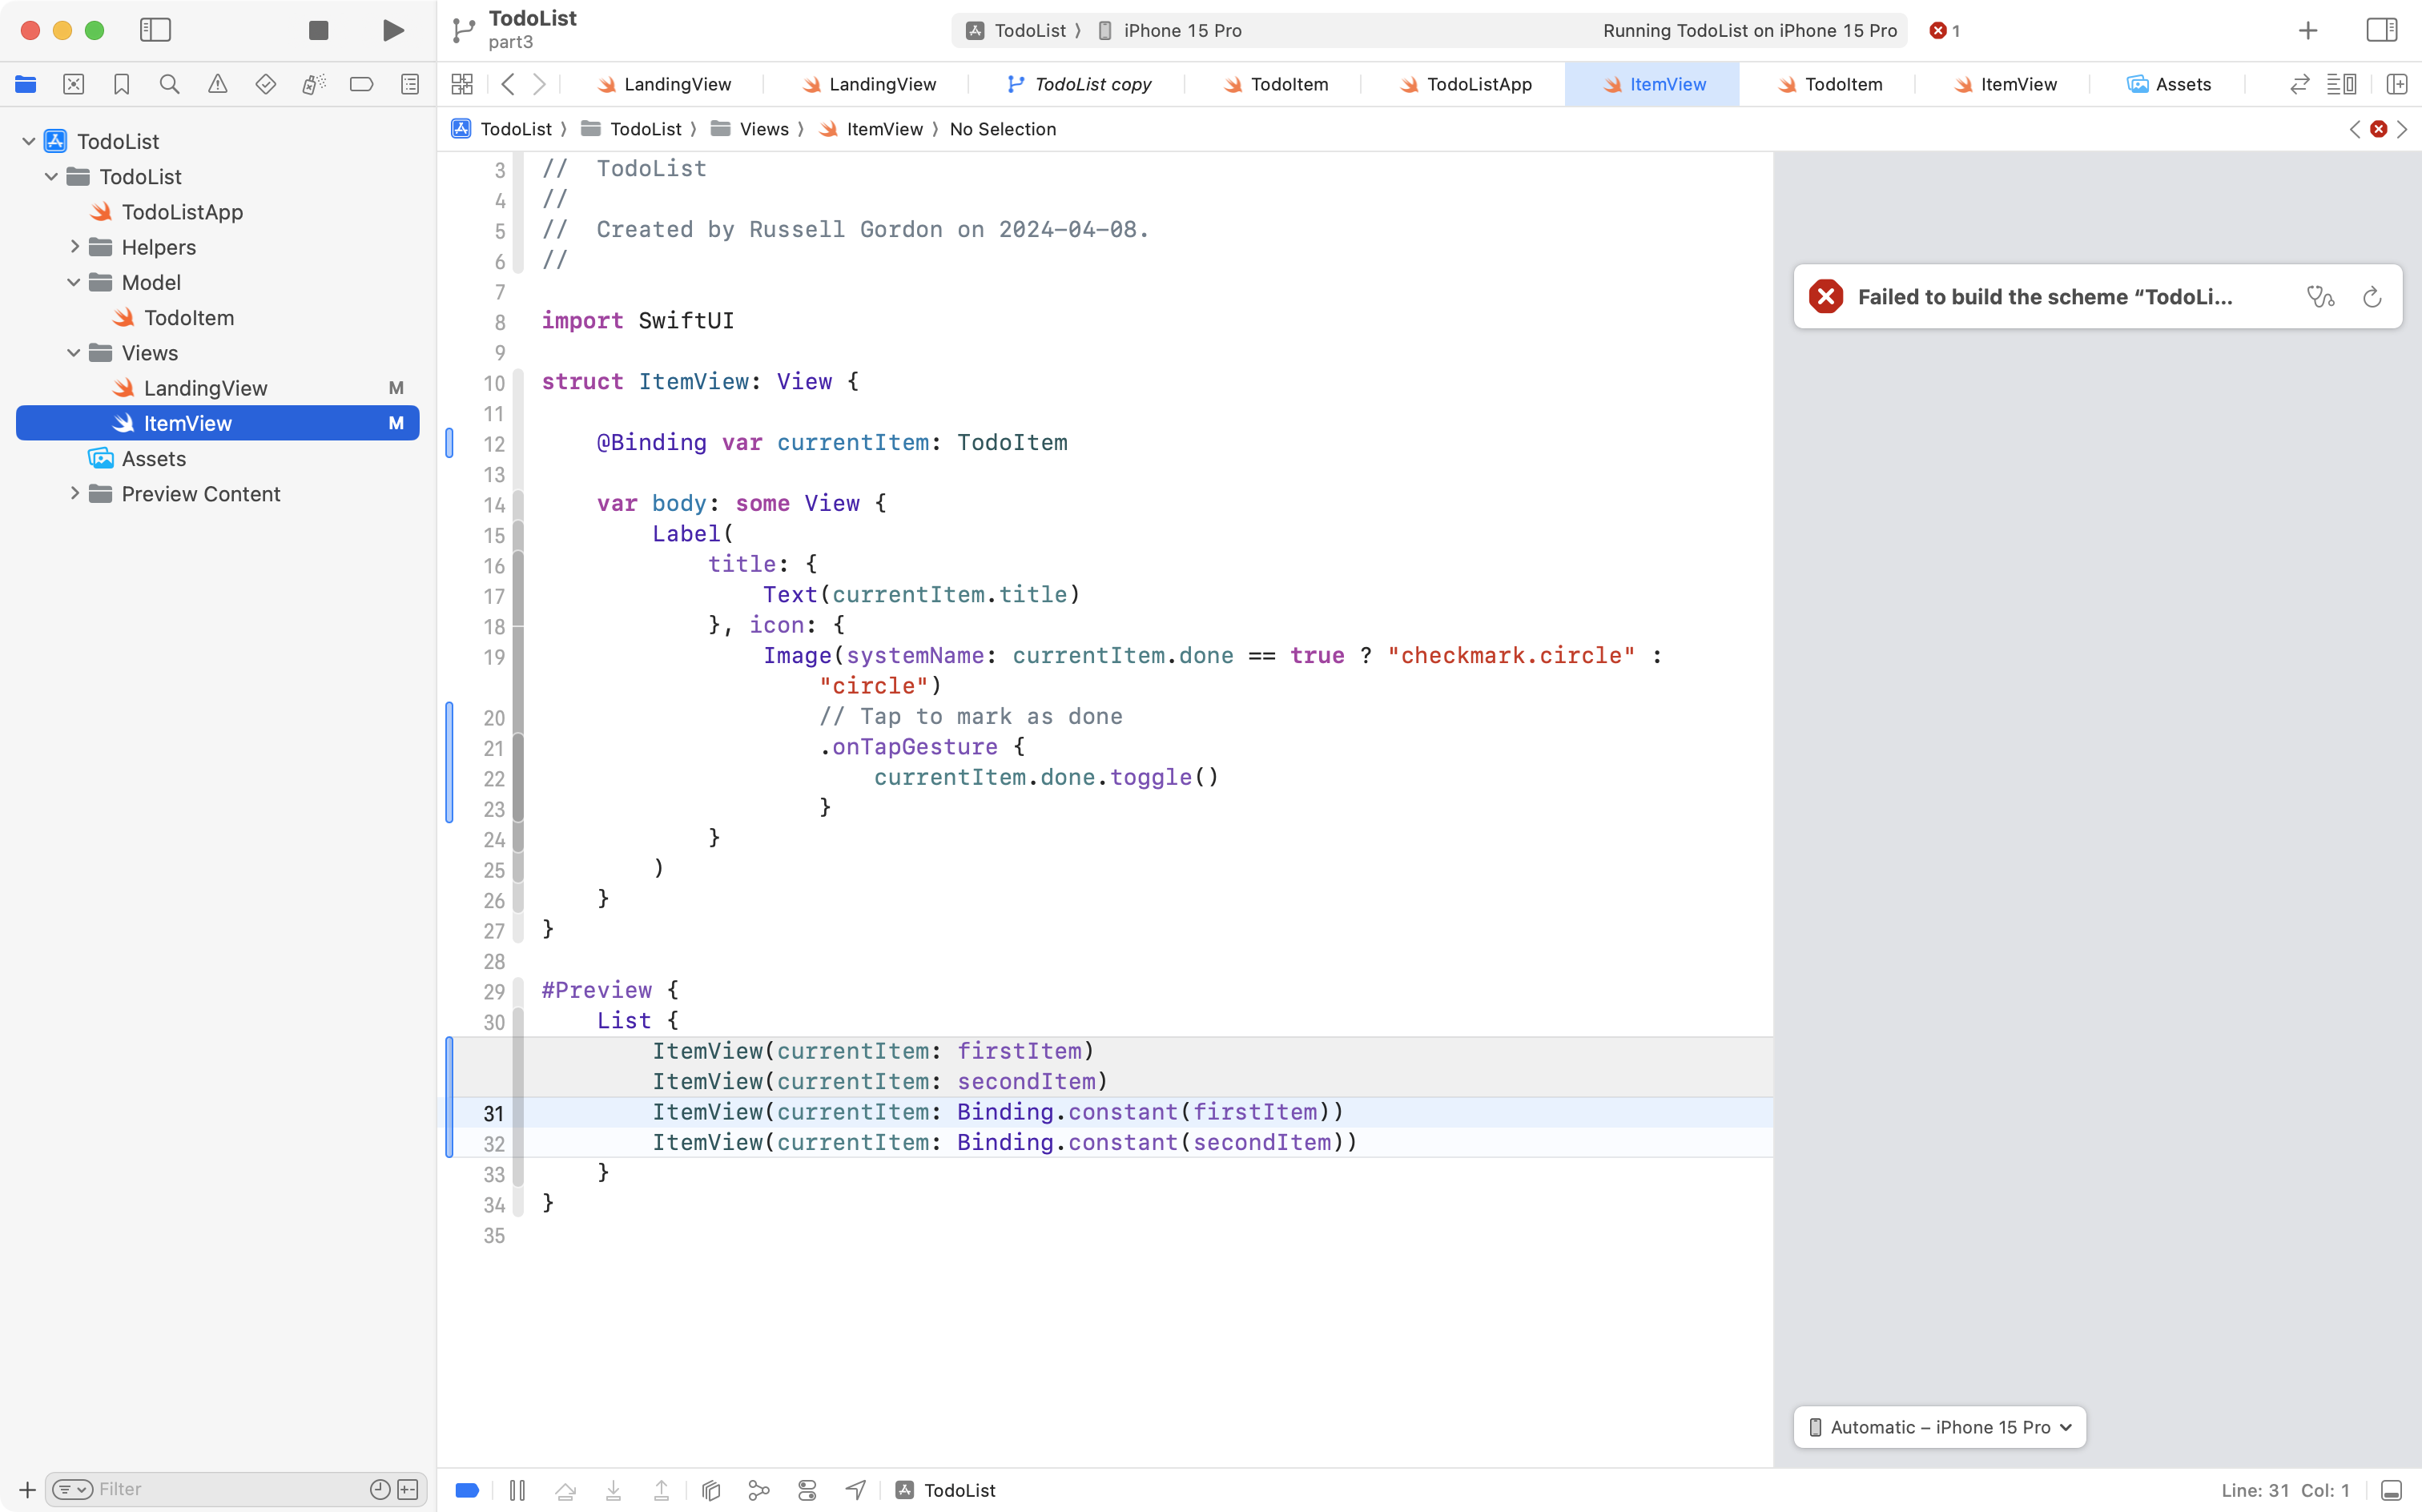
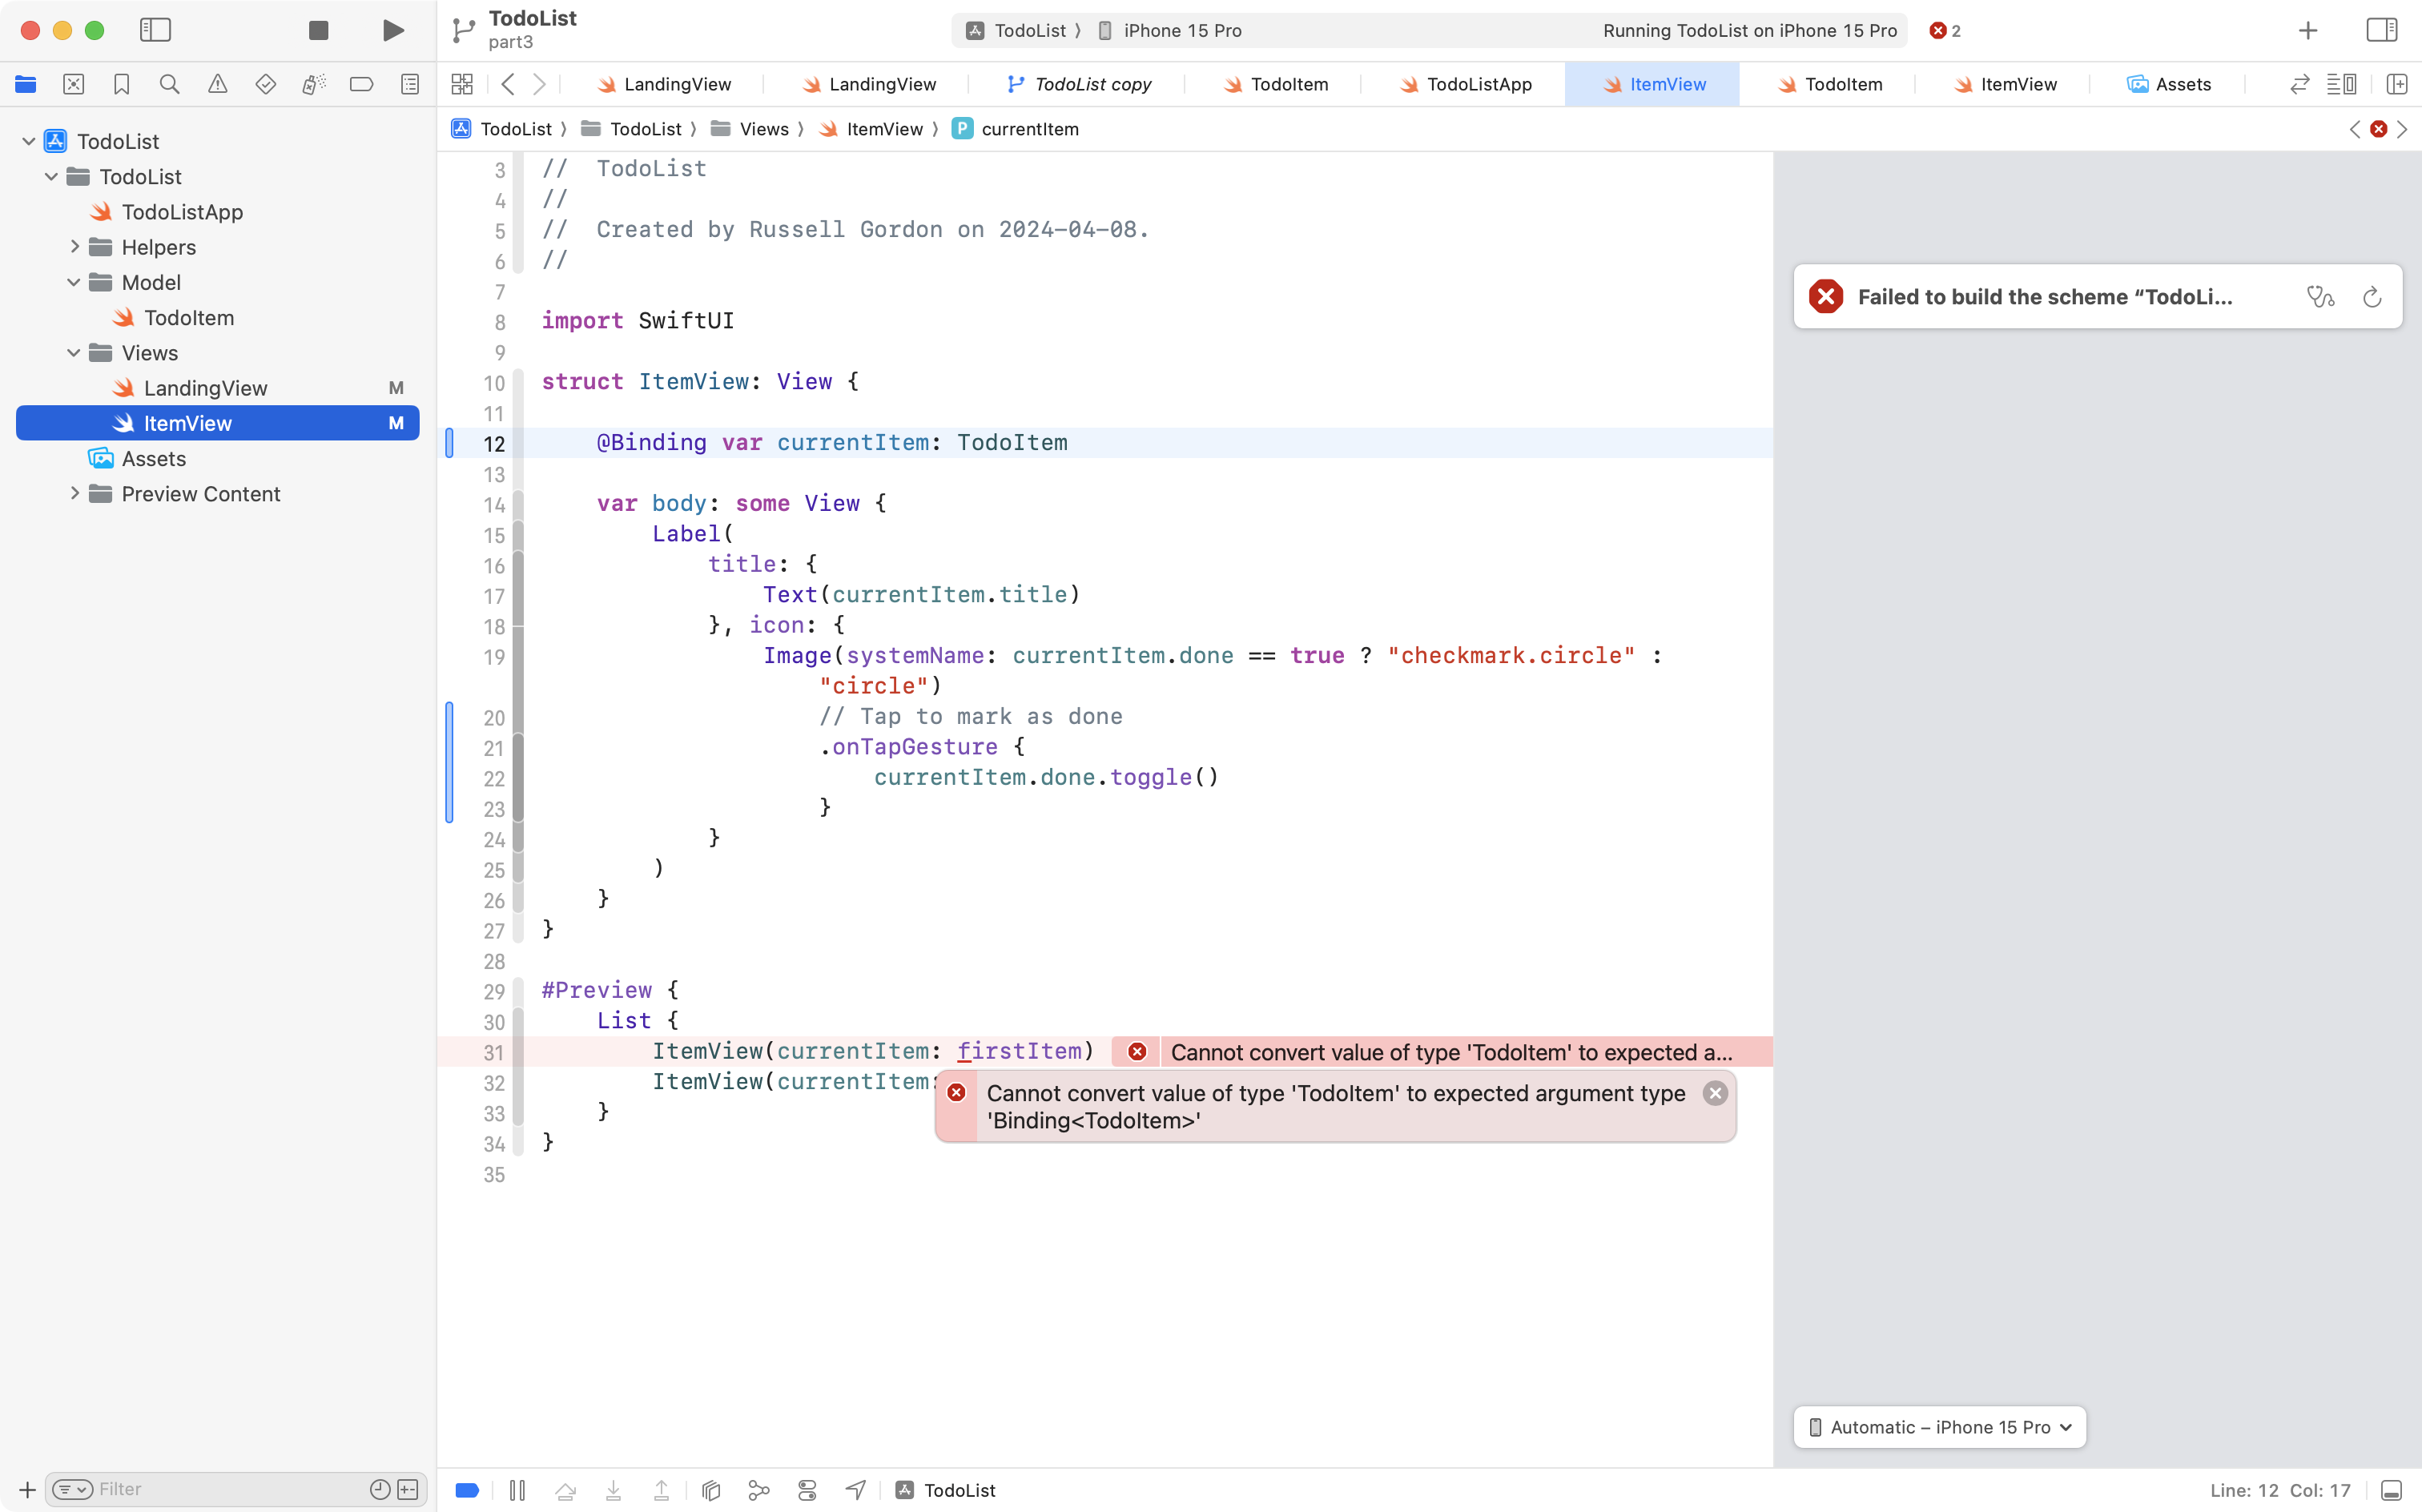
By passing in, for example, Binding.constant(firstItem) rather than just firstItem, we are creating the expected argument type – remember, by using this code on the stored property:
@Binding var currentItem: TodoItem… we indicated that we want currentItem to be bound (connected to) some source of truth.
For the previews section of our code, using Binding.constant essentially creates a temporary source of truth that cannot be changed (this is good enough for seeing a preview of ItemView).
What we really need to do, though, so that data within currentItem can be changed within the helper view, is make one final tiny edit in LandingView, at the call site for ItemView.
Return to that file now, and find this line of code:
ItemView(currentItem: todo)It will probably be around line 31:
Simply add a $ in front of todo, like this:
ItemView(currentItem: $todo)By doing so, as shown here:
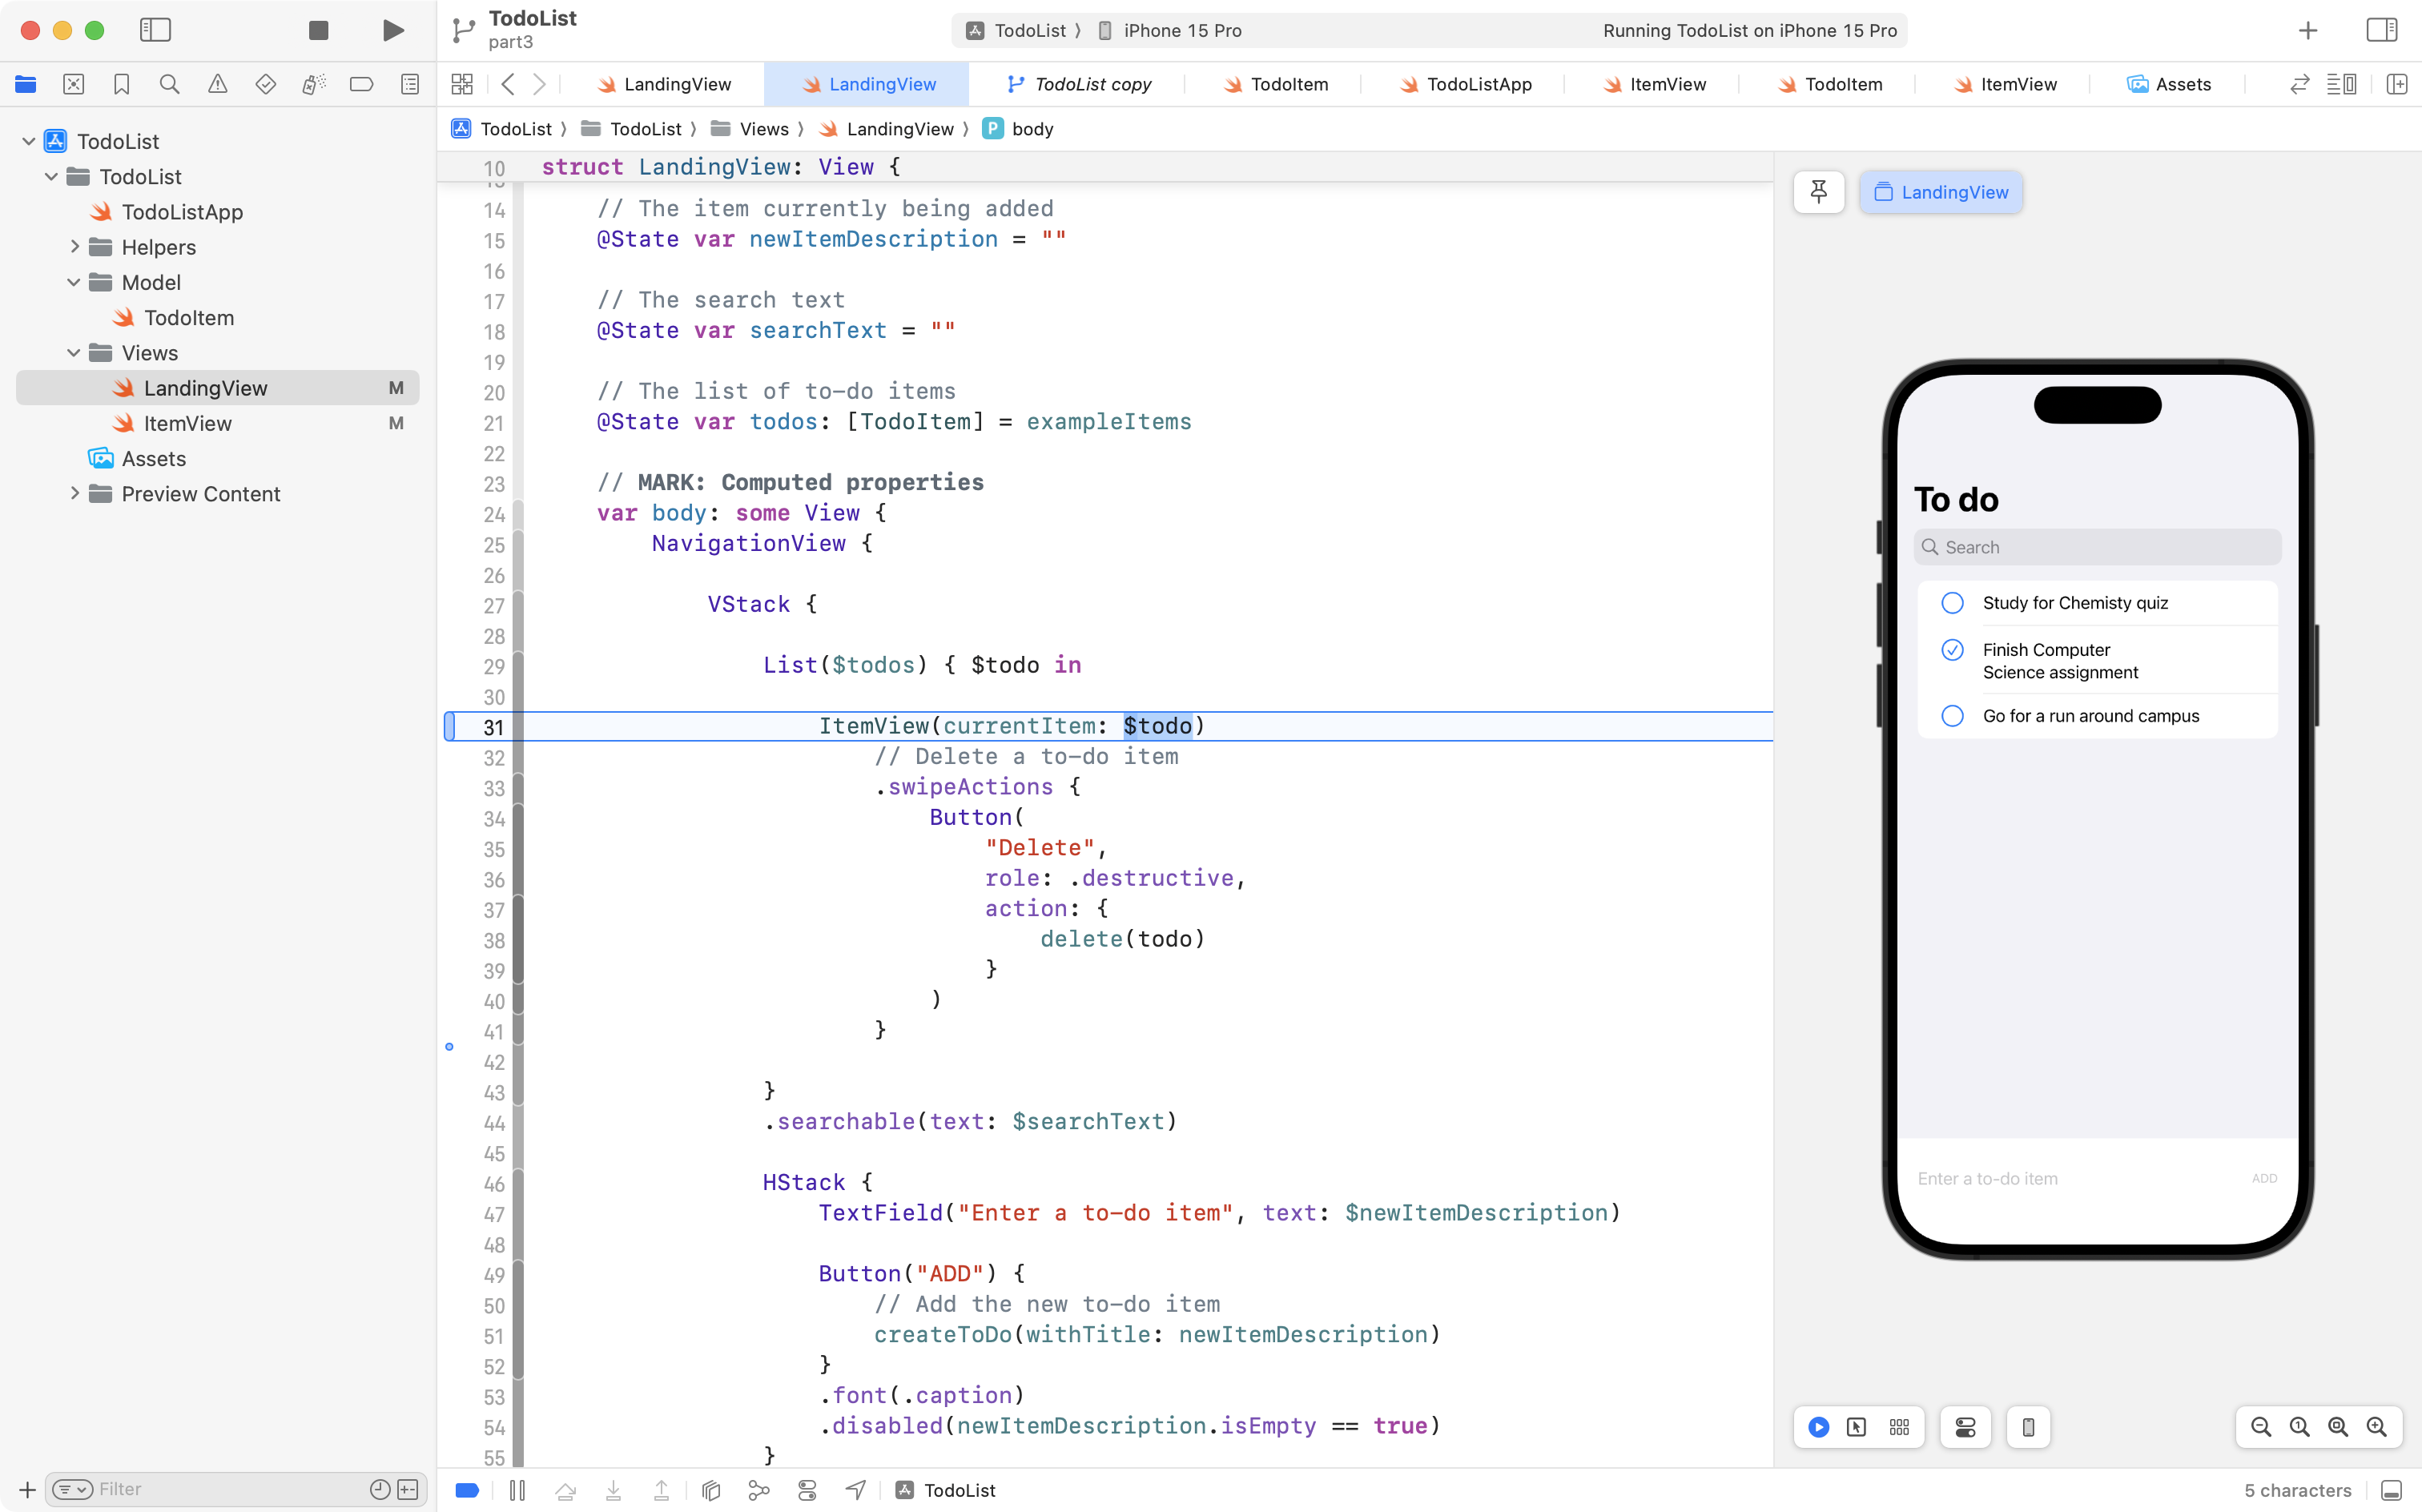
… we provide the expected type (a binding) which means that, when the completion status of an item is changed inside ItemView, that change – through the binding – is passed back up to the source of truth, here, in LandingView.
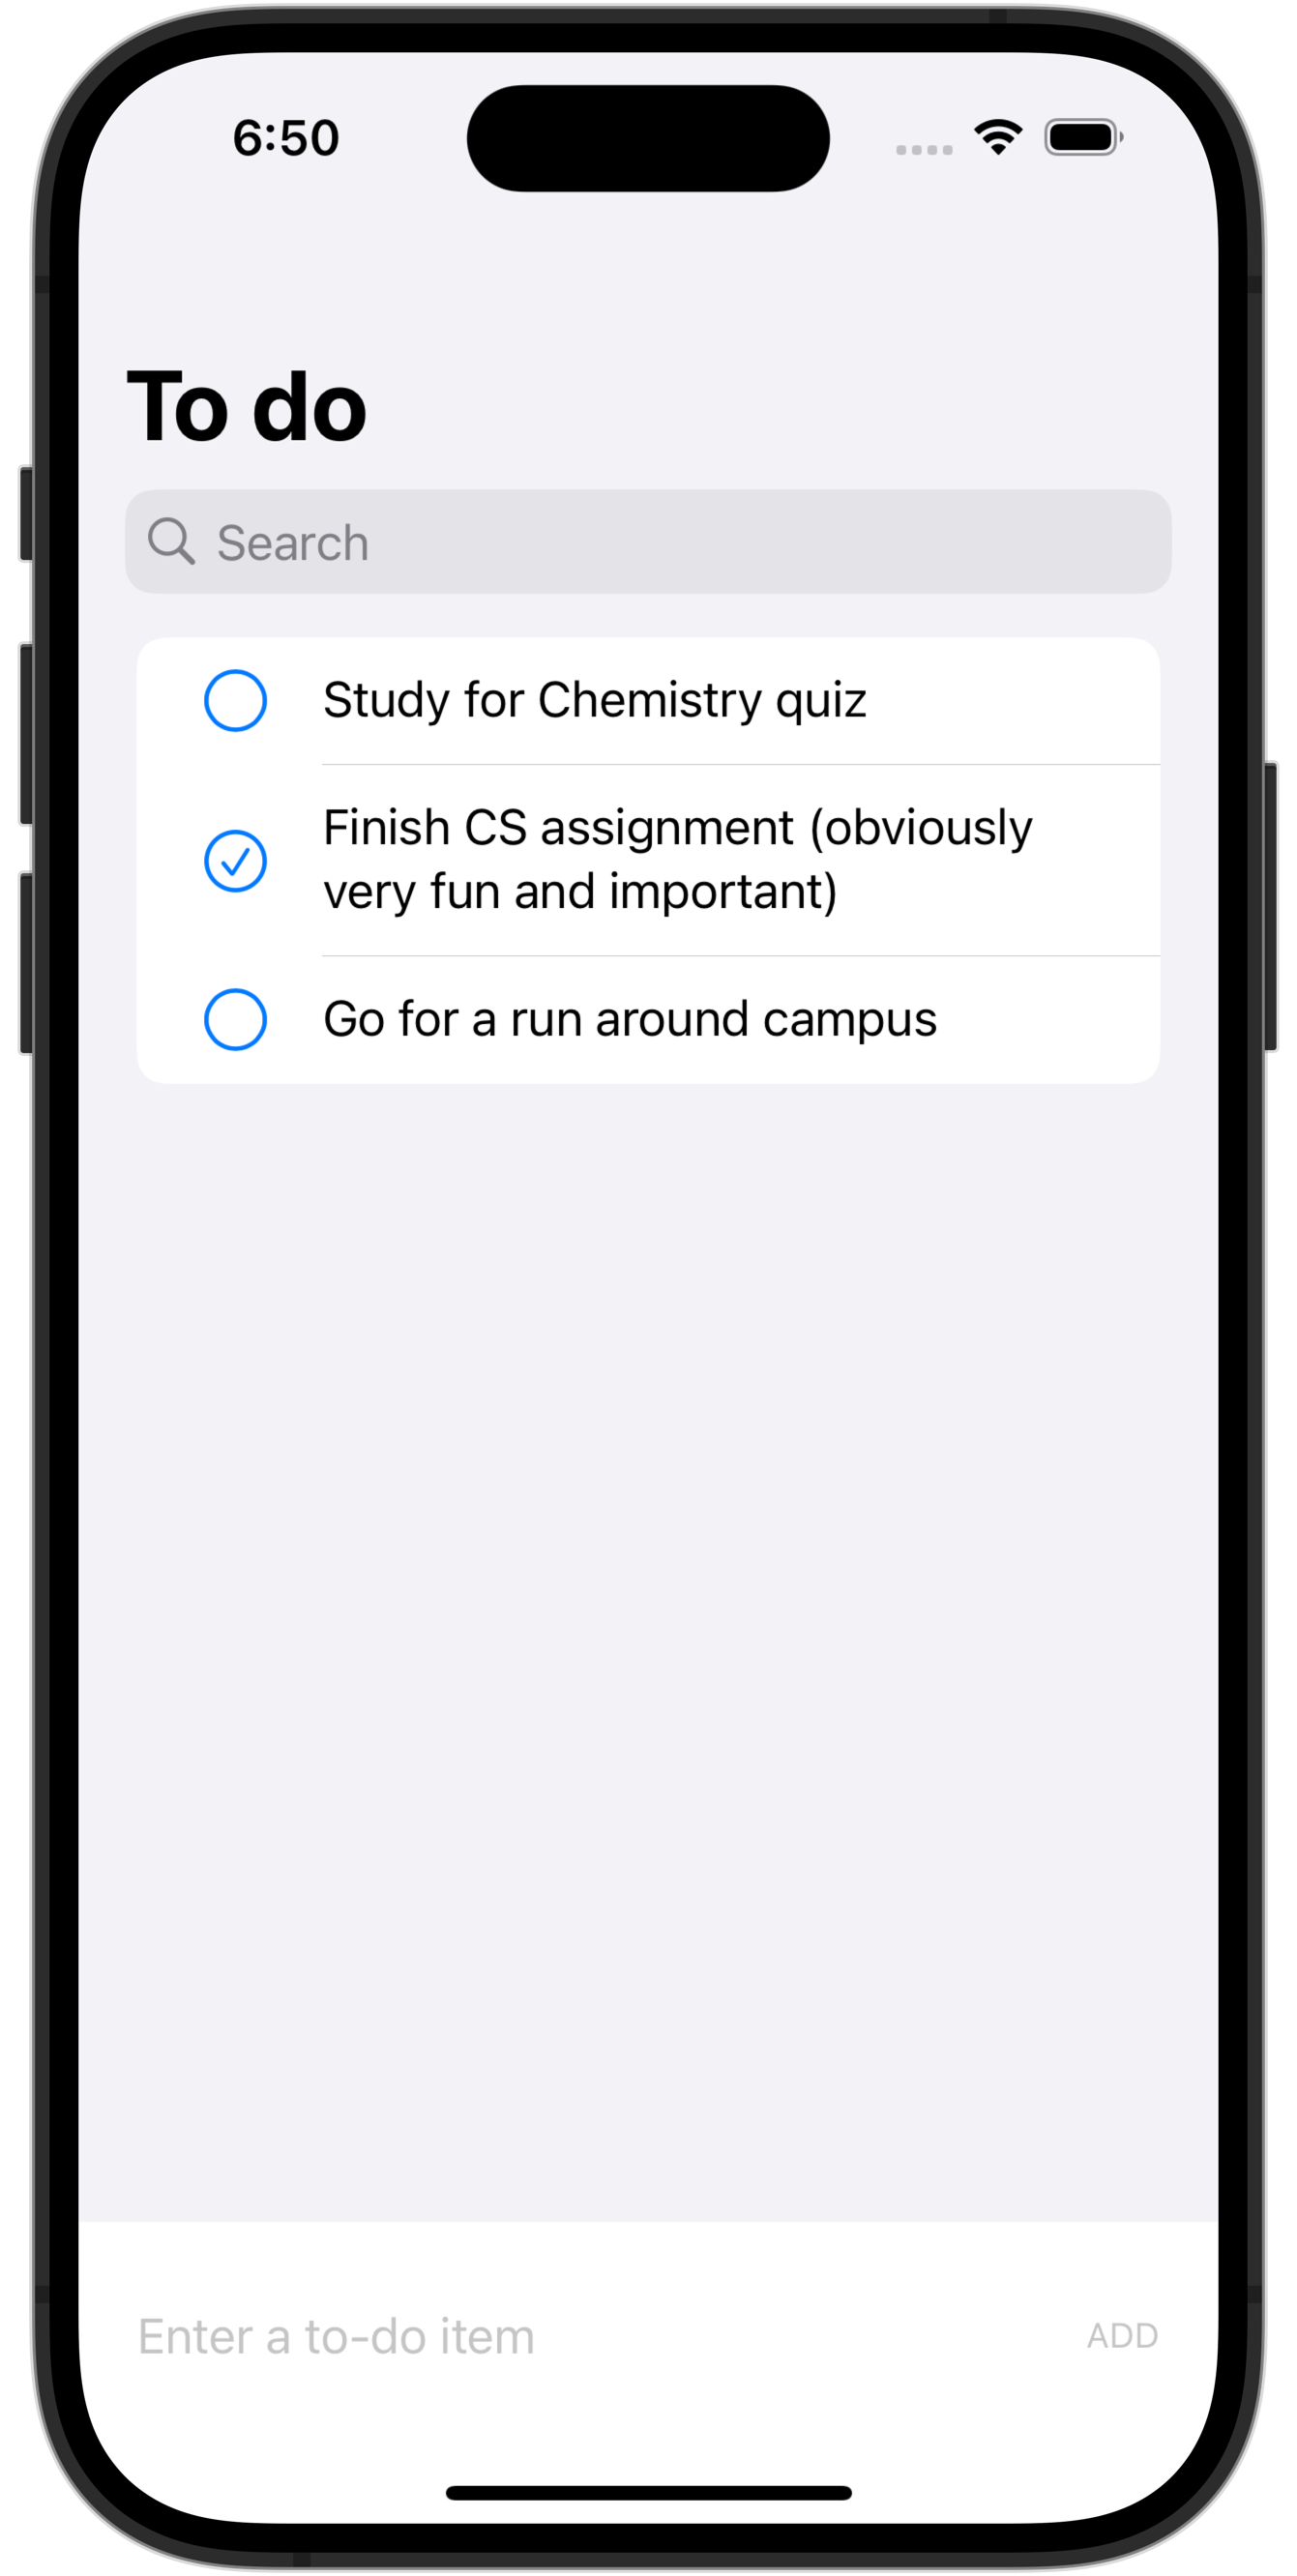
Try out your app now – notice that the completion status only changes when you tap on the circle image for a to-do item:
This is important progress that we don’t want to lose – or mix in with other changes we are about to make – so please, commit and push your work now with this message:
Using @Binding in helper view to allow the image only to be tapped to change to-do item completion status.
Modifying a to-do item by tapping the text
The next change is much smaller, as we’ve already done most of the required work in the most recent section of this tutorial.
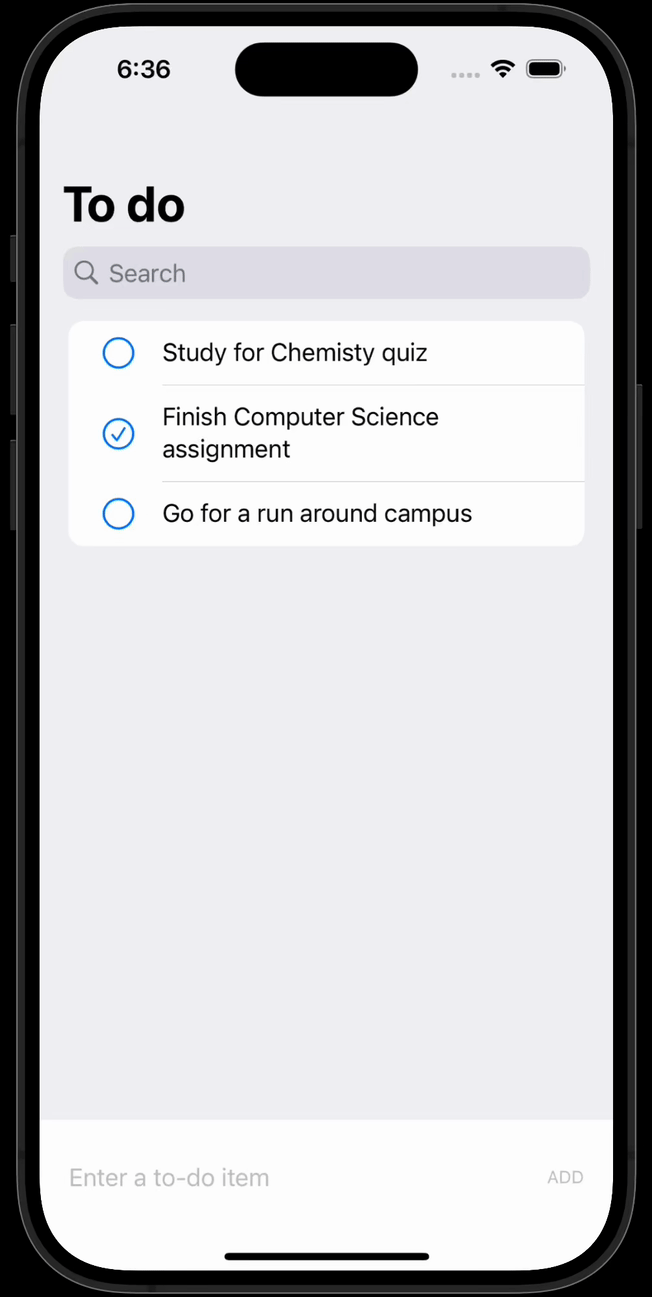
We want to be able to tap the text of a to-do item, then simply type to change it.
So, inside ItemView, we will make the following edit – change the code (around line 17) from this:
Text(currentItem.title)… to this instead:
TextField("Enter a to-do item", text: $currentItem.title, axis: .vertical)… like this – old code is in grey, new code is in blue:
A Text structure is read-only – it just presents information.
A TextField structure both presents data, and allows it to be changed.
This text field (if it were empty) will prompt the user with the text “Enter a to-do item”.
It is bound to $currentItem.title so that whatever the user types is placed inside the title property of currentItem, which is of course an instance of our TodoItem data type.
Finally, the parameter axis and argument .vertical means that if the user types a to-do item that is longer than the space available on a single line, the text field will expand to take up a second line (or more), as needed.
Try this out:
Editing to-do items is a necessary feature, because human beings make typos.
For example:
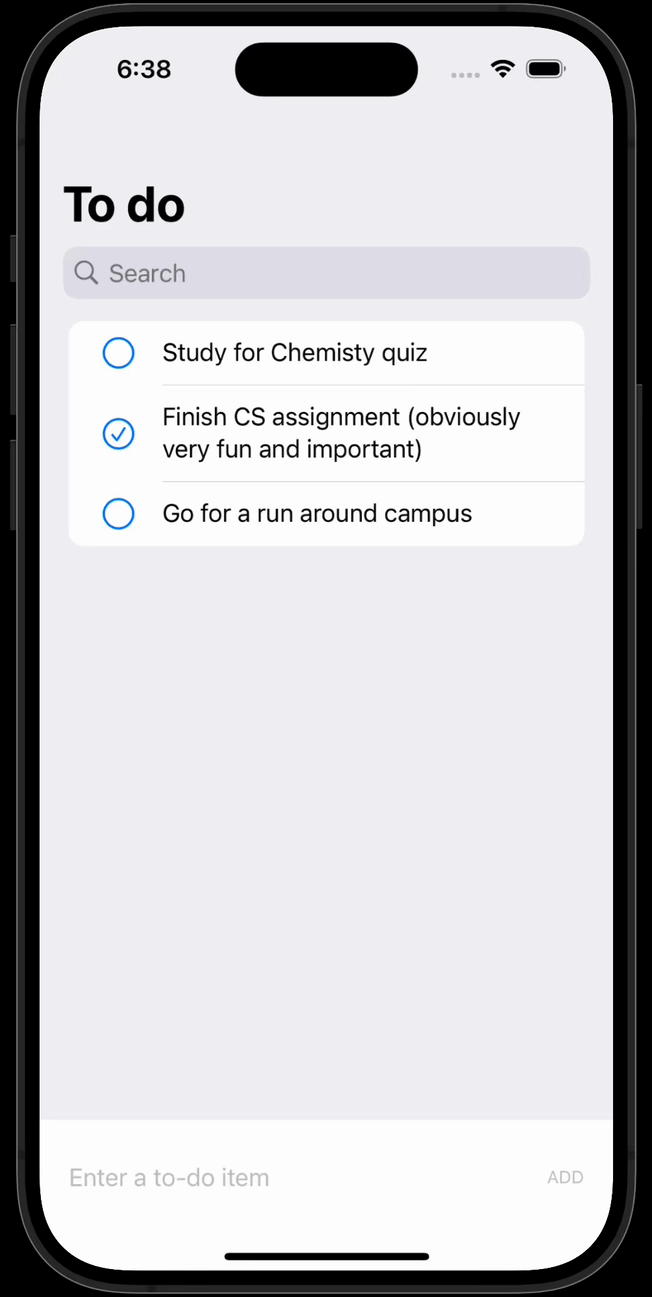
Although only one line of code was changed, it is an important modification, and we don’t want to mix up this edit with the source code edits we are about to make.
So, please commit and push your work with this message:
Made to-do items editable and responsive to size of the text they contain.
Persist data with SwiftData
Next, we will adjust the app so that when it is quit, and then re-opened, data is persisted, or saved.
For most of this year, we have been creating interactive apps using the SwiftUI framework, which is a library of code authored by a team at Apple.
Today, you will learn how to make use of another framework – SwiftData – which makes it easy to persist data in a database.
When to use it
Use SwiftData to persist data within your app when a given user of your app is the only person who ever needs to see that data.
Here are a few examples of good use cases for SwiftData:
- a journalling app where a person might record their daily thoughts
- an expense tracker
- a note-taking app
These are just a few ideas.
IMPORTANT
SwiftData does support syncing data between multiple devices owned by a single individual, by using iCloud.
Setting up syncing between devices goes beyond the scope of this tutorial, however.
Theory
NOTE
You will never to be quizzed or tested on terminology and concepts related to the SwiftData framework.
However, it’s useful to have a general grasp of what is going on when you make use of a given framework.
So, read on to understand how the SwiftData framework automatically creates a database on our behalf to persist information kept within our apps.
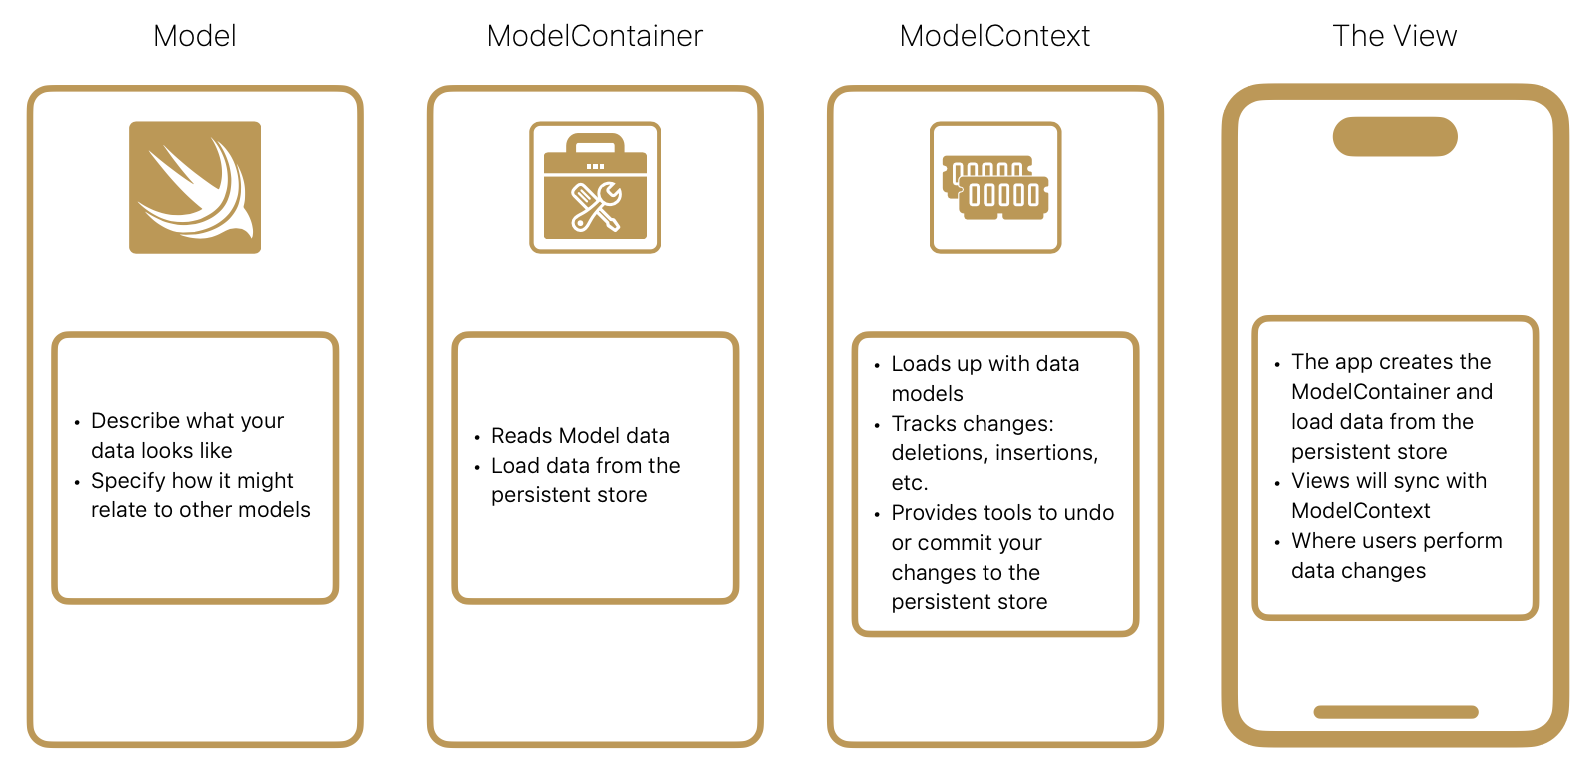
There are four main components that are always used when working with SwiftData in SwiftUI.
Borrowing from Mark Moeyken’s very recently published book on this topic, those four components are:
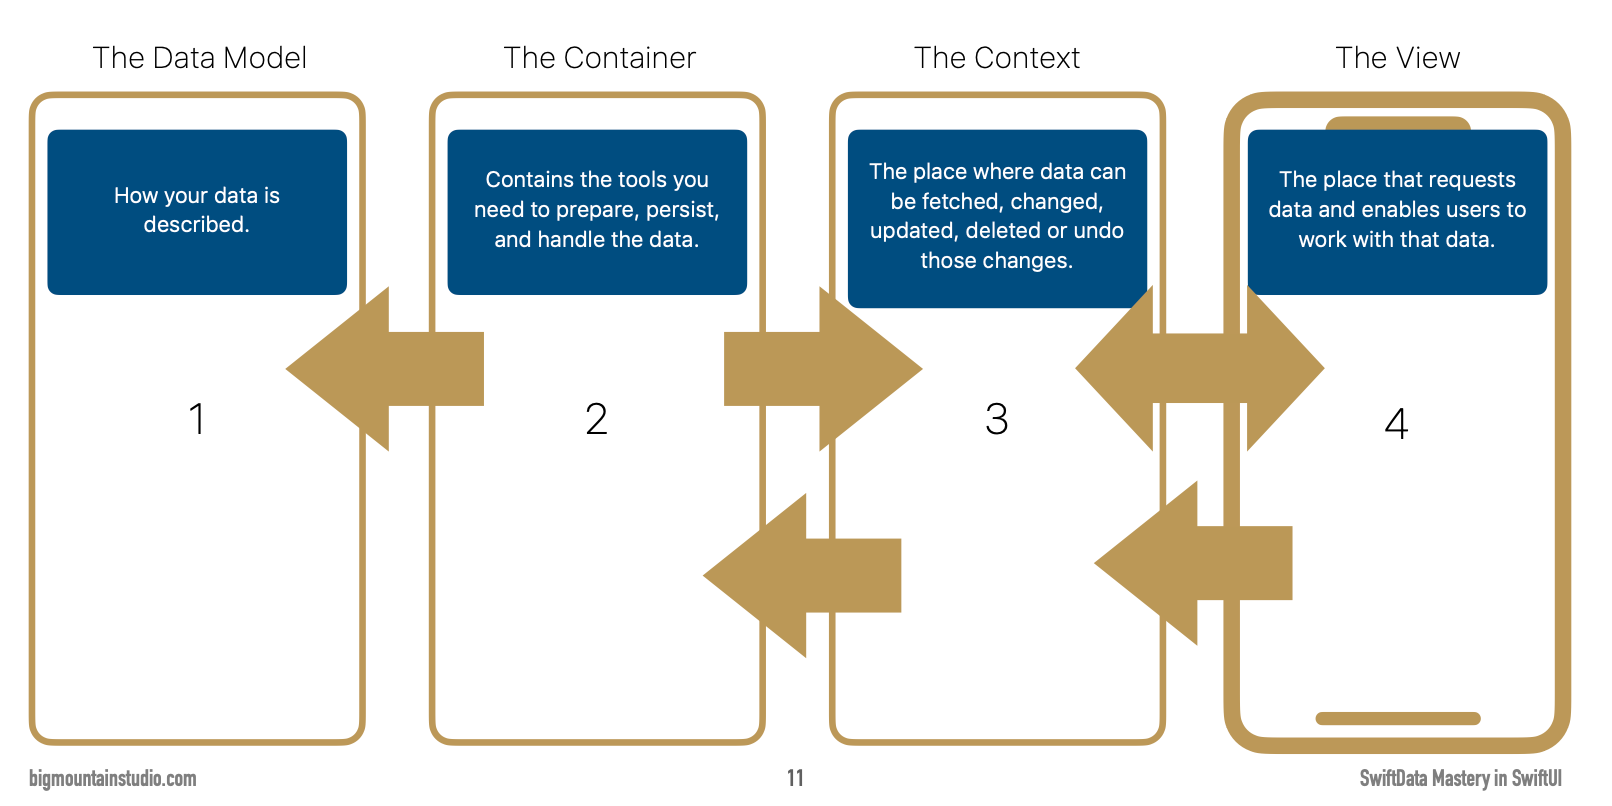
You are already familiar with a model and a view.
The role of those parts of an app do not change.
A container takes care of storing the data so it persists on a device. SwiftData is backed by a SQLite database. Behind the scenes, a SwiftData container reads and writes information to that database.
The context sits between the container and our app. It fetches data, and allows us to insert, change, and delete data. A SwiftData context even has built-in support for undo/redo actions.
Let’s look at each of these four components just a bit more closely.
The model
The model of an app is the definition of all the information that it can store – how it will be structured and organized.
For example:
class Dog {
	let name: String
	let massInKG: Double
}
A data model is not the same thing as a data object.
An object is an instance of a model that is actually populated with real data.
For example:
let myDog = Dog(name: "Piper", massInKG: 31.2)The container
A SQLite database provides an organized way for storing and retrieving information.
The SwiftData framework is an abstraction that keeps the messy details of how this works hidden, so we can focus on the unique logic of making our apps, without having to do more tedious work – like manually defining database tables or writing raw SQL queries that join tables together.
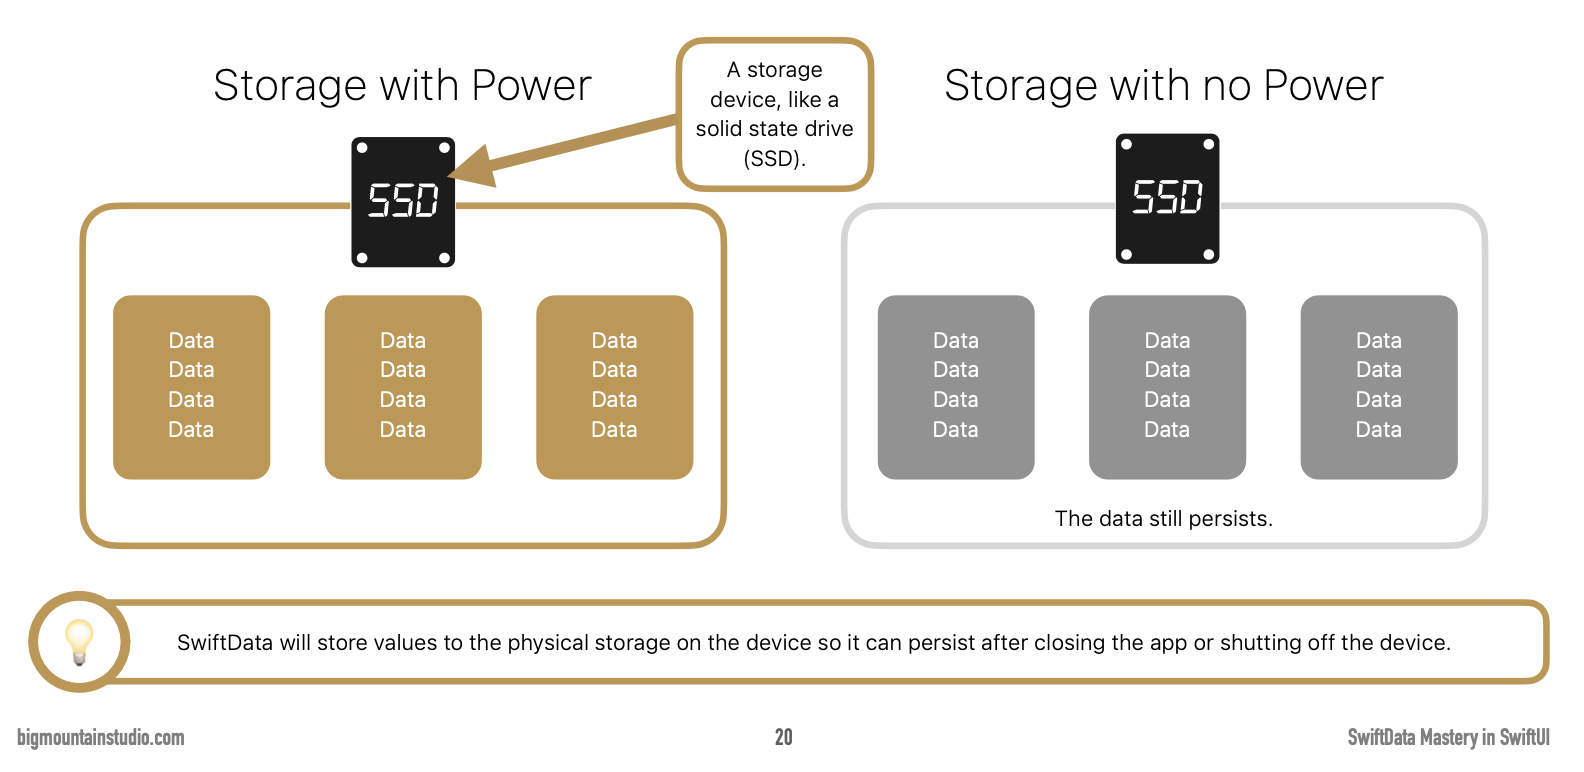
When you hear the word persist that means keep data around – even when power to a device is lost. An iPhone uses a solid state drive or SSD to persist data.
The context
This is a place in memory to work with data while your app is running.
An SSD is fast, but memory – random access memory or RAM – is much, much faster:

As indicated before, the context takes care of fetching, changing, deleting, and adding new data.
All of this happens in memory, and usually, we let SwiftData decide when to write that data to the container and on to permanent storage. SwiftData ensures that if your app is quit or backgrounded, your data will be persisted.
The view
As you know, the view is what we see in an app, and how we interact with data.
At a very literal level, app design is all about identifying a way to uniquely present data to users – and allowing them to interact with that data easily.
If the convenience and utility of using your app to interact with data outweighs the price you attach when you choose to sell software – well, that is how you make money as an app developer. 💵
Putting it all together
To remind us that the container and context draw their information from the model, Apple has designed the SwiftData framework so that the word model is always present.
The four main parts of SwiftData are formally named:
- Model
- ModelContainer
- ModelContext
- The View
Here is a summary:
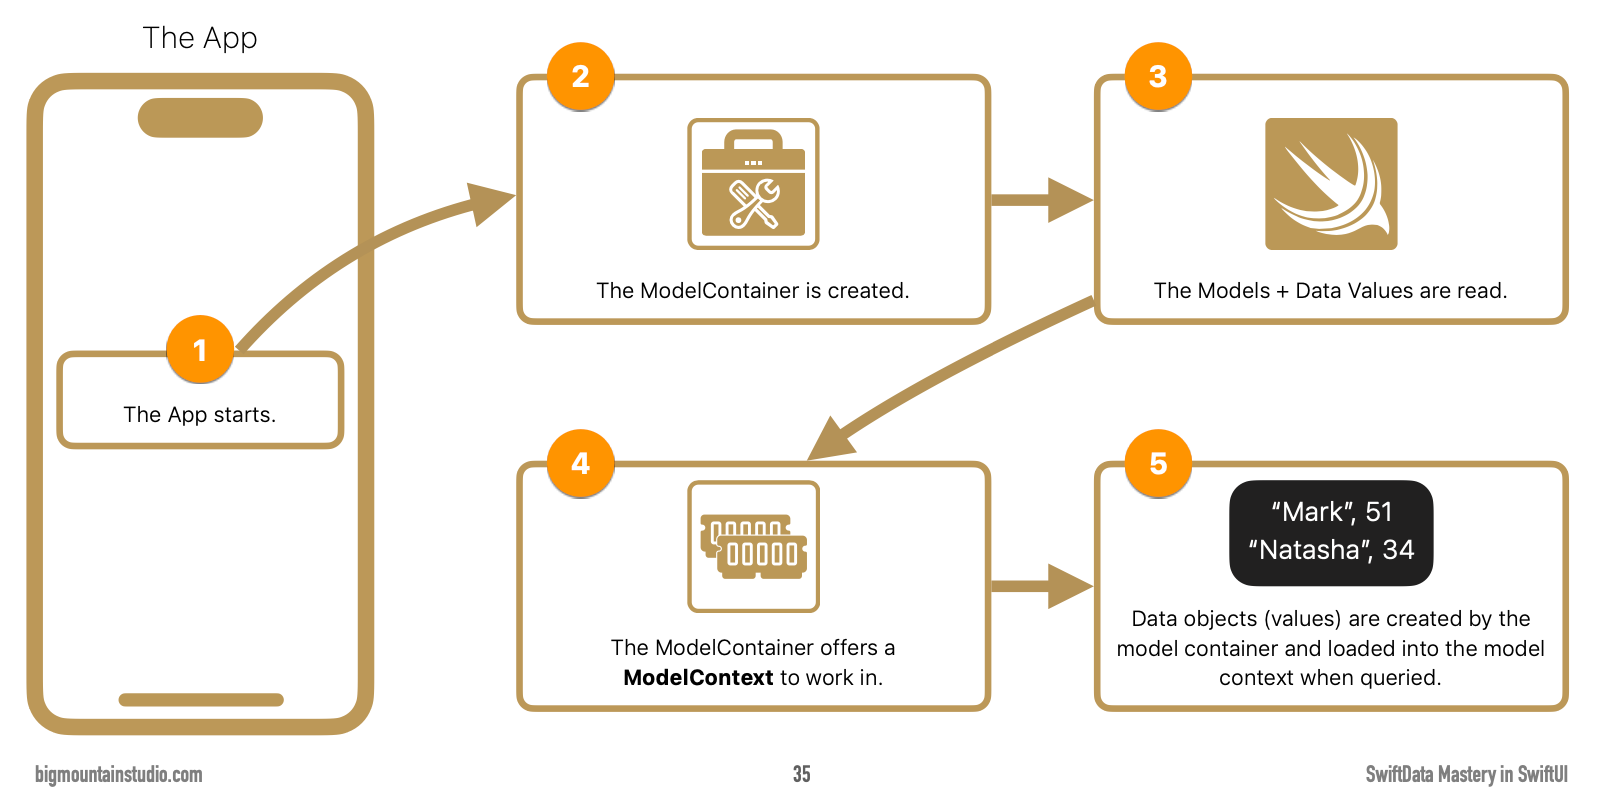
Here is a somewhat simplified look at what happens when an app using SwiftData is opened:
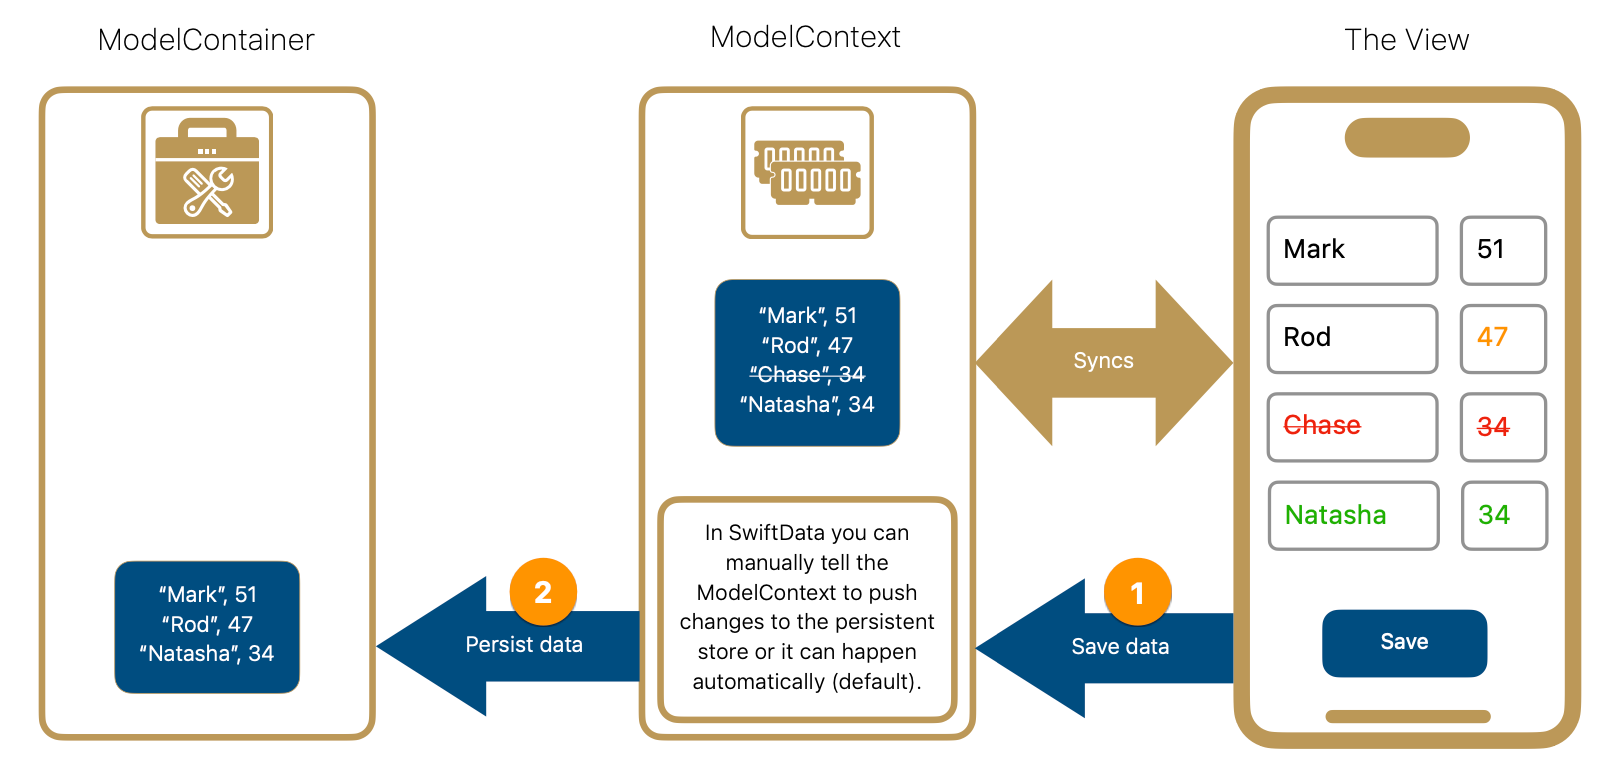
When it’s time to save data, here is what happens:
I agree with Mark Moeykens, who states his belief that the ModelContainer is the most important part of SwiftData.

Application
Now let’s apply everything you just learned about.
I think you’ll be pleasantly surprised to see how few code changes are required.
Adjust the model
Navigate to the TodoItem structure in the Model group:
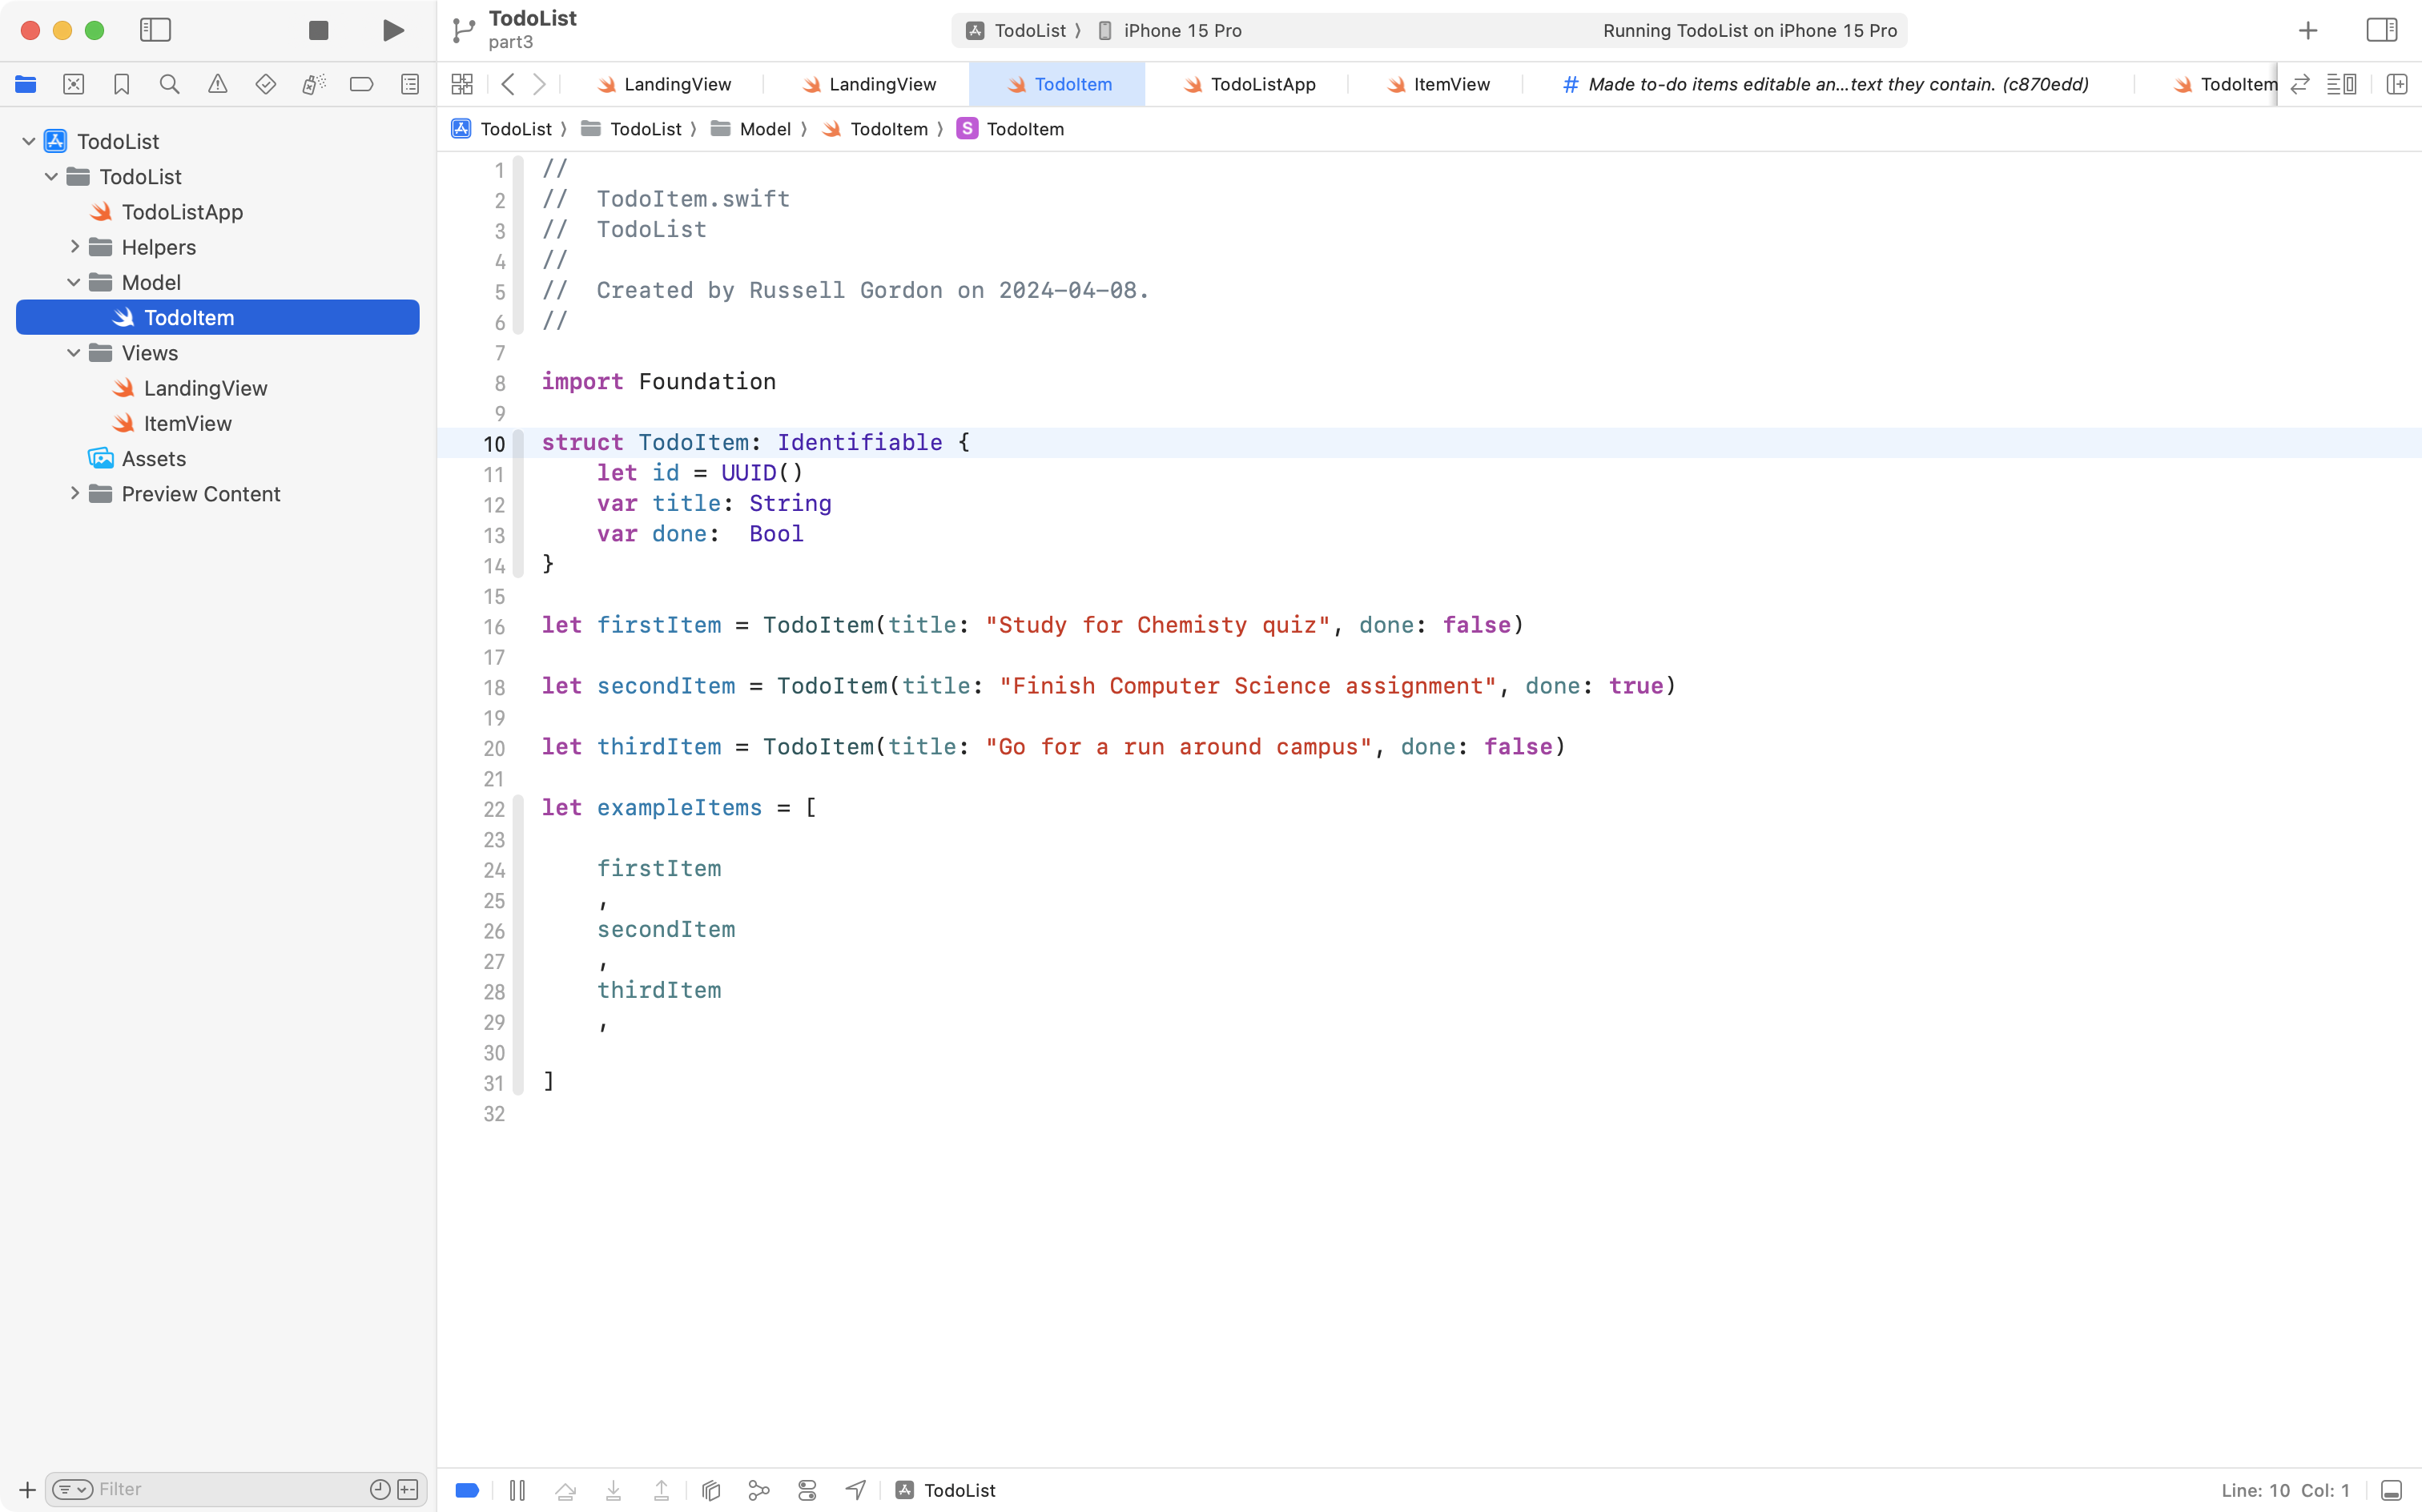
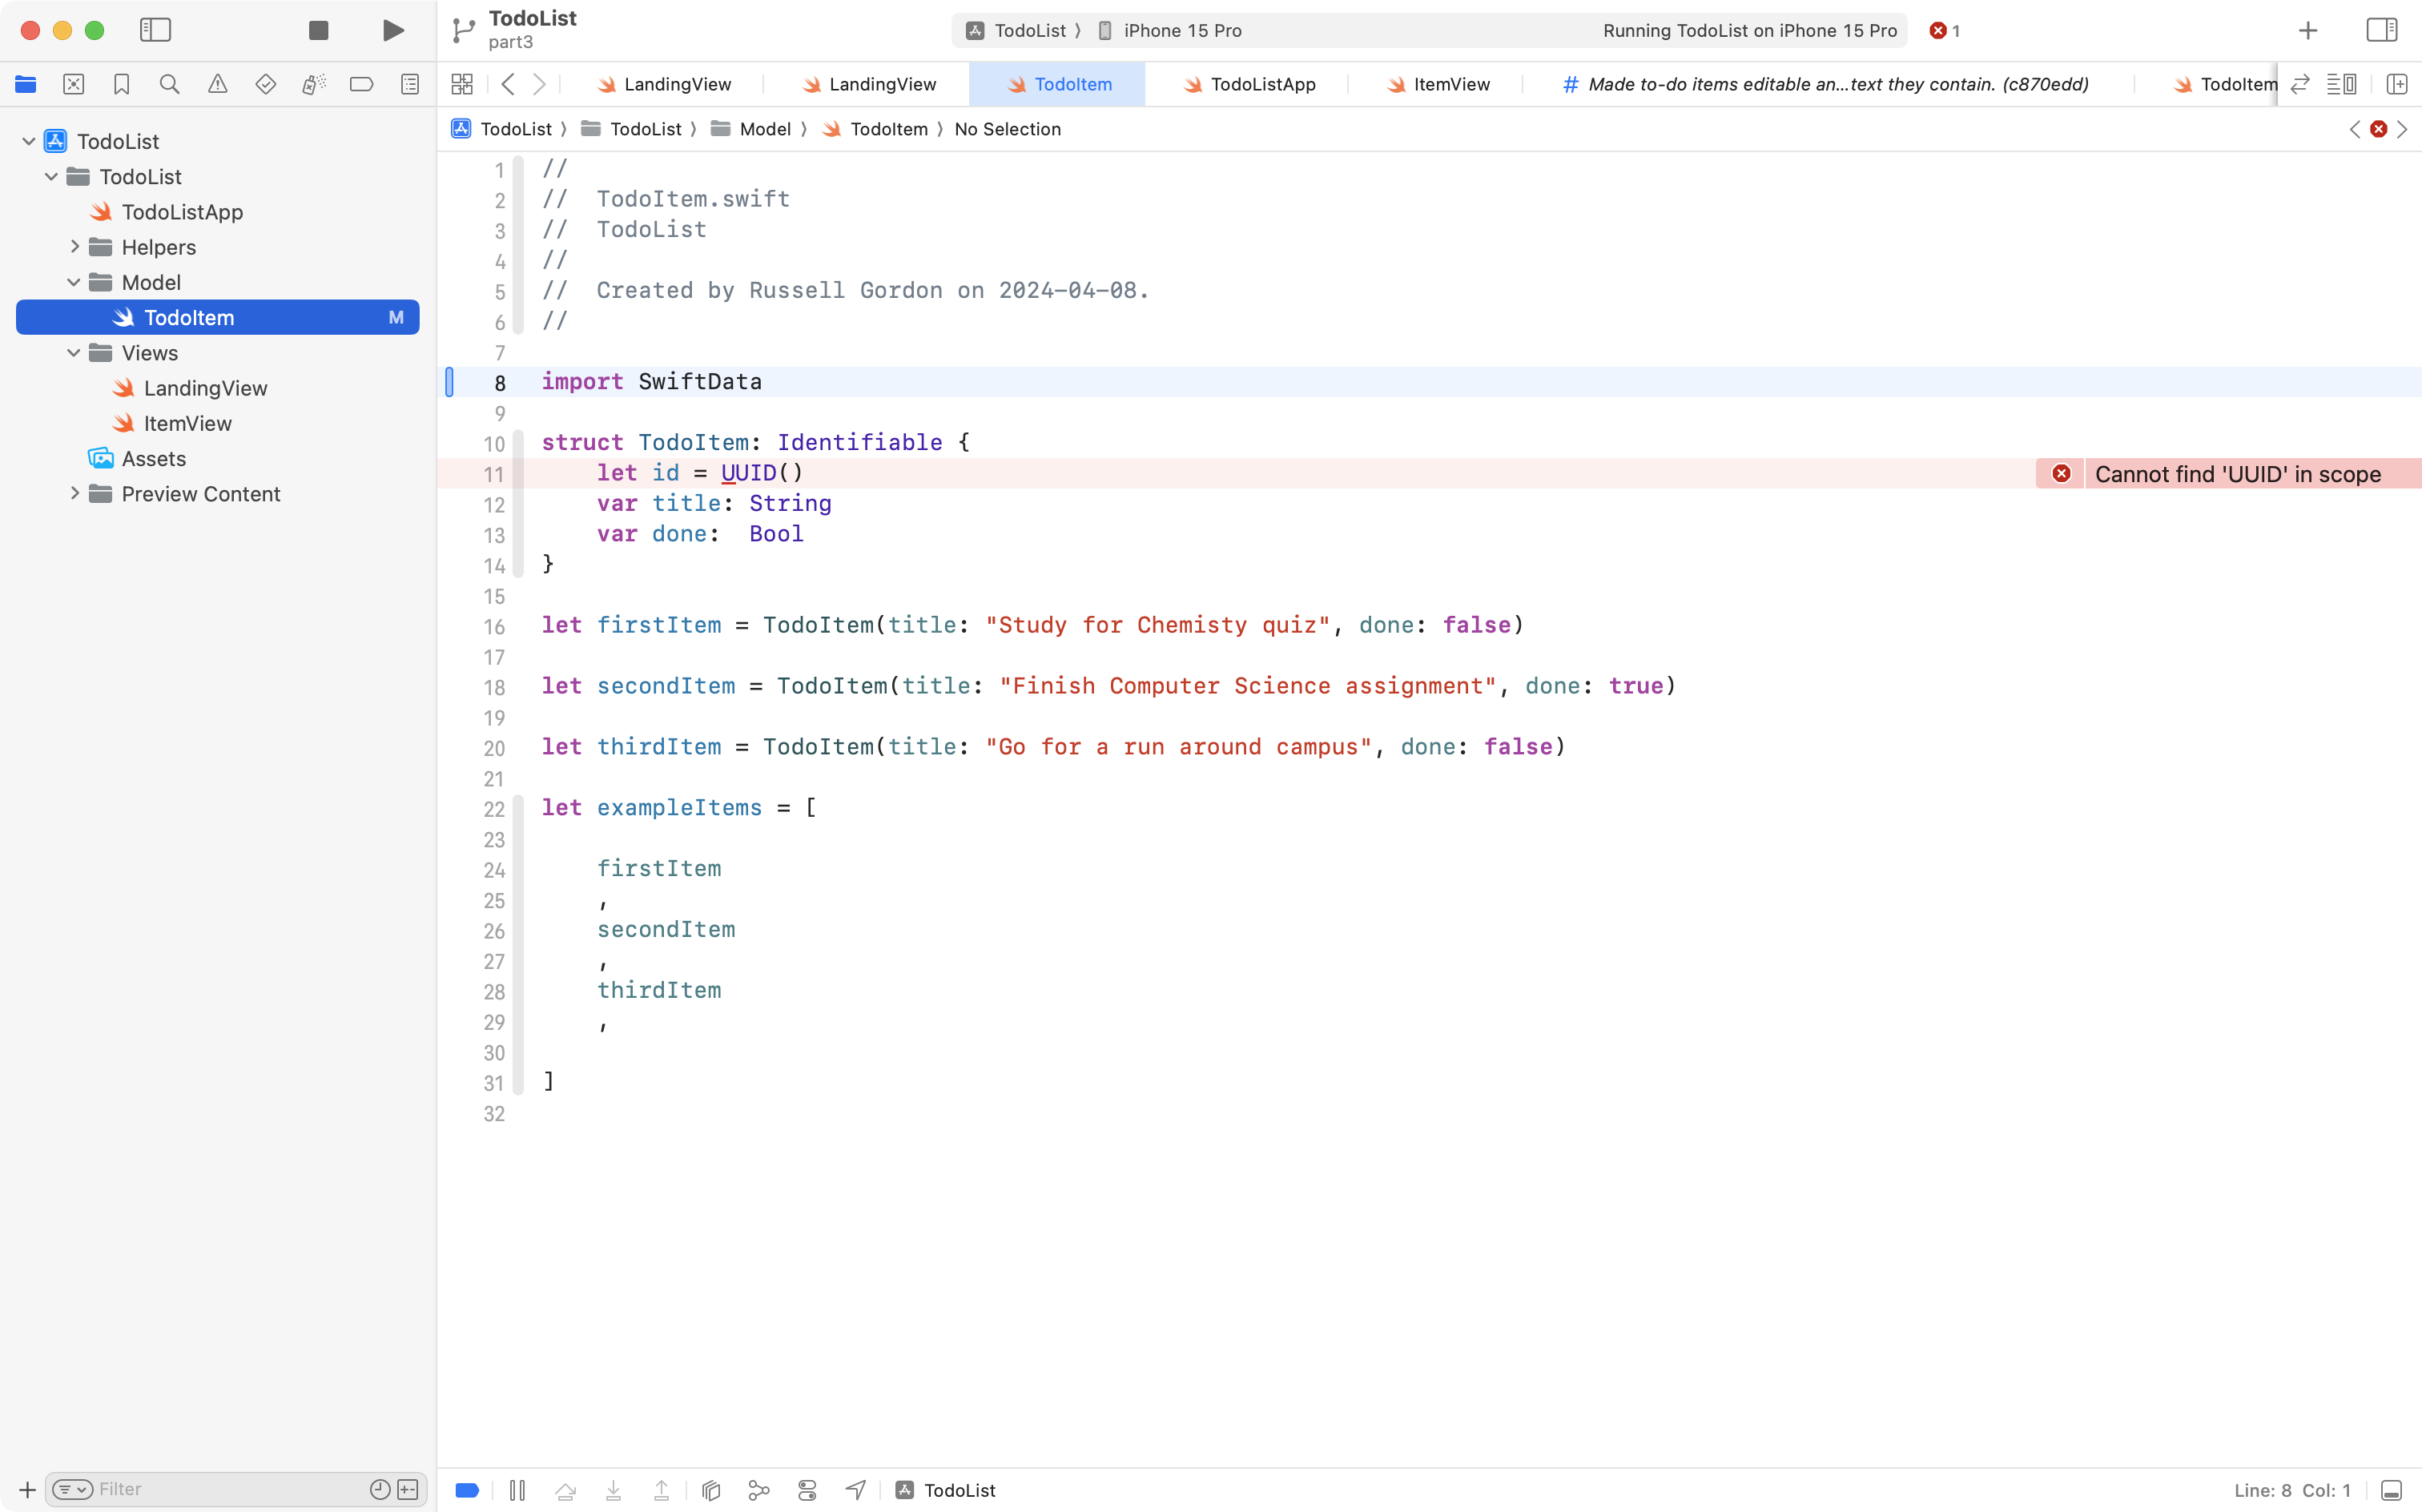
Where we are currently importing just the low-level Foundation framework (a minimal collection of code provided by Apple) we will now instead import the SwiftData framework:
SwiftData works with classes, rather than structures. Among other reasons, this allows data for a given instance of a datatype to be shared among multiple screens within an app – since a pointer to a single source of data is created – rather than a copy.
Accordingly, change line 10, so that a class is defined instead of a structure:
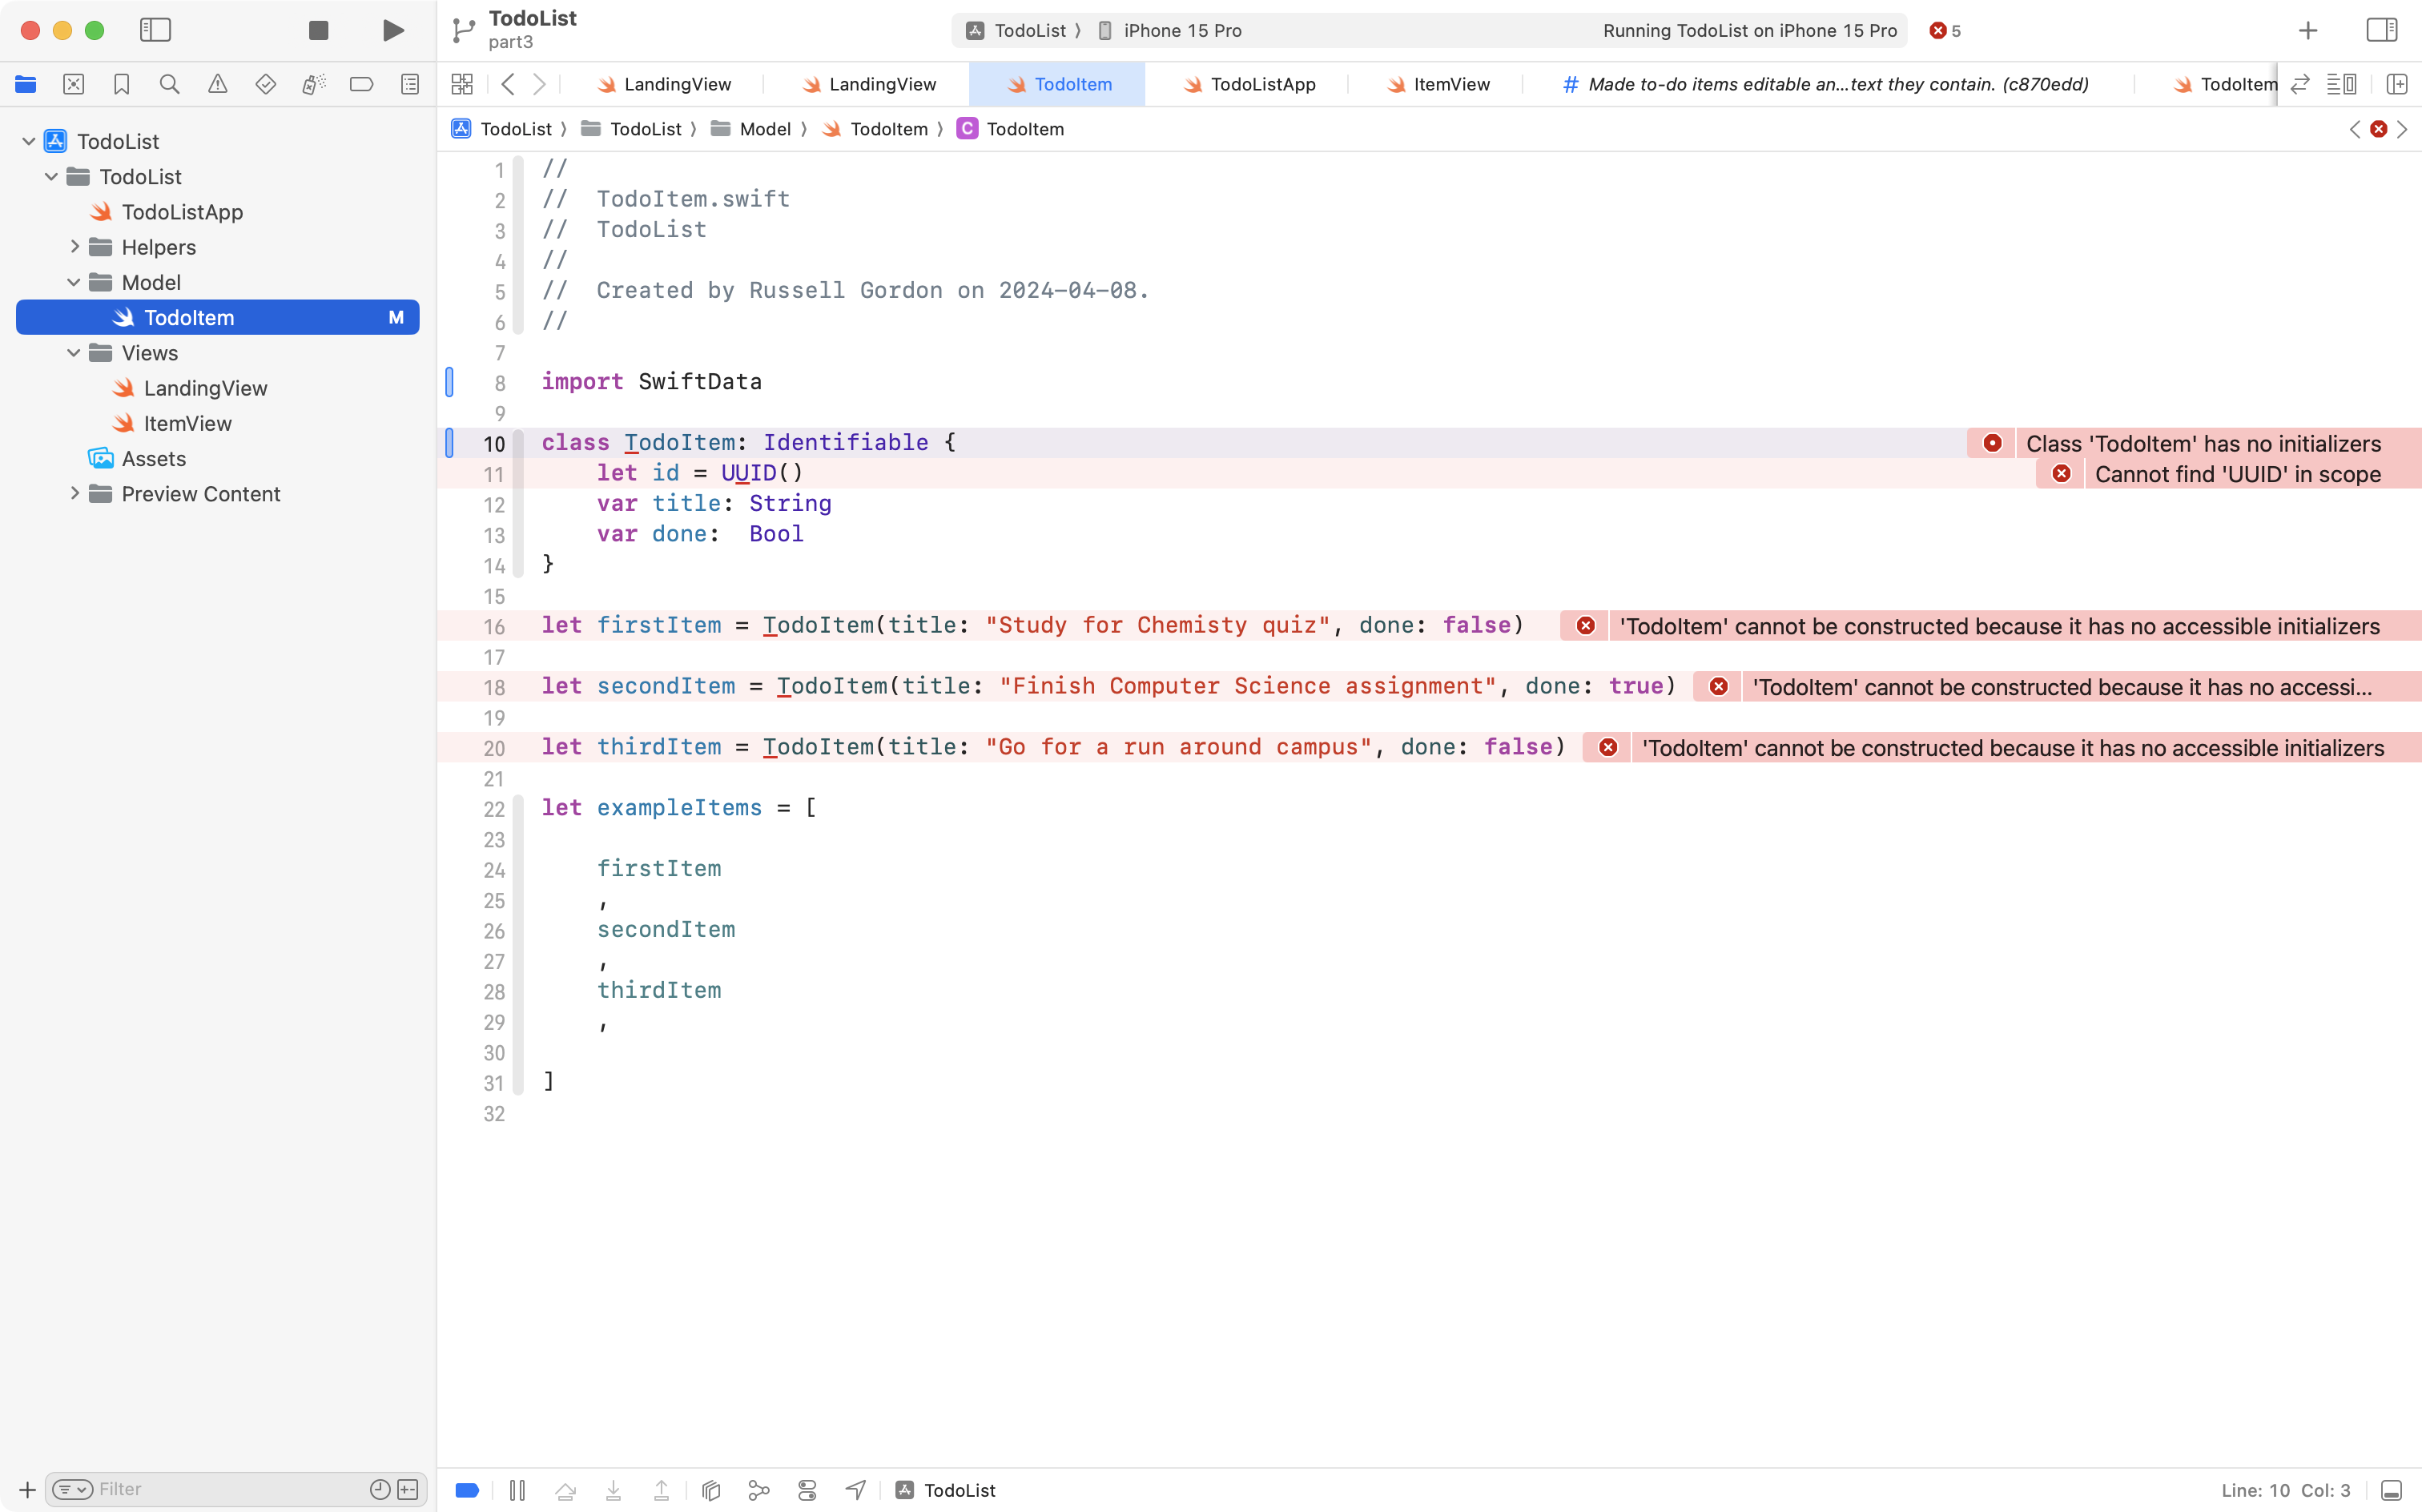
Don’t worry about the errors that are created. Those will be cleaned up in a moment.
To mark TodoItem as a data type that we want to use as a model with SwiftData, add the code @Model on the line above the class definition:
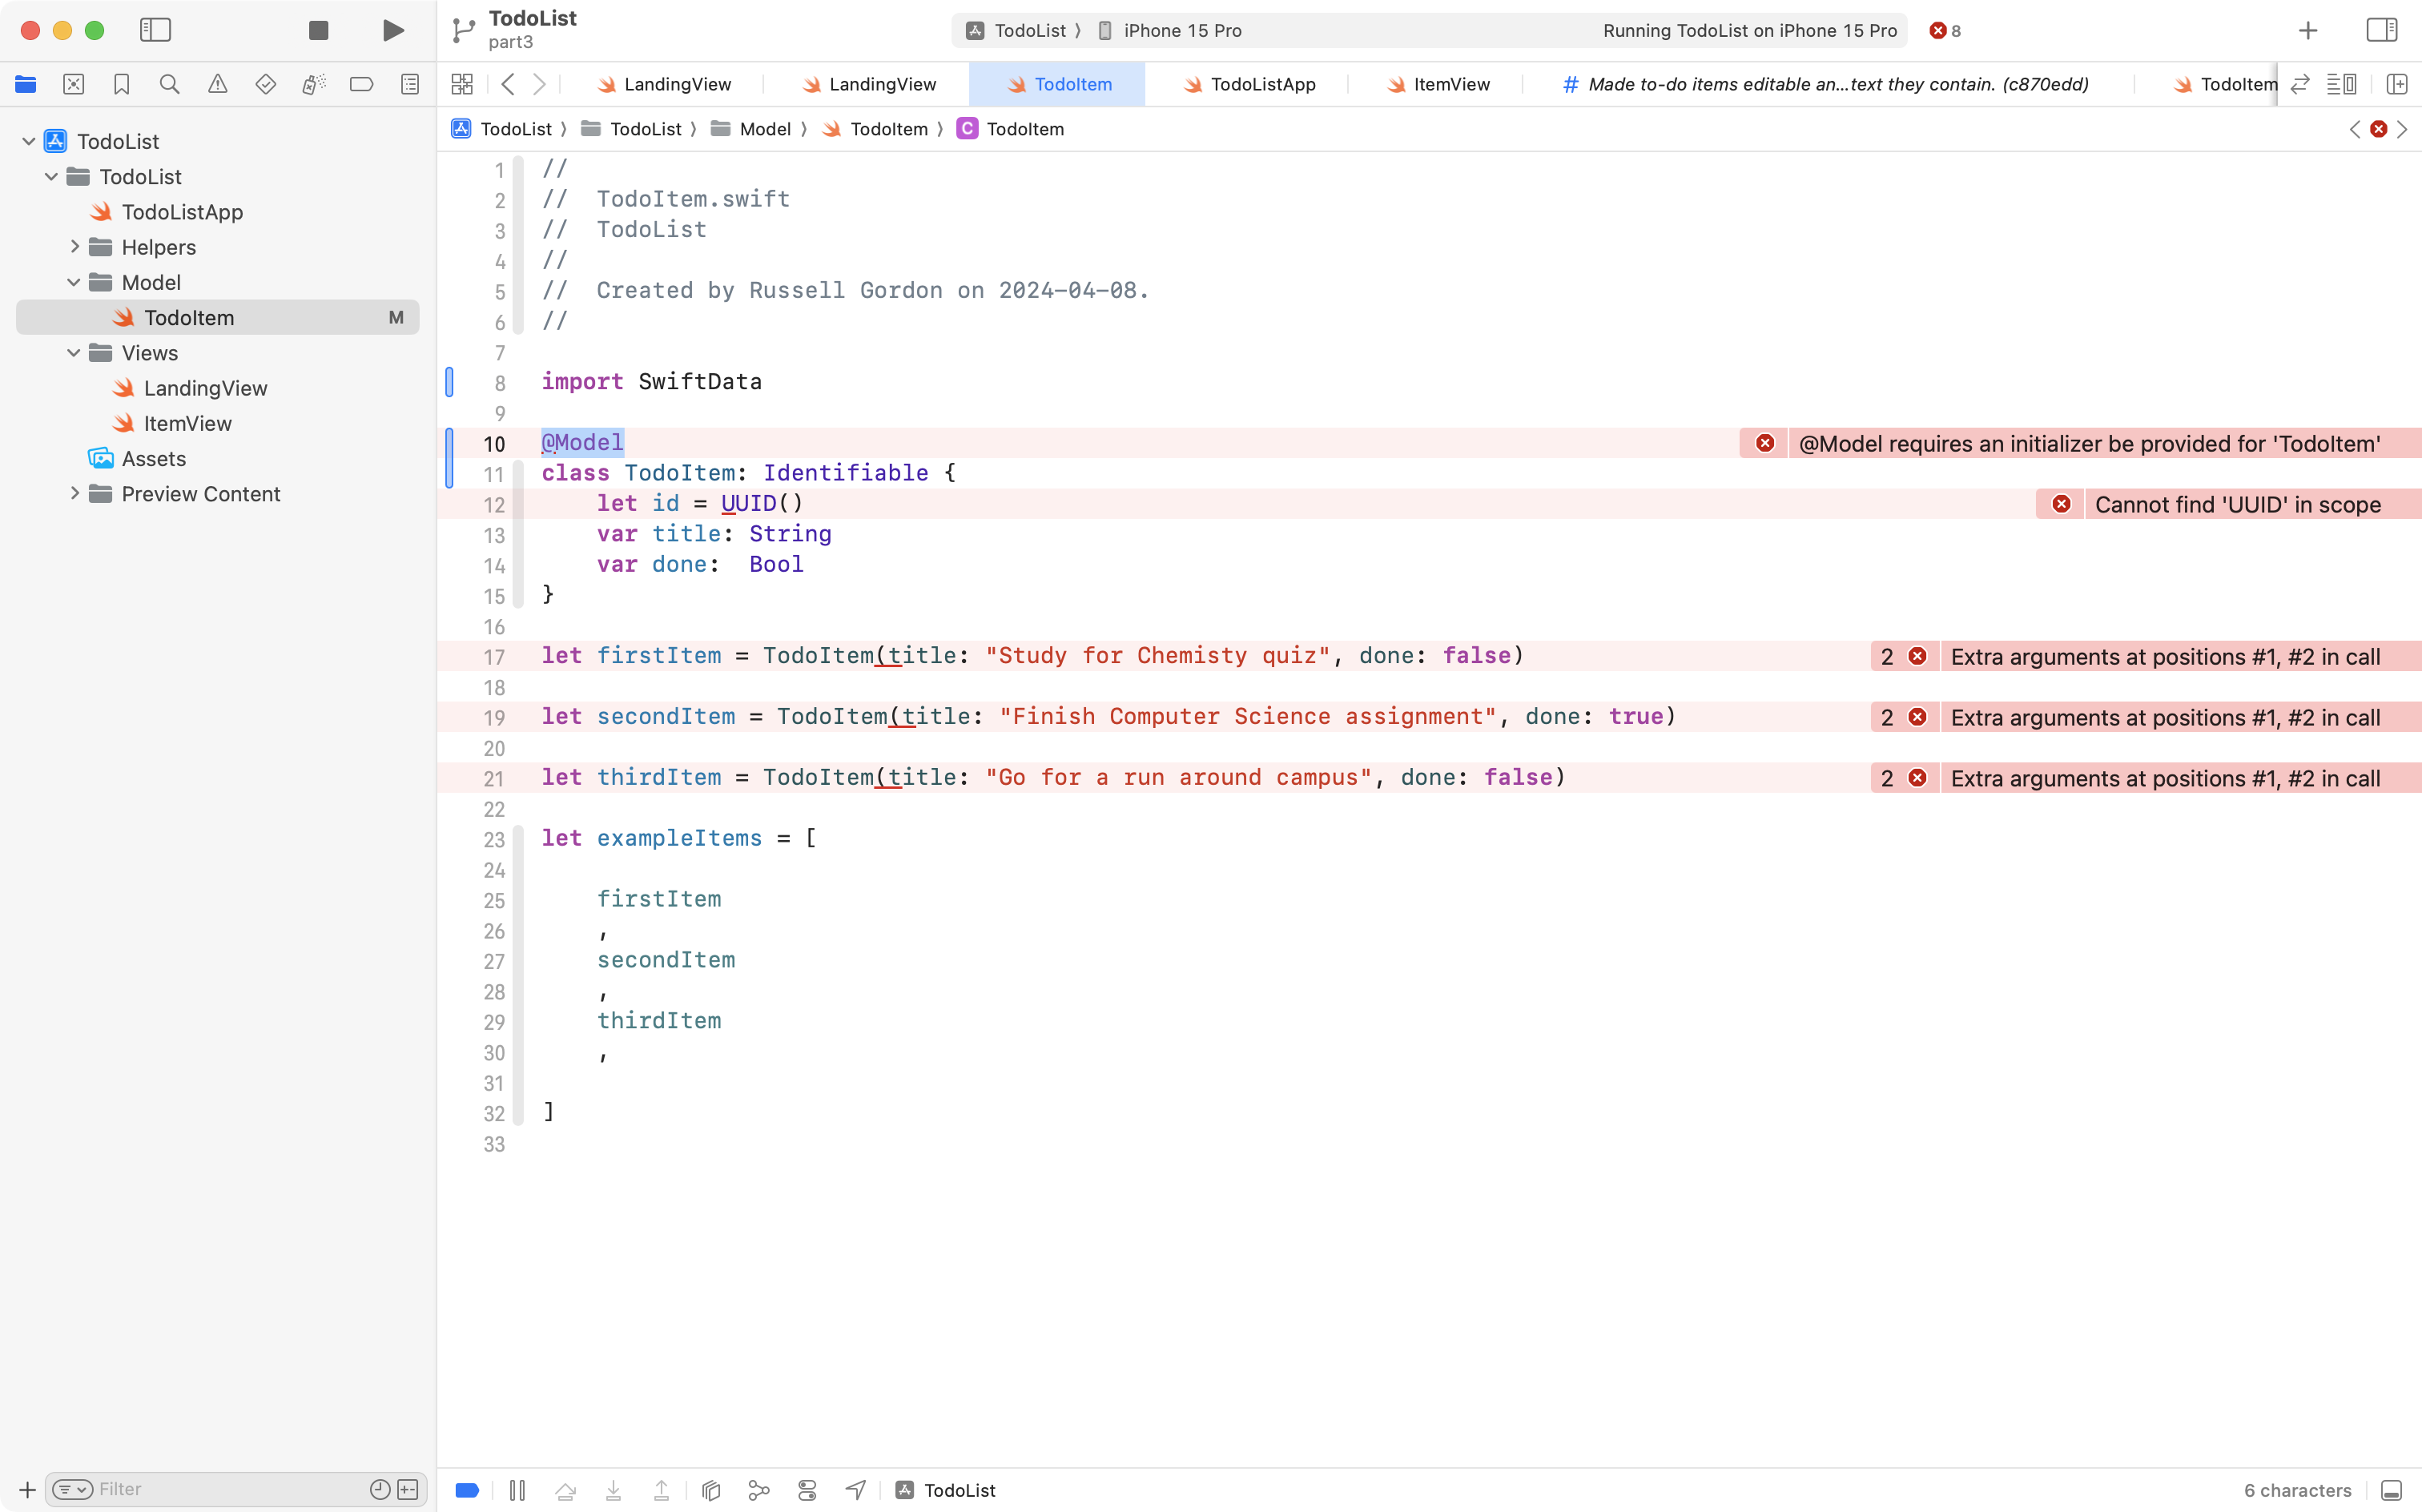
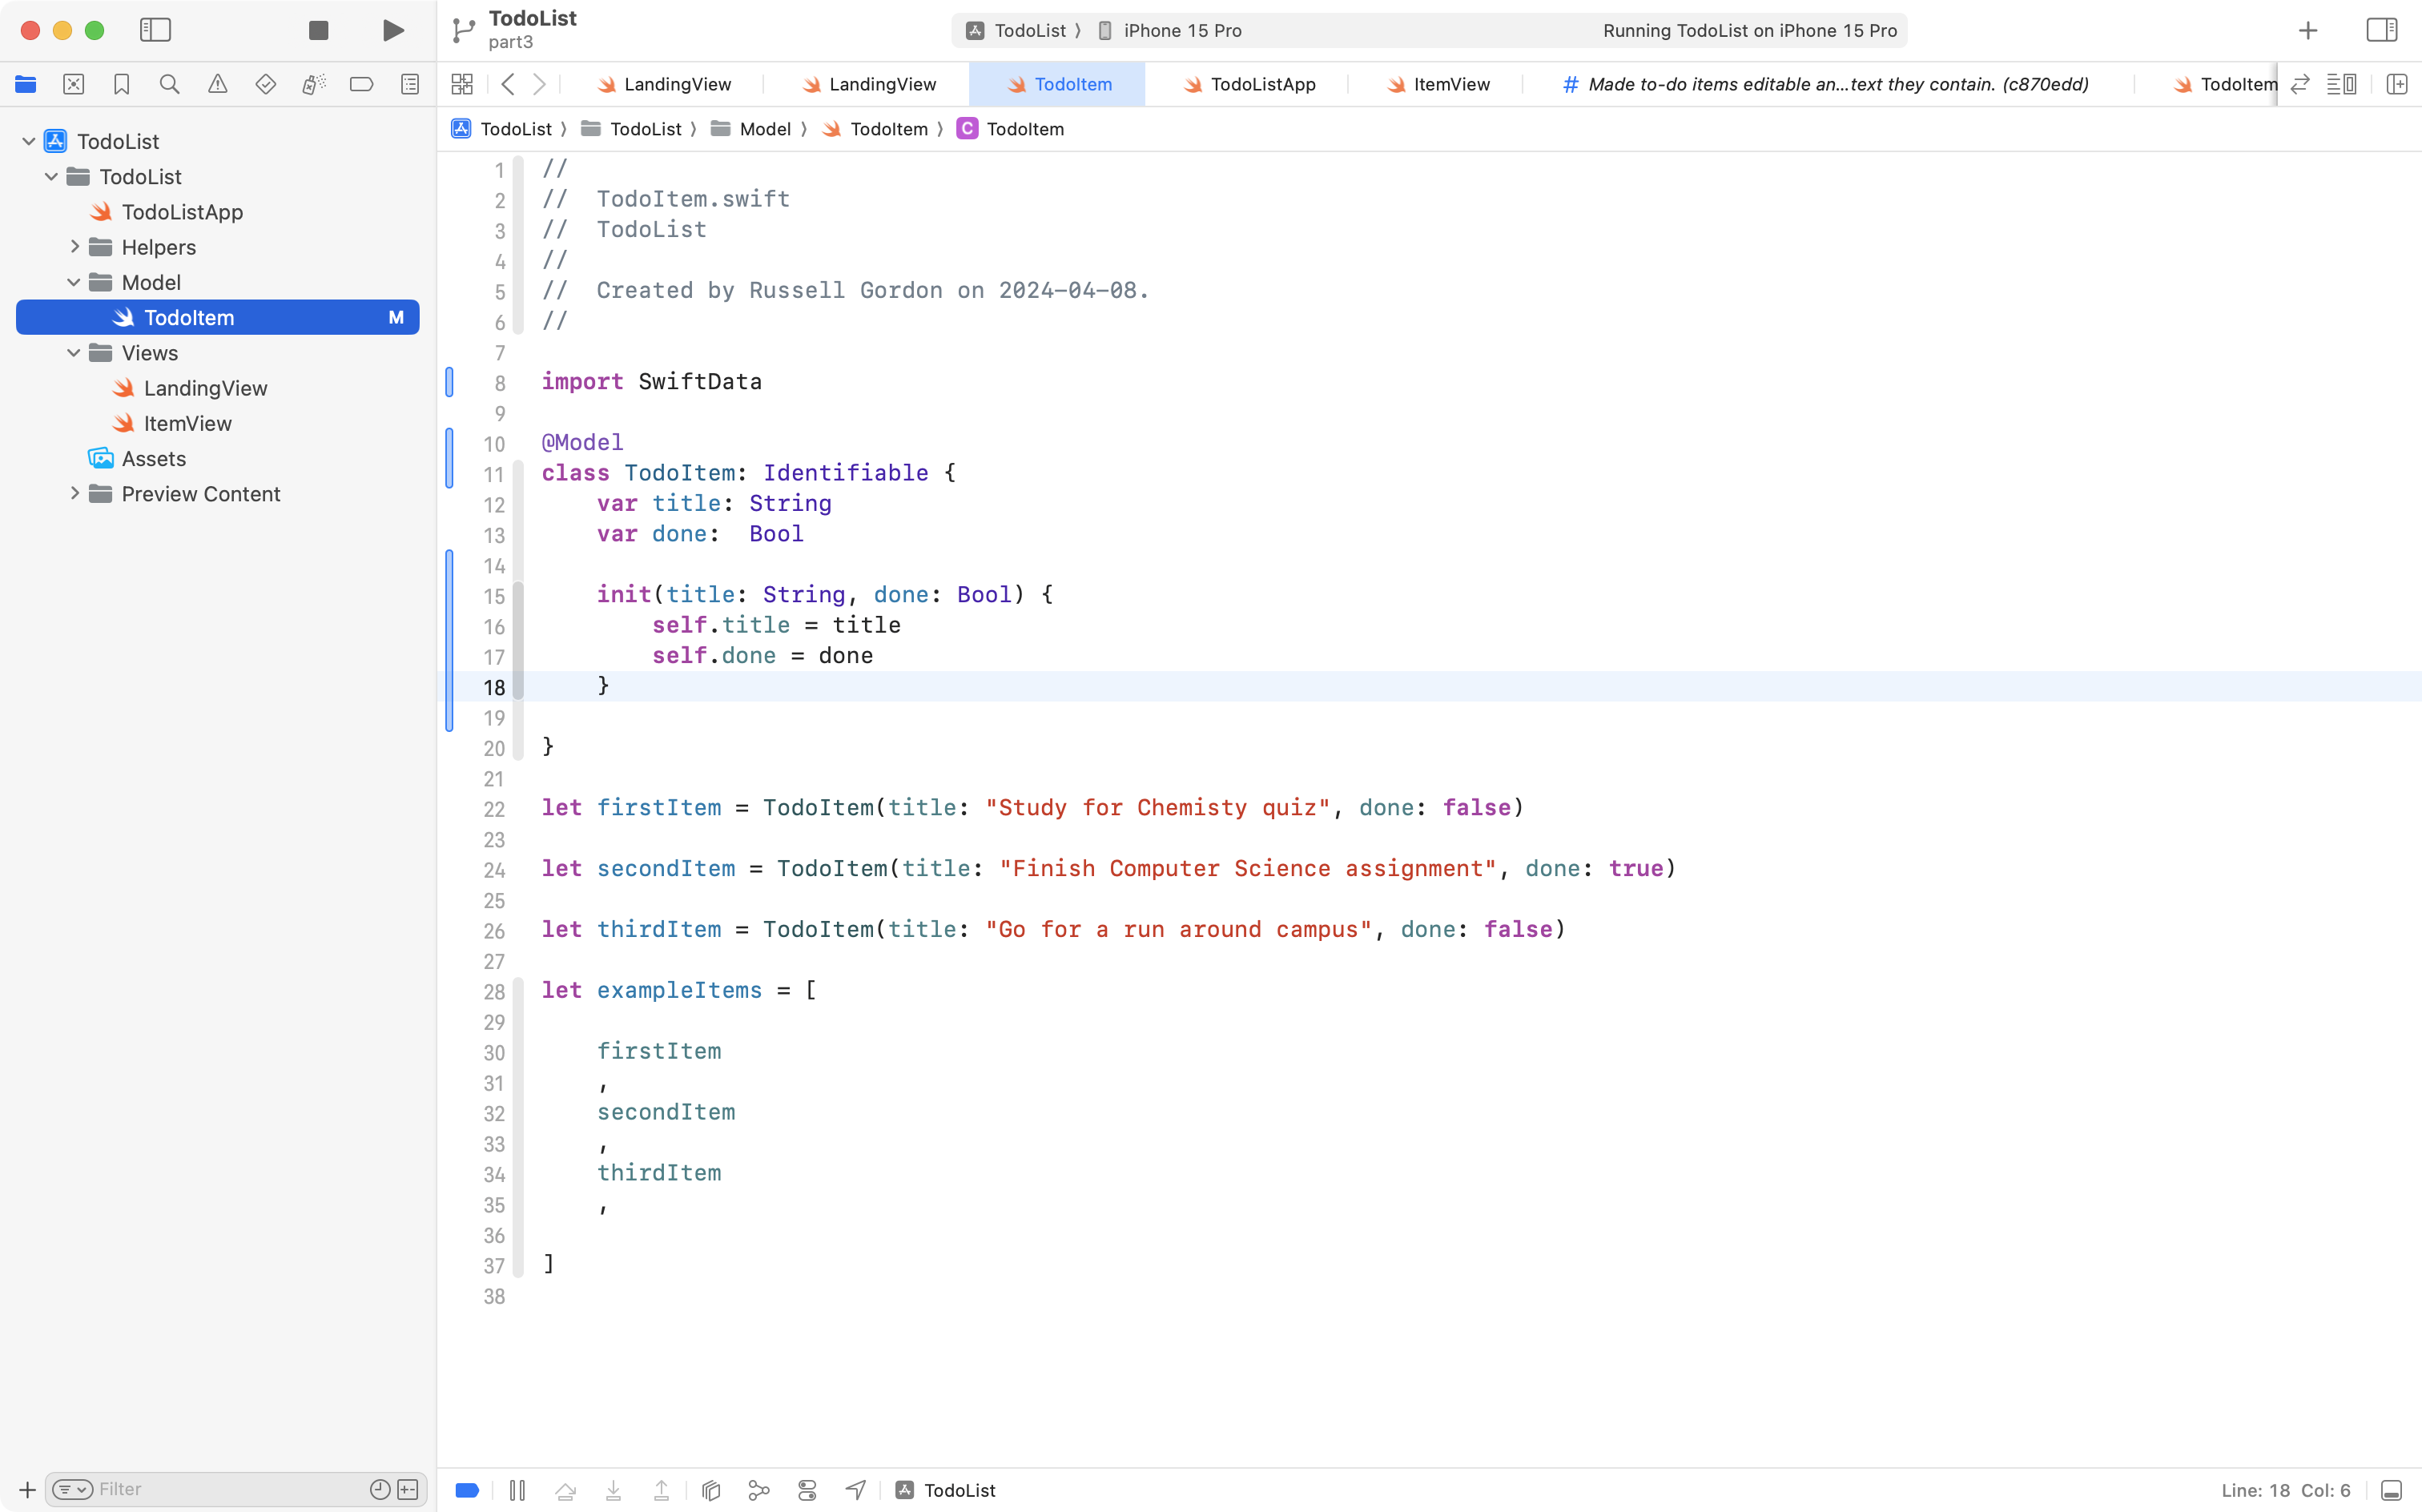
One of the nice things about SwiftData is that is automatically makes data types used with it conform to the Identifiable protocol.
So, we can remove the id stored property entirely, as SwiftData will create this behind the scenes on our behalf:
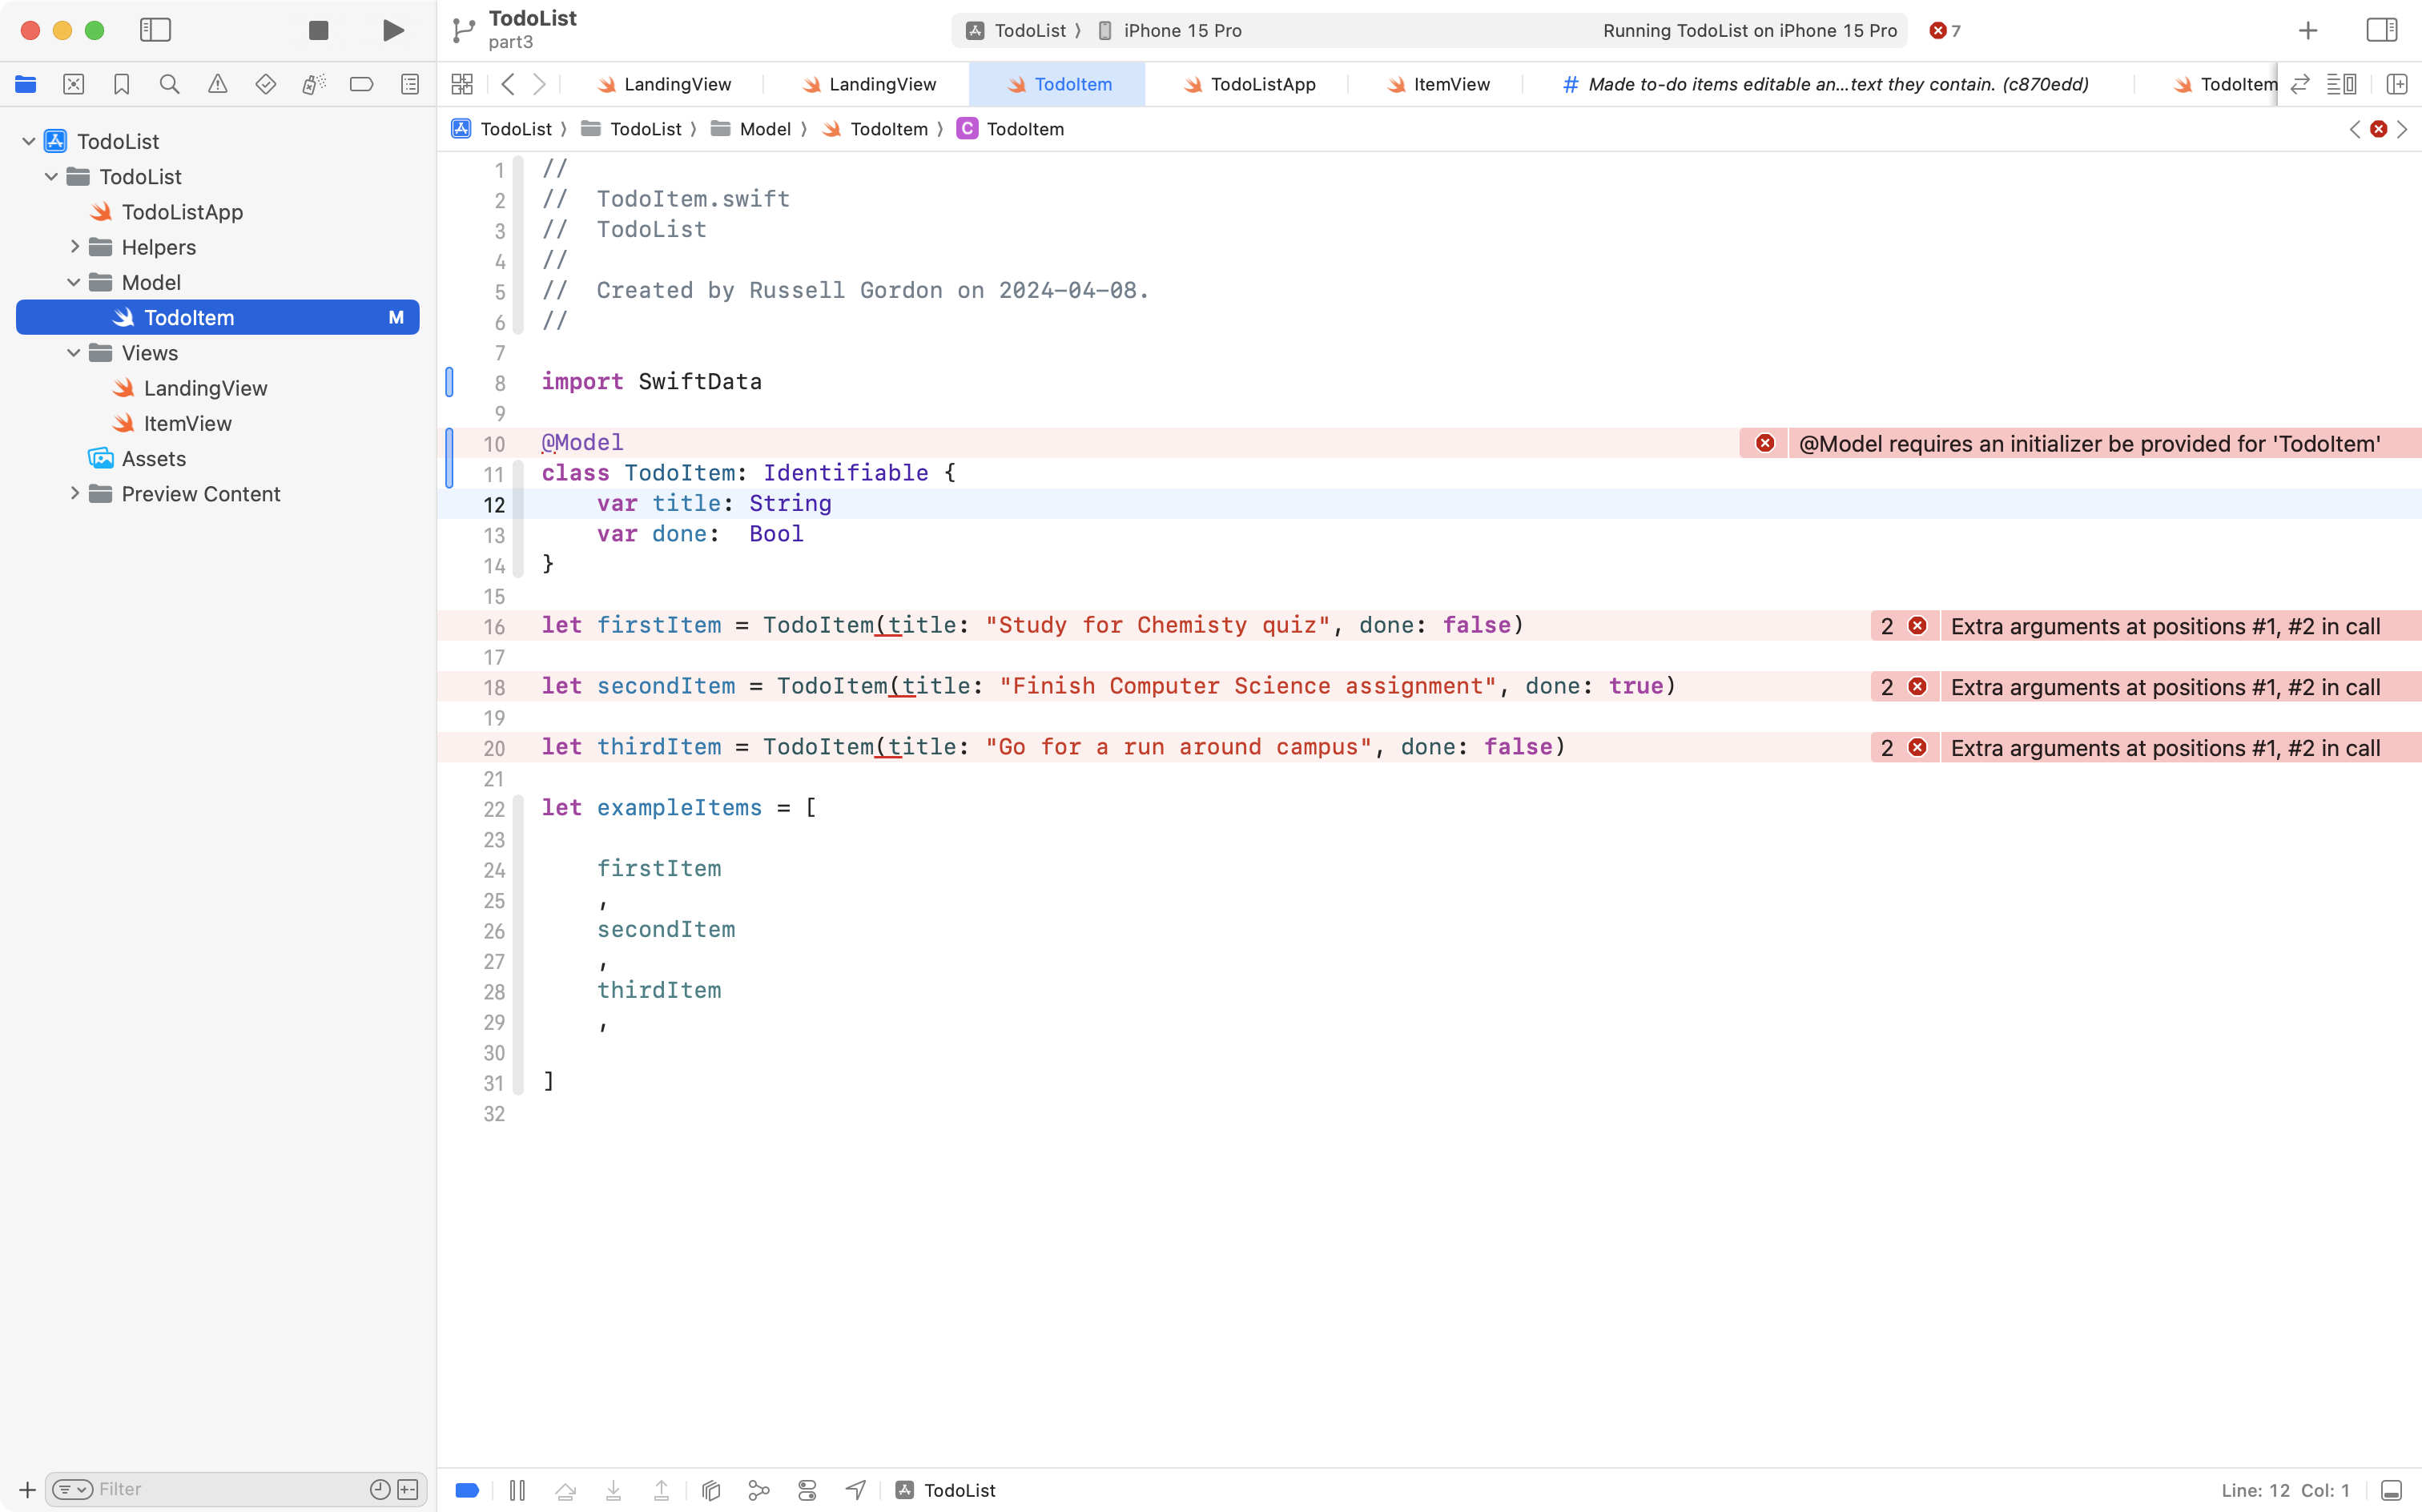
Finally, you can see that the Swift compiler really, really wants us to create an initializer for our TodoItem class.
So, place your cursor just after the done property, press Return a few times, and then start typing init.
Auto-complete should do the rest of the work for you, creating a basic initializer, which is all we need:

Ultimately, your code should look like this:
We are not done adding SwiftData support to the app, but this is a good time to commit your work.
Please do so now with this message:
Adjusted model for a to-do item to use the SwiftData framework.
That’s step 1 complete – adjusting the model.
Add the container
Next we set up the container.
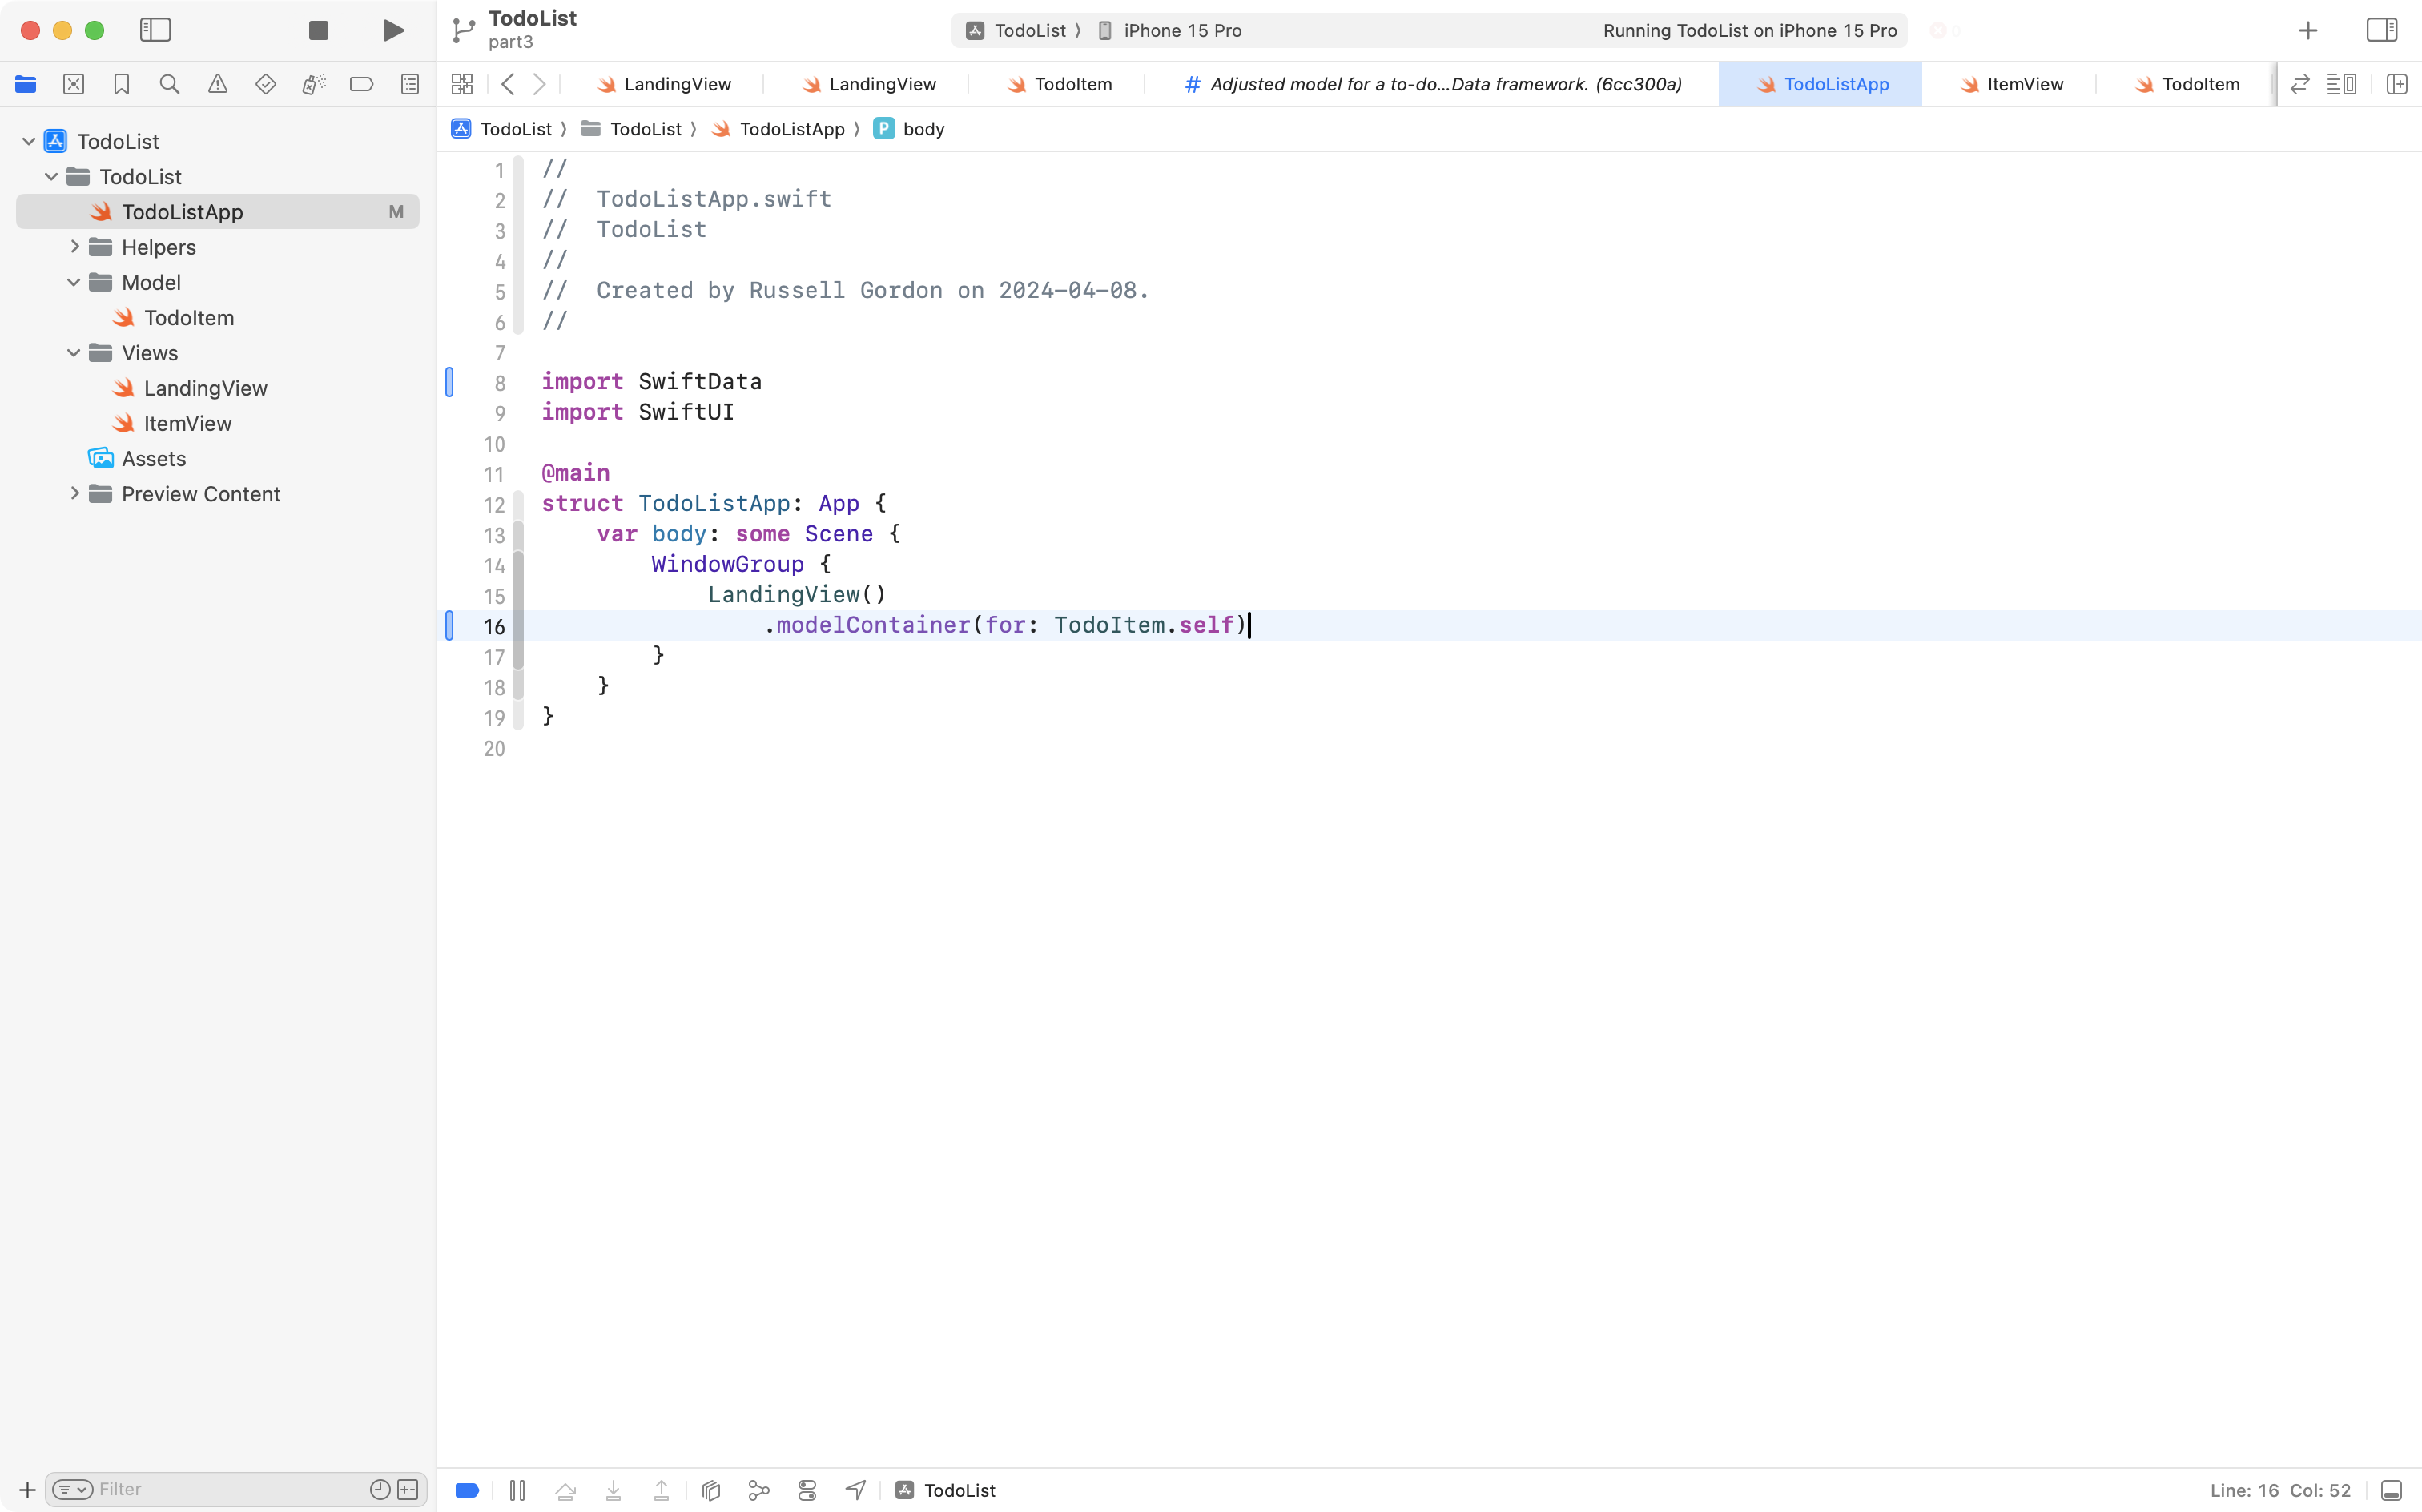
Navigate to the app entry point file – TodoListApp.
Import the SwiftData framework, then create a container for the TodoItem model by adding the code shown on line 16:
NOTE
Be prepared to see error messages often if you forget to add the SwiftData framework at first. It happens to Mr. Gordon frequently! 😅
Quoting from Mark Moeyken’s book again – here is what that .modelContainer view modifier is telling SwiftData to do:
- Create our permanent storage – the database file itself – if it is not already there.
- Create this model (
TodoItem) in our permanent storage – this will be a database table – it is created if not already present. - Load the model into the model context (more on this later).
- Add the model context to the environment of the view (or window group) it is attached to.
This is another important step, so please commit and push your work with this message:
Added model container to the app entry point.
Disable previews temporarily
Handling previews (the side panel where a single view within an app can be seen) requires a bit of extra work with SwiftData.
For now, we will comment out the code that shows previews.
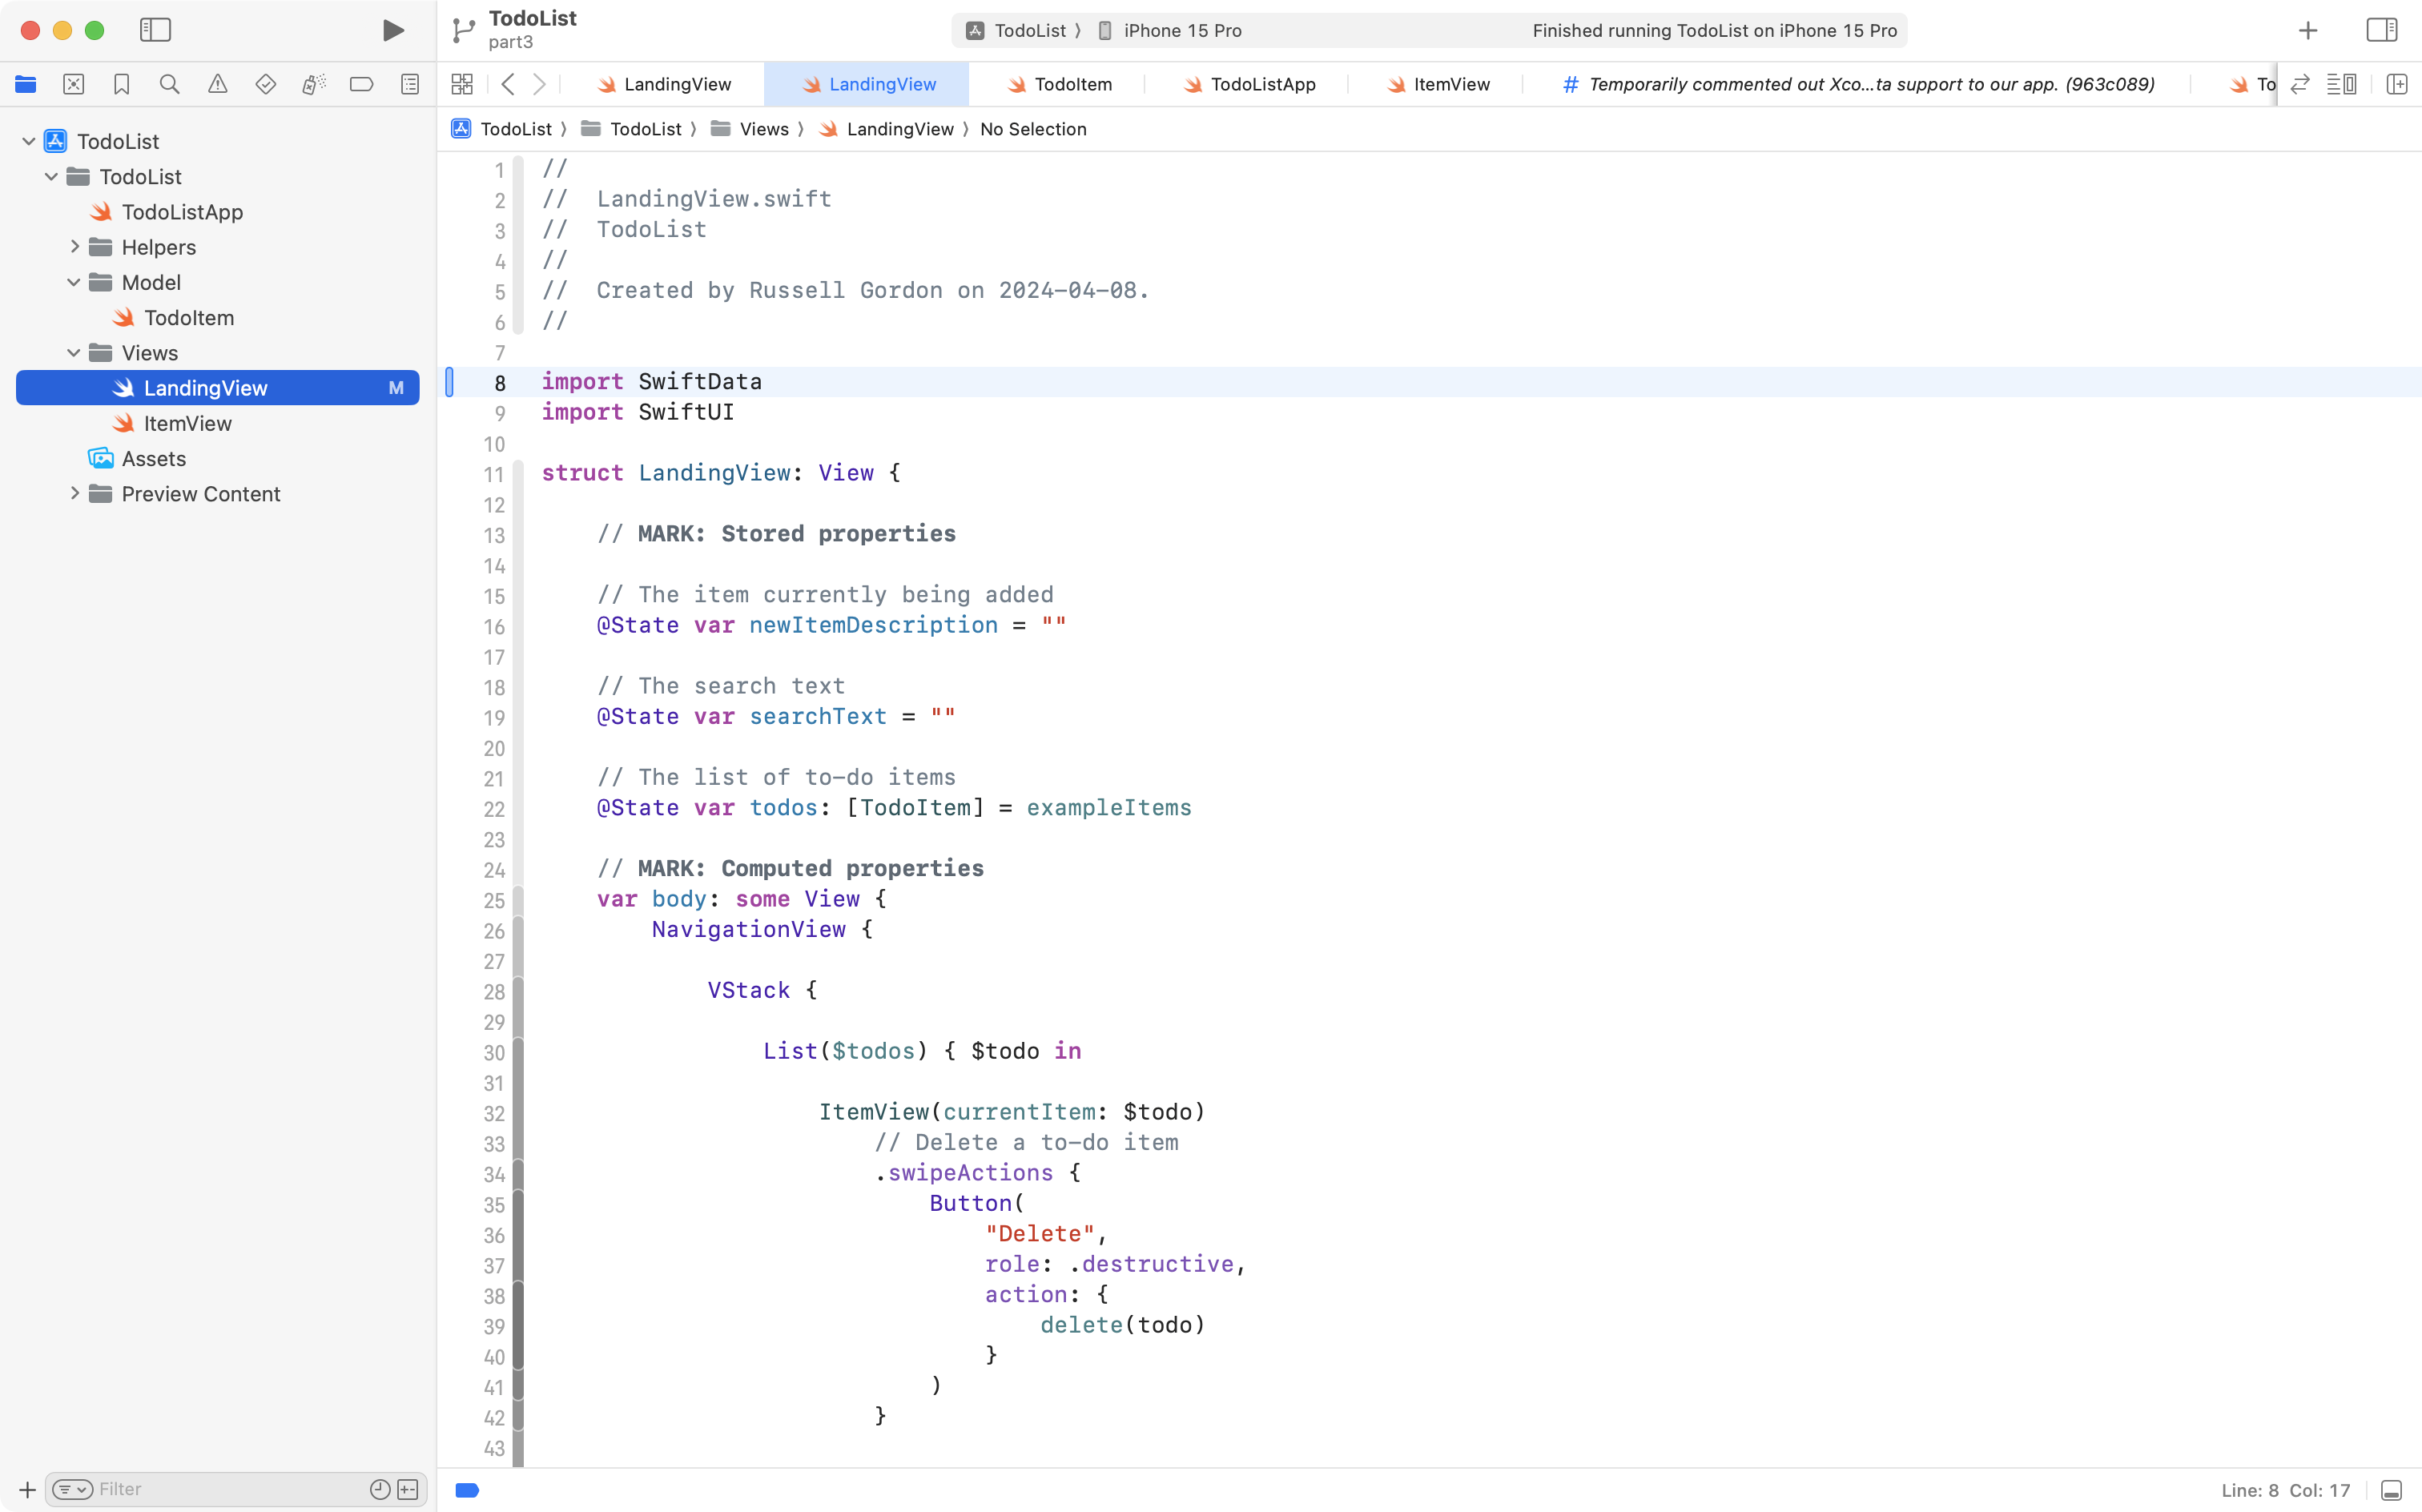
Navigate to LandingView and comment out that code:
Then do the same for ItemView:
We don’t want to mix these changes up with the changes we’re about to make, so please commit and push these changes now:
Temporarily commented out Xcode Previews while adding SwiftData support to our app.
Add the context
We need the context to do CRUD – create, read, update, or delete data.
Any view that needs to perform those operations needs access to the context.
We access the context through the environment of our app:
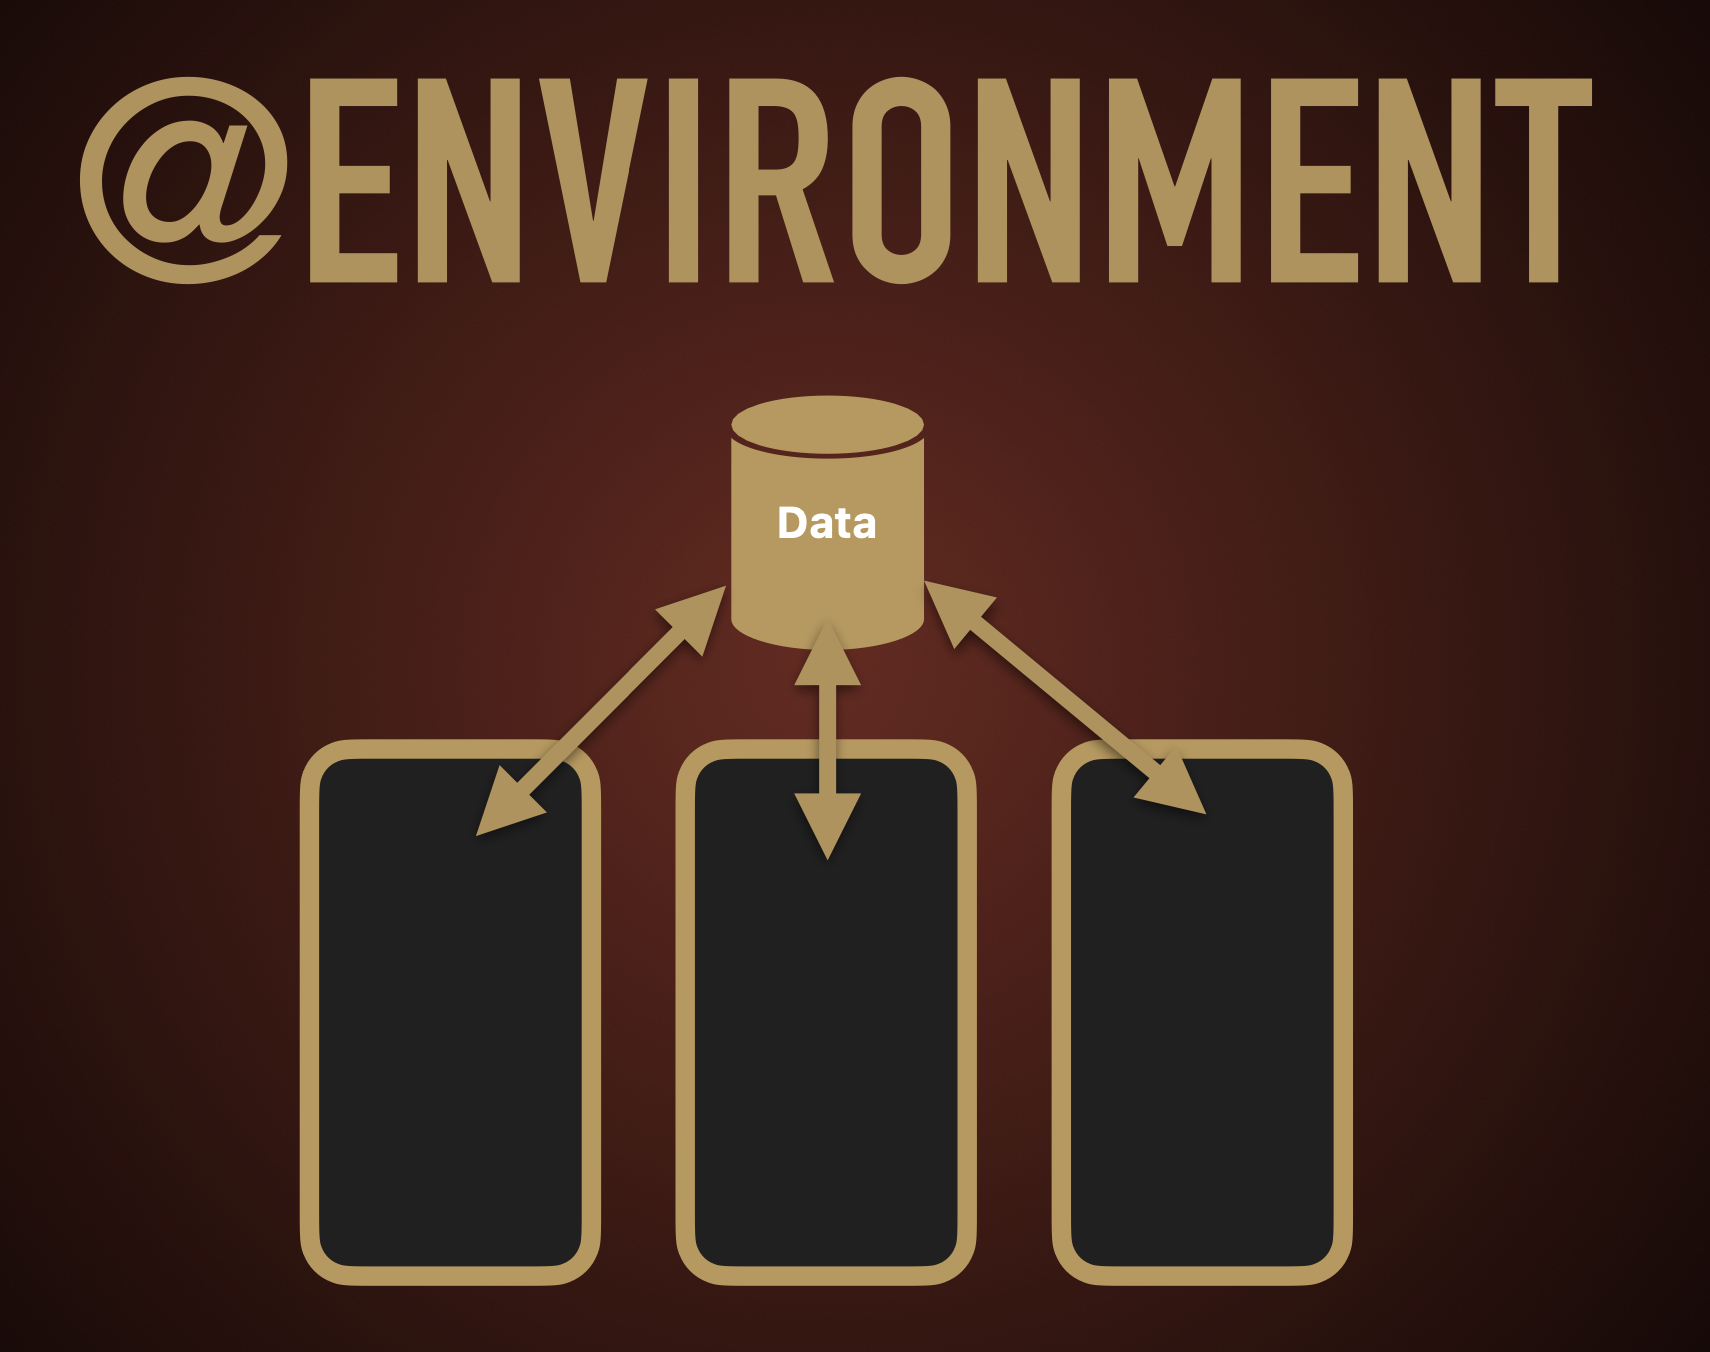
What is this mysterious environment, though?
The environment is a small, special section of variables and constants managed by SwiftUI that make it easy to share information between views.
In this case, a moment ago we created the container at the app entry point, and it will handle these four steps, as described earlier:
- Create our permanent storage – the database file itself – if it is not already there.
- Create this model (
TodoItem) in our permanent storage – this will be a database table – it is created if not already present. - Load the model into the model context (more on this later).
- Add the model context to the environment of the view (or window group) it is attached to.
Step 3 was to create the context – which we now need – so here is how to get at it from LandingView.
First, remember to import the SwiftData framework:
Then, in the stored properties section, create a new property named modelContext, like this:
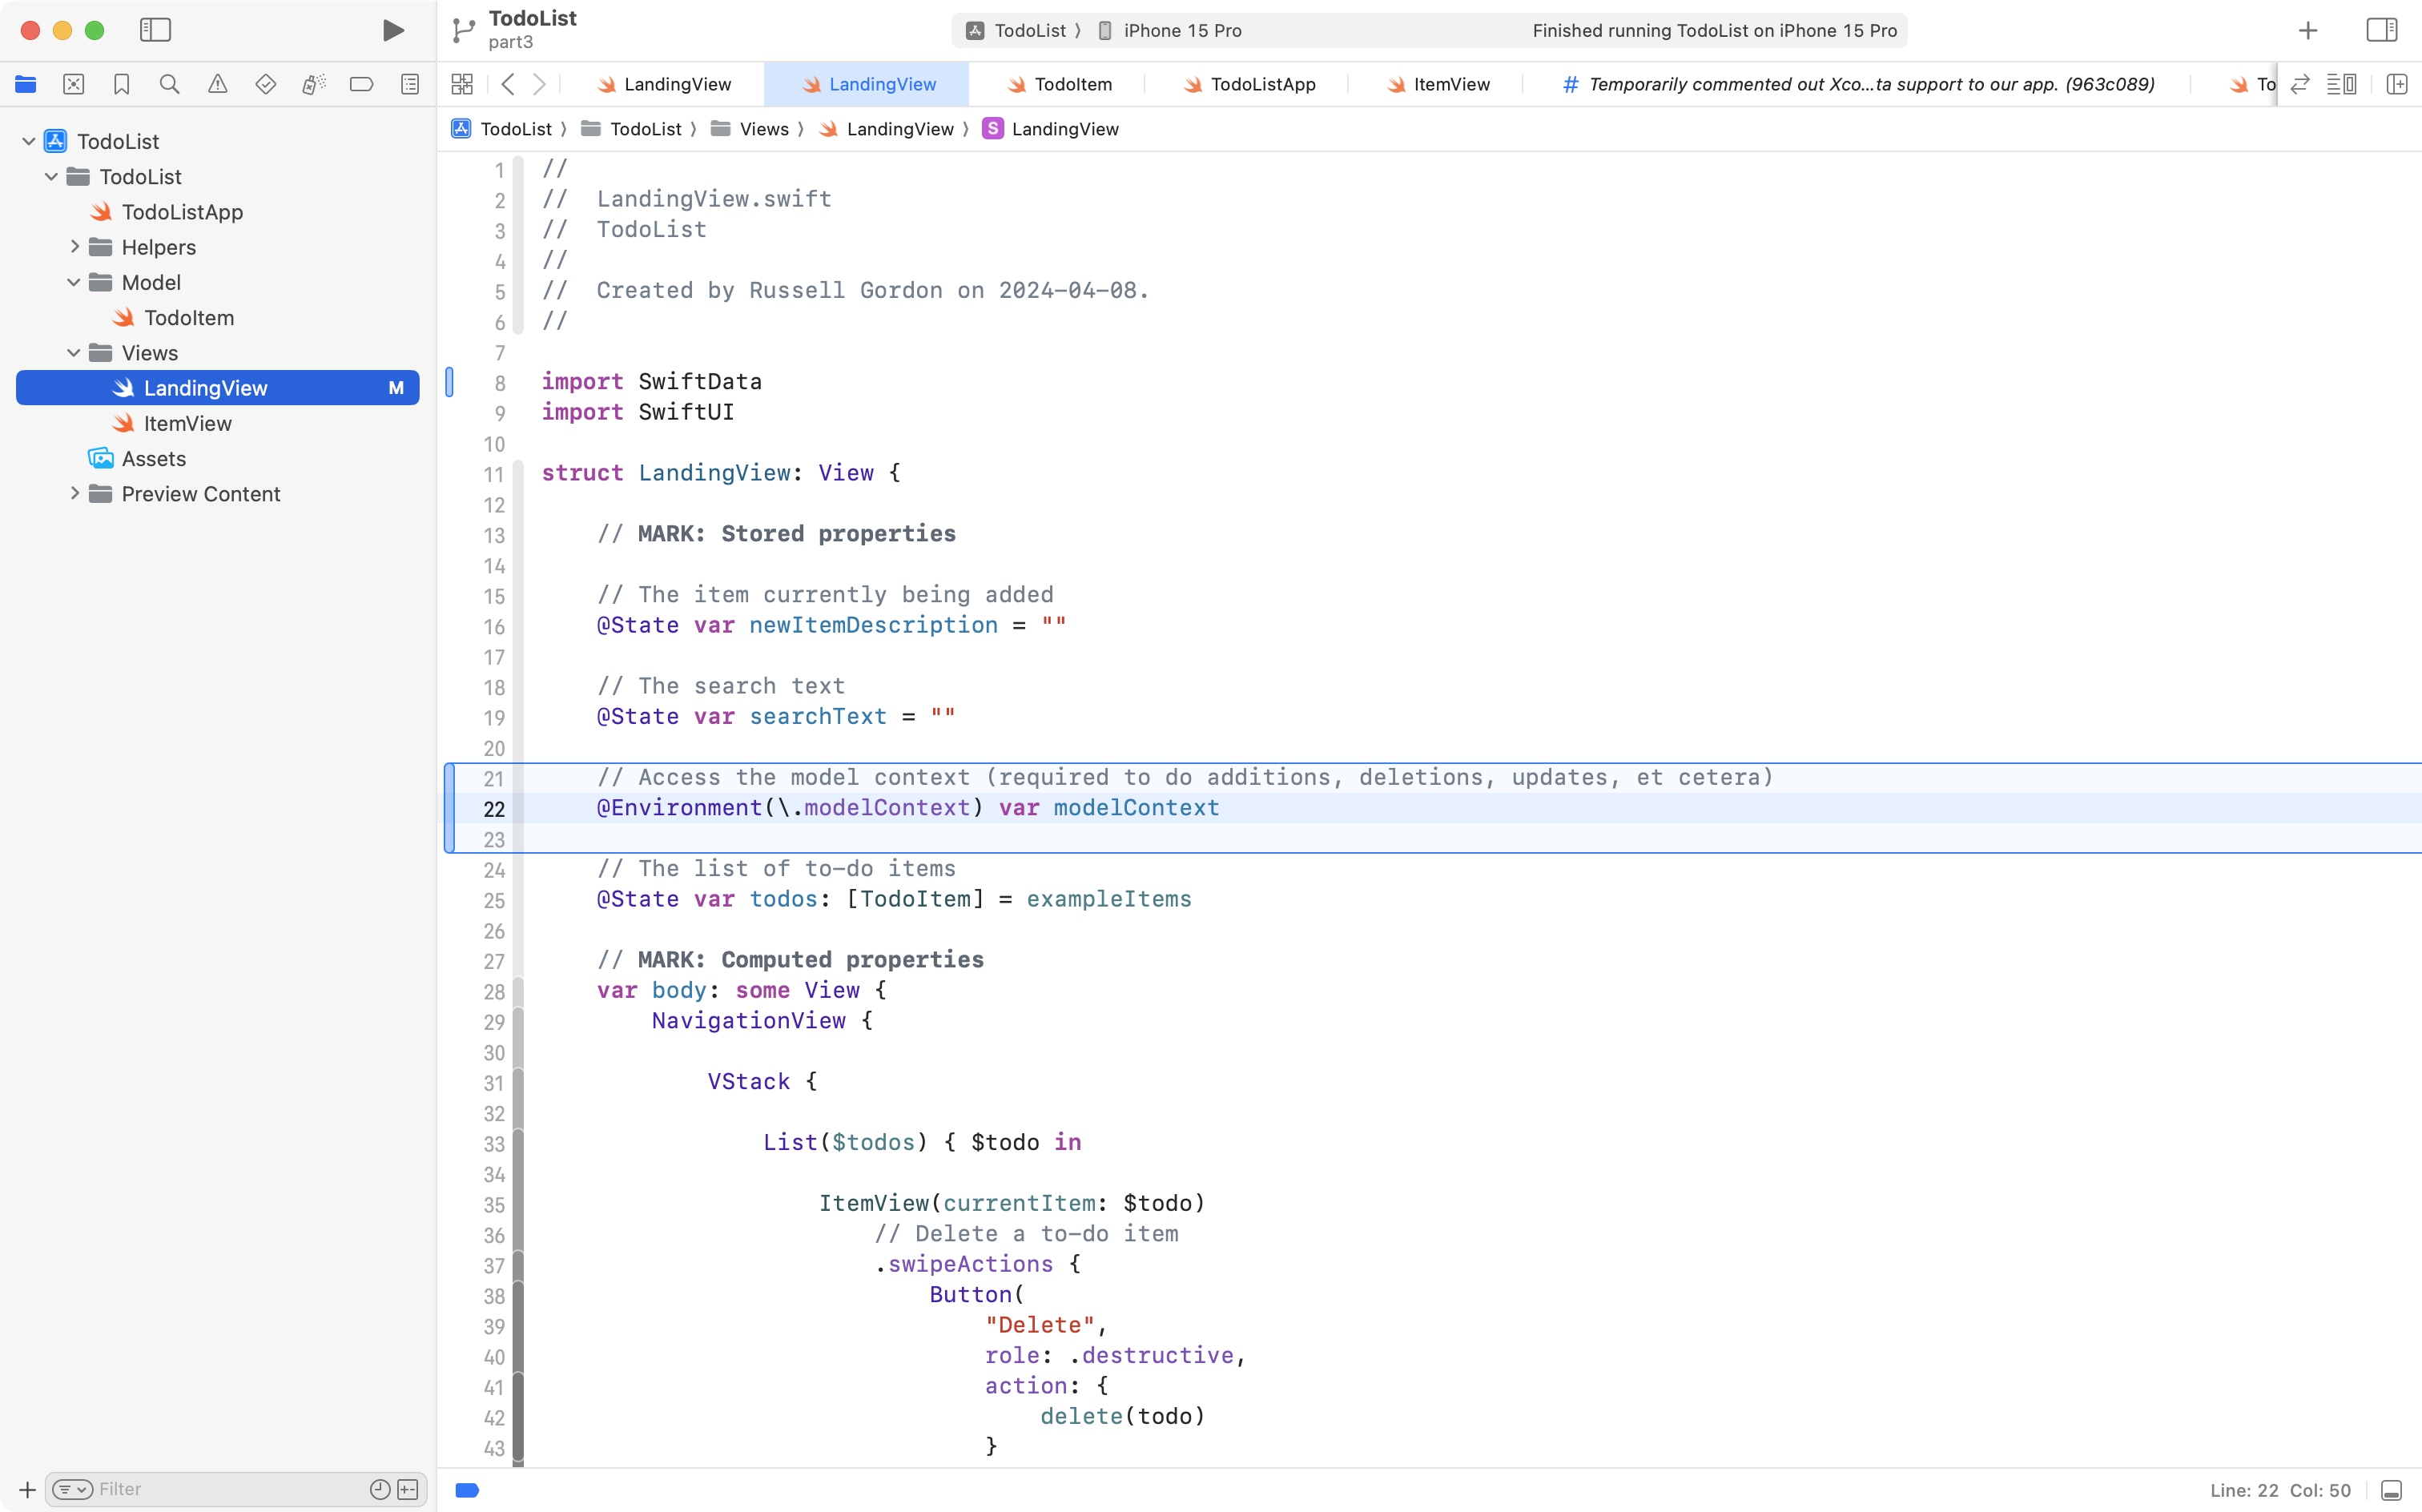
To keep these changes separated from the next step, please commit and push your work now, with this message:
Added the model context to the landing view so we are ready to perform creations, deletions, modifications, etc.
Adjust view to run a query
On line 25 we currently create the source of truth – the single place where our list of to-do items exists:
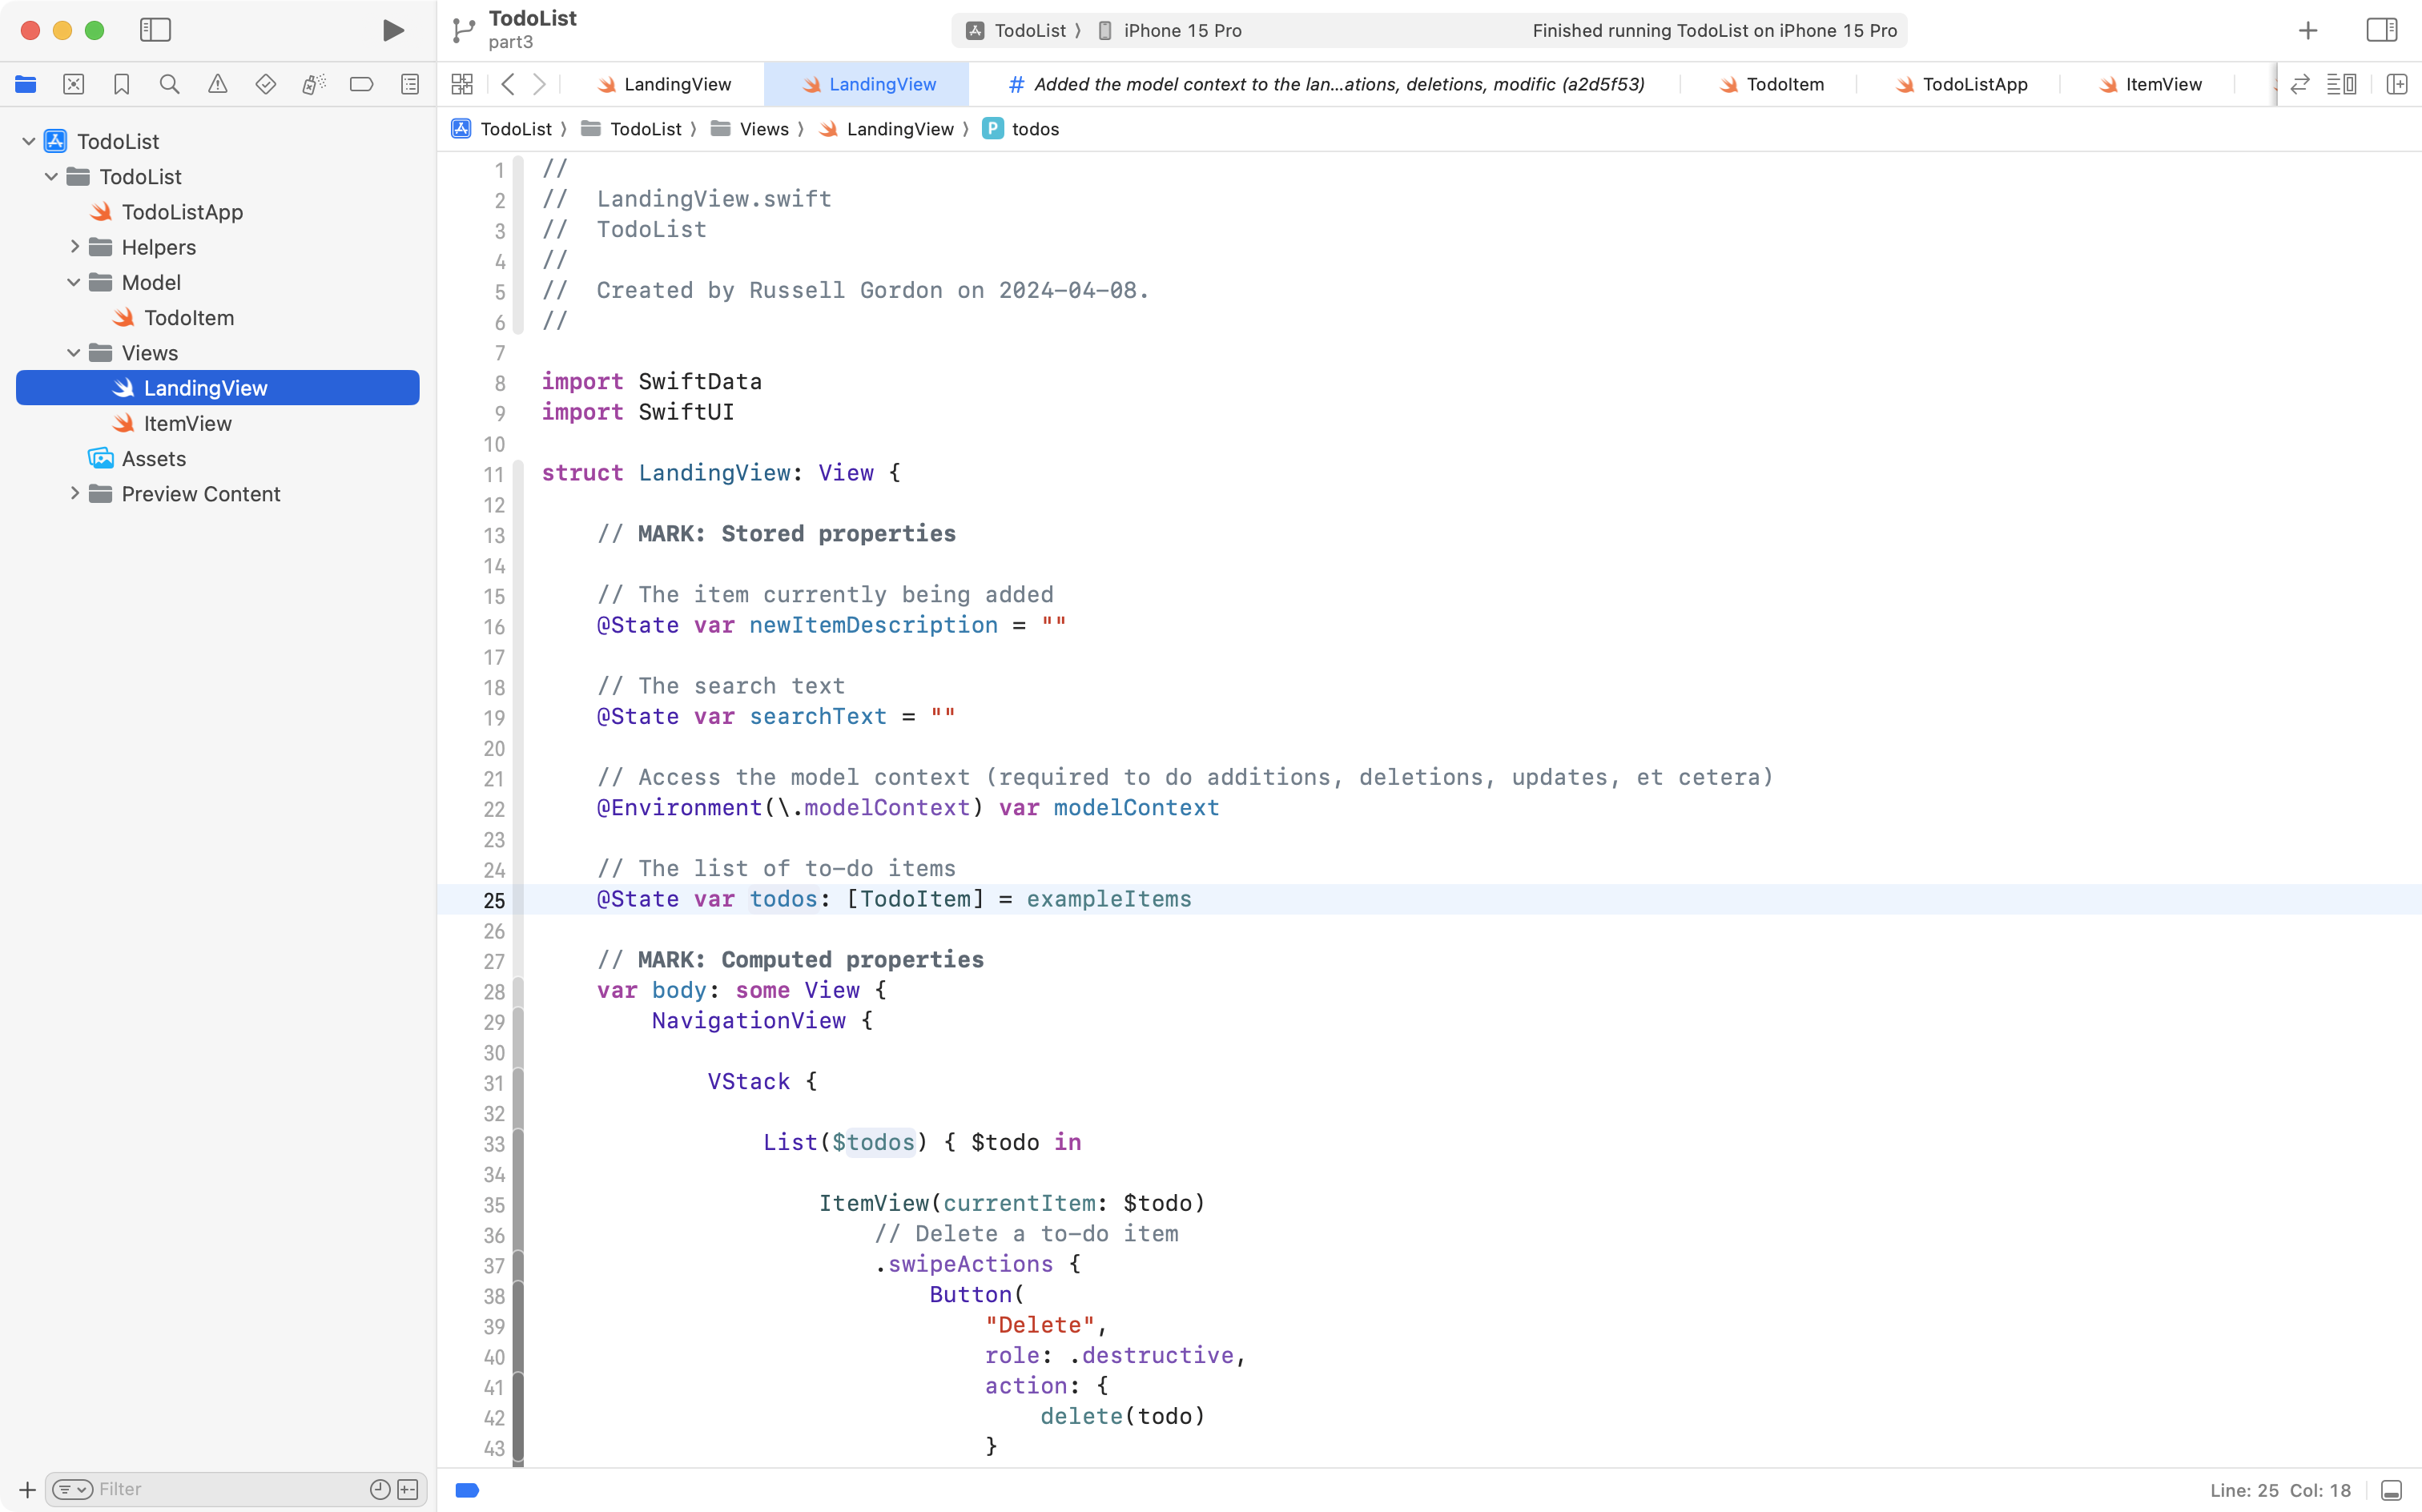
We are now going to change that, so that instead, the to-do items are stored in the database that is managed by SwiftData.
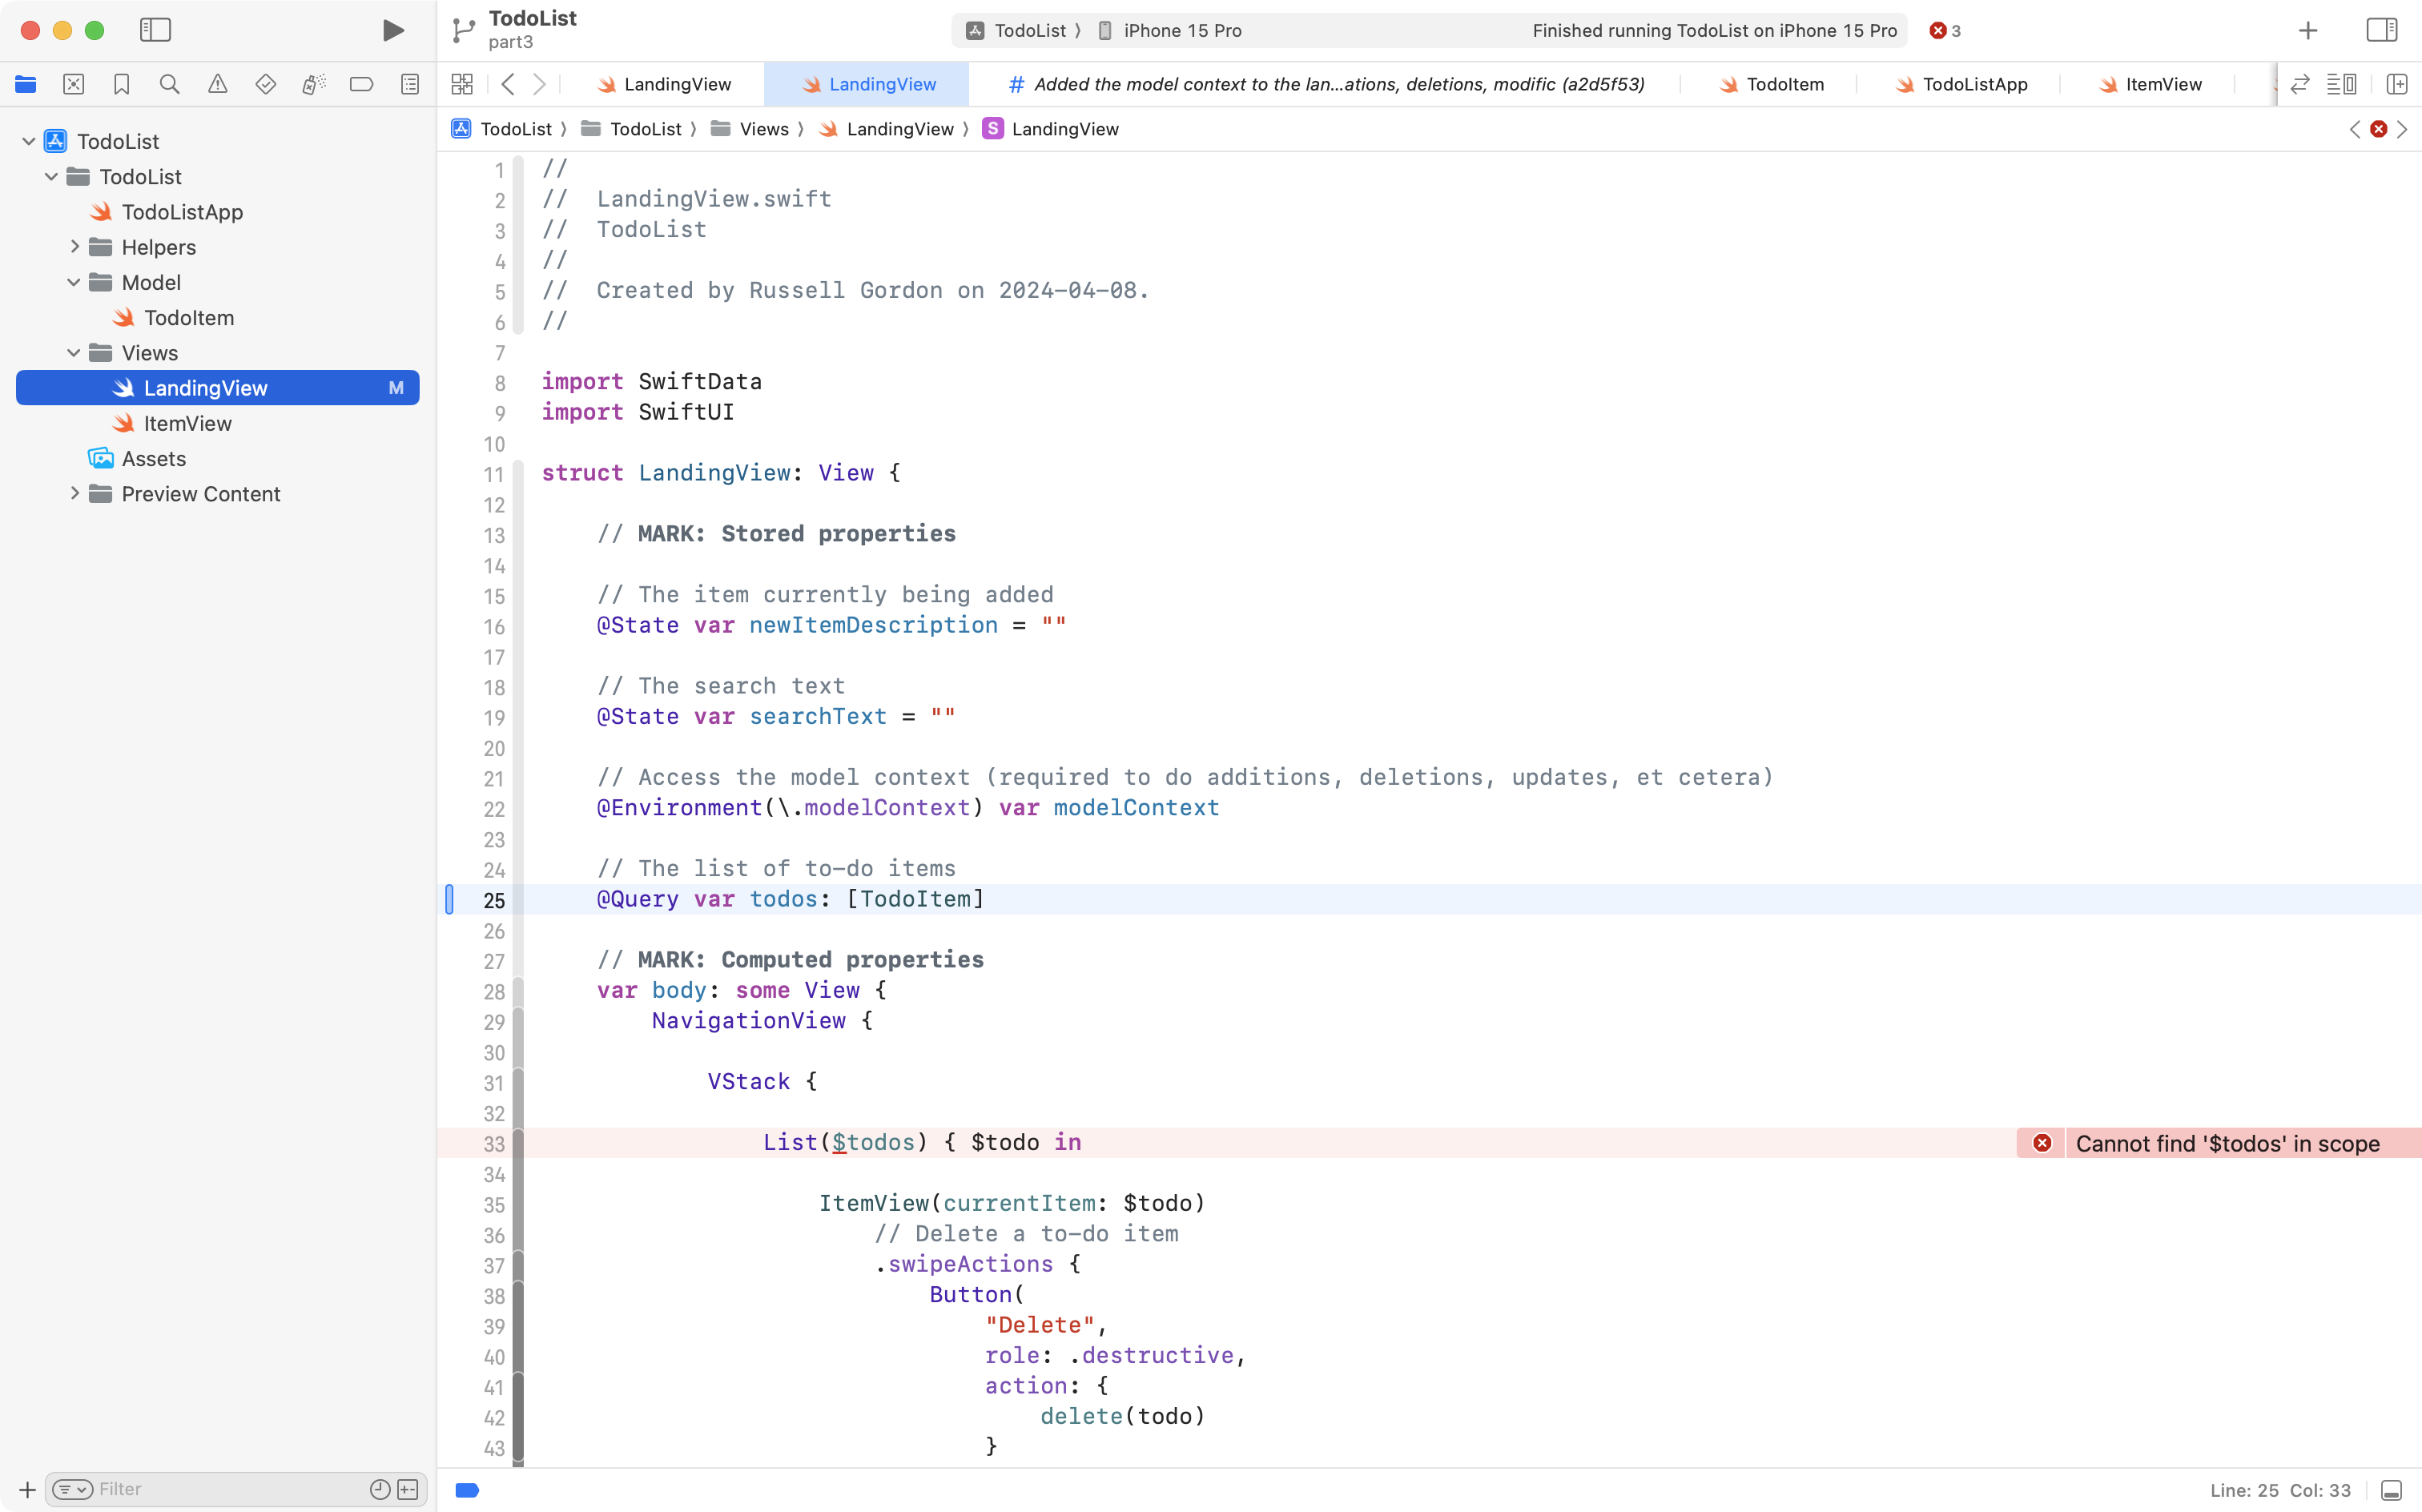
Replace that code on line 25 with this instead:
@Query var todos: [TodoItem]… like this:
That tells SwiftData to run a query that is equivalent to the following:
SELECT *
FROM TodoItem
So, imagine that we’d created a database file ourselves.
We then created a database table named TodoItem.
The code:
@Query var todos: [TodoItem]… essentially runs the SELECT query and places all the to-do items found into the todos array.
Next, we need to change how the List structure iterates over that array.
SwiftData automatically creates references to each to-do item when a List iterates over an array that is populated by SwiftData.
We do not need to manually create these bindings.
So, we can change to code on line 33 from this:
List($todos) { $todo in… back to this:
List(todos) { todo in… as shown:
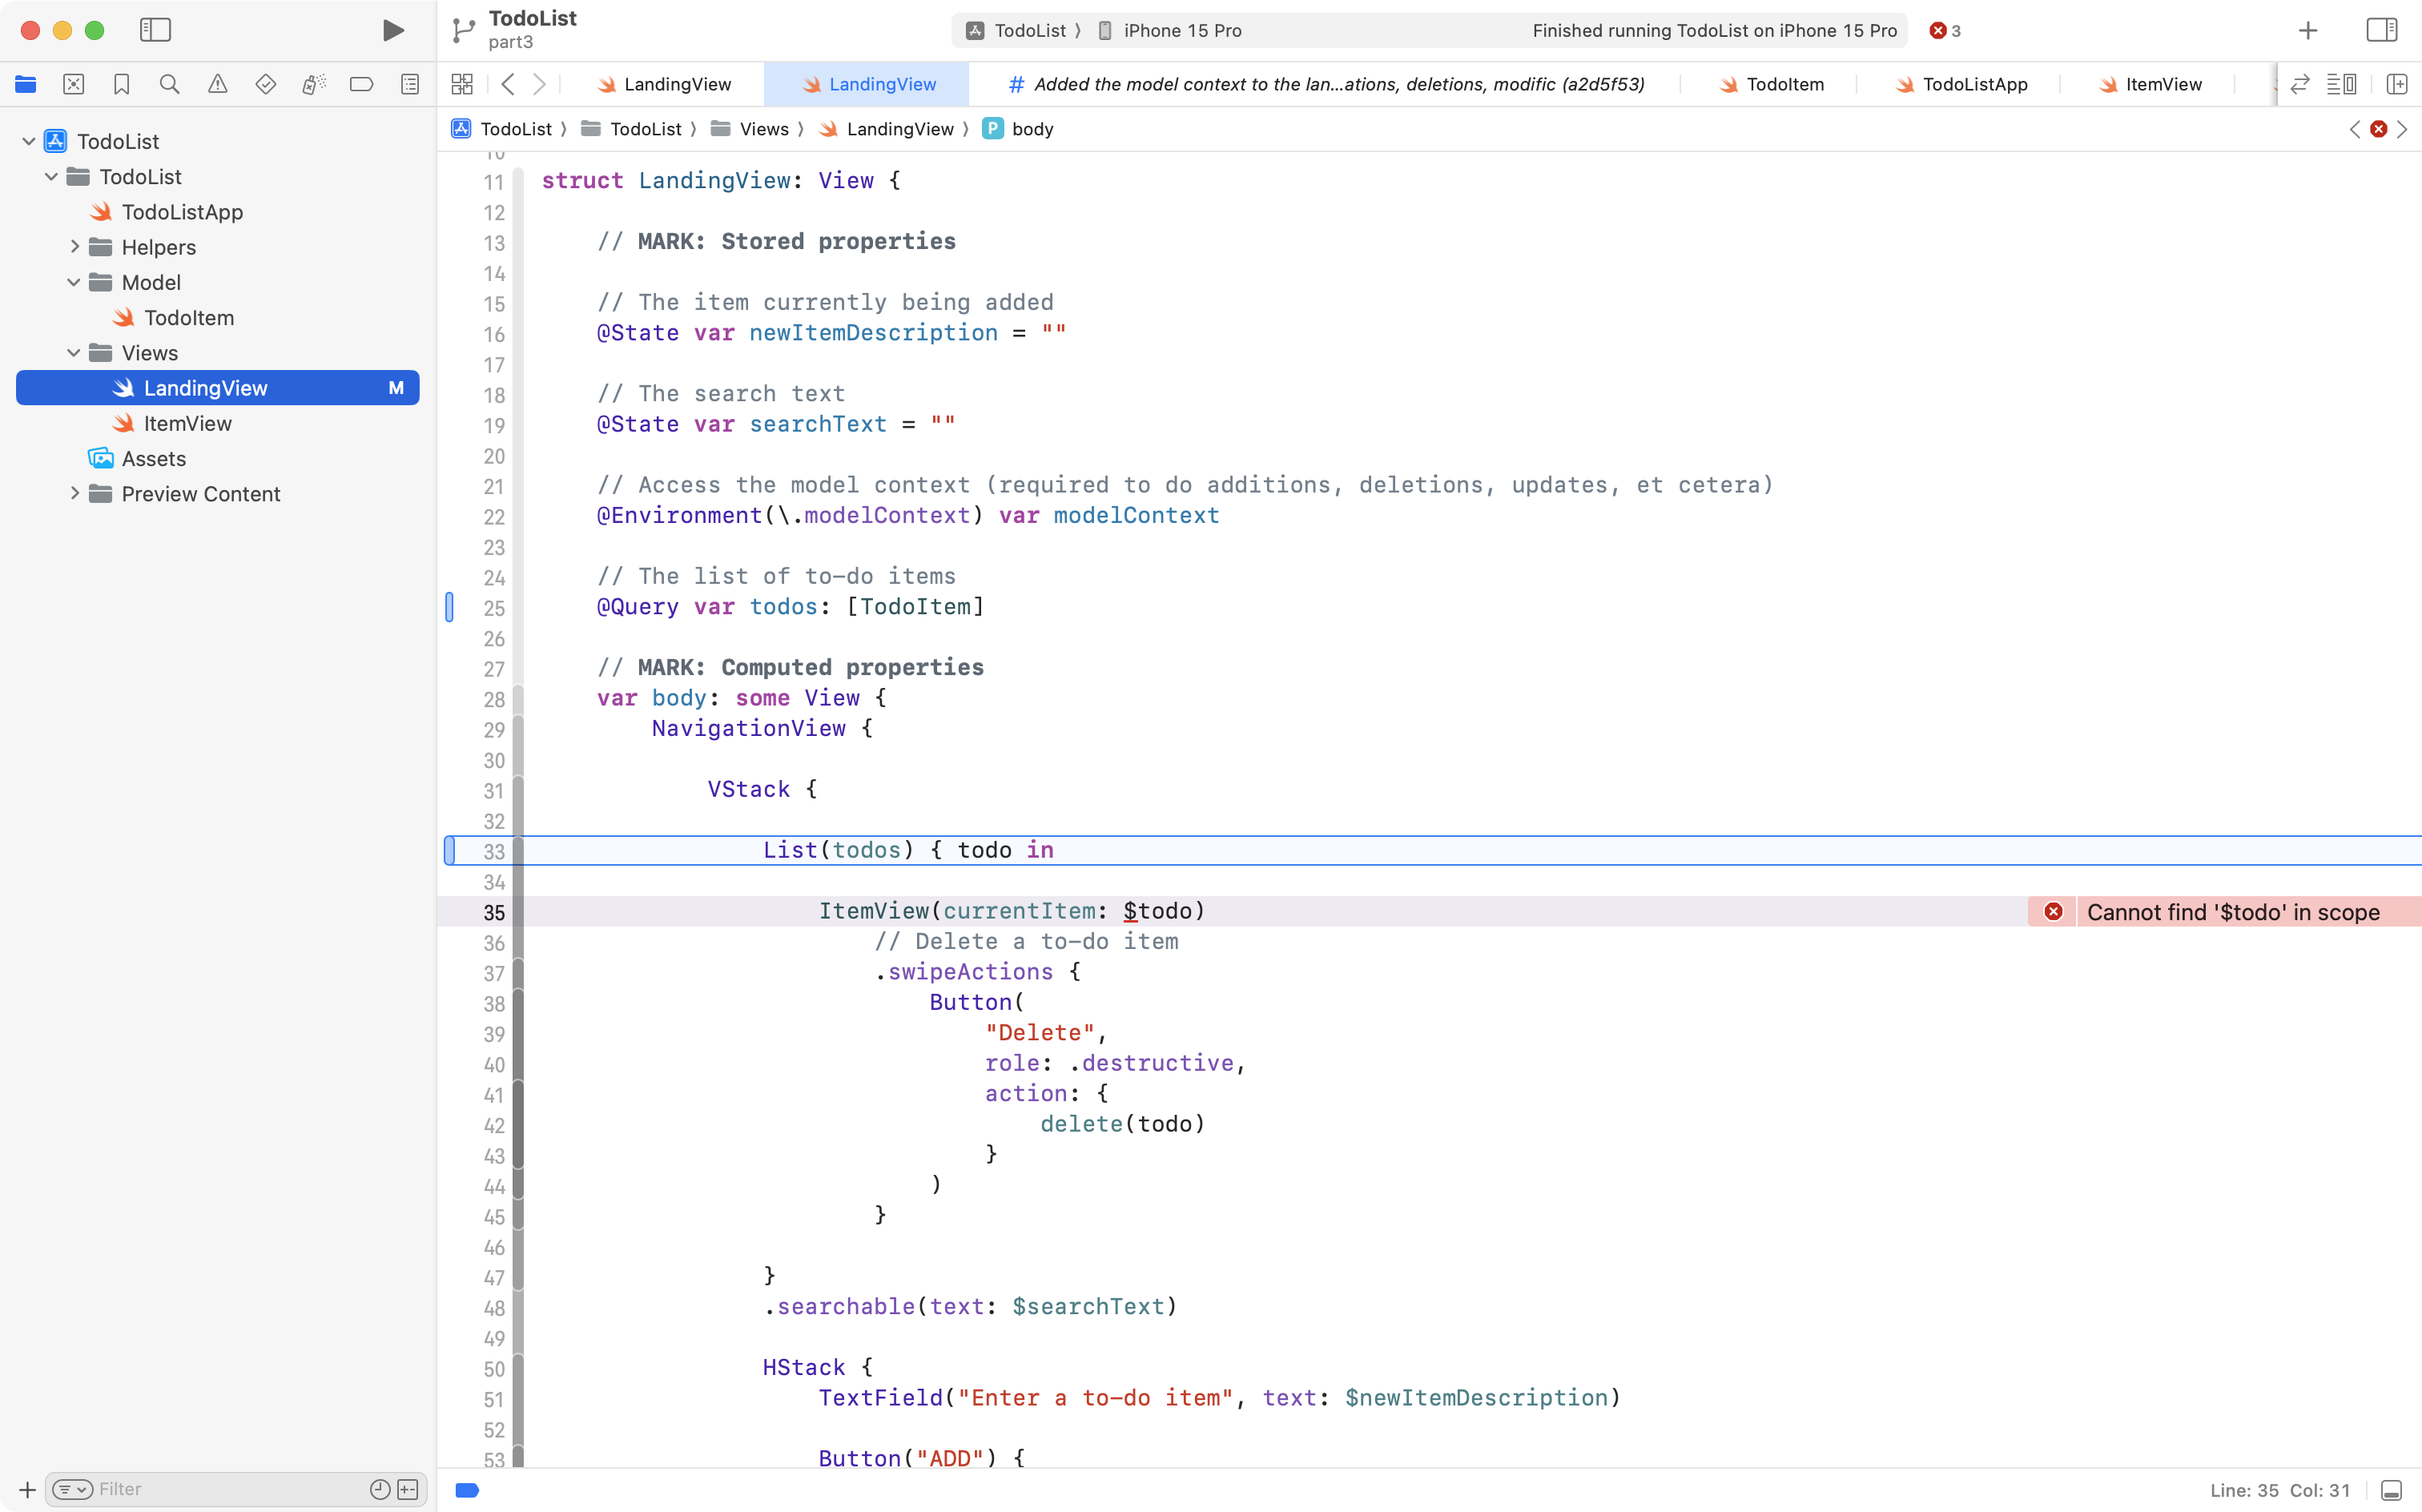
Next, we must adjust line 35, to simply use the todo reference, instead of the $todo binding:
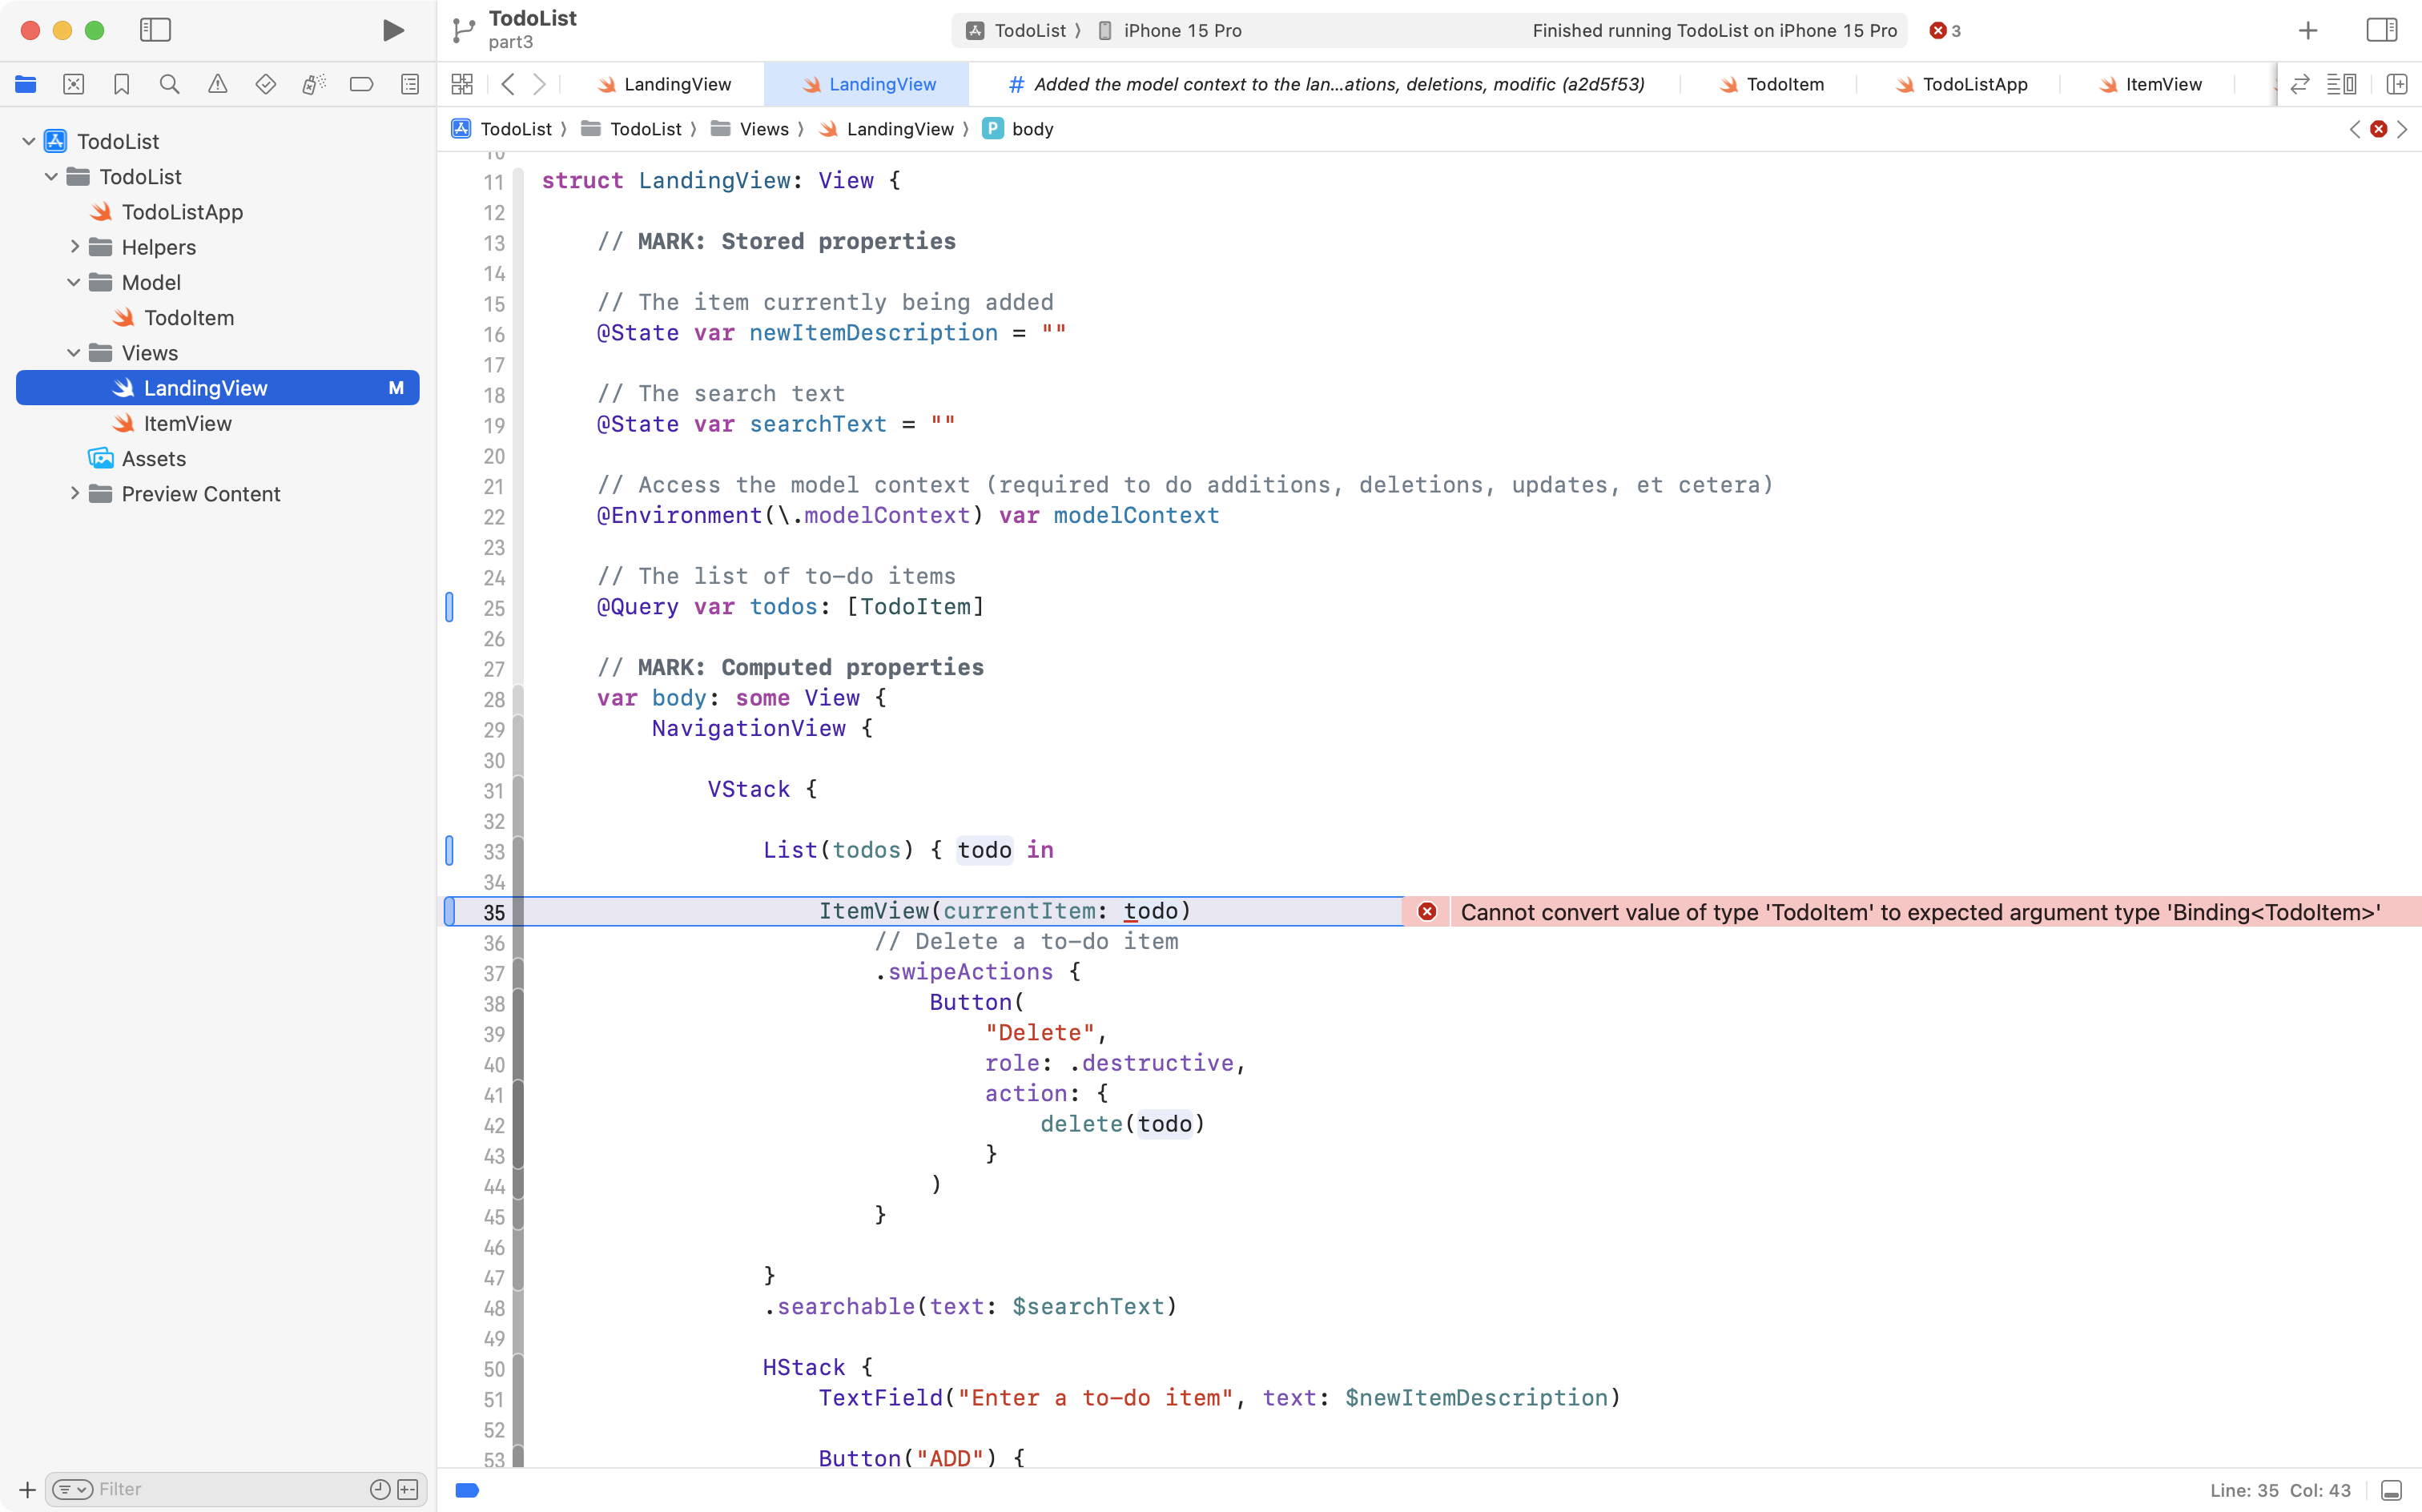
You can see that we have an error, as ItemView is expecting us to provide an argument that is a regular binding, like we had before.
So, navigate to ItemView, and change this line of code on line 12 from this:
@Binding var currentItem: TodoItem… to this:
@Bindable var currentItem: TodoItem… like this:
So, what is the difference between @Binding and @Bindable?
When you are storing information in-memory only, and the source of truth for the data on a parent view was marked with @State, as our todos array used to be:
@State var todos: [TodoItem] = exampleItems… use @Binding to connect to the source of truth from a child, or helper, view.
When you are storing information using SwiftData, and the source of truth for the data comes from a query on a parent view:
@Query var todos: [TodoItem]… use @Bindable to connect to the source of truth from a child, or helper, view.
We are almost done.
Recall that we need to use the model context to perform CRUD operations – create, read, update, or delete data.
Navigate back to LandingView, and scroll down to the createToDo function:
We will fix line 78 by changing the code from:
// Append to the array
todos.append(todo)
… to:
// Use the model context to insert the new to-do
modelContext.insert(todo)
… like this:
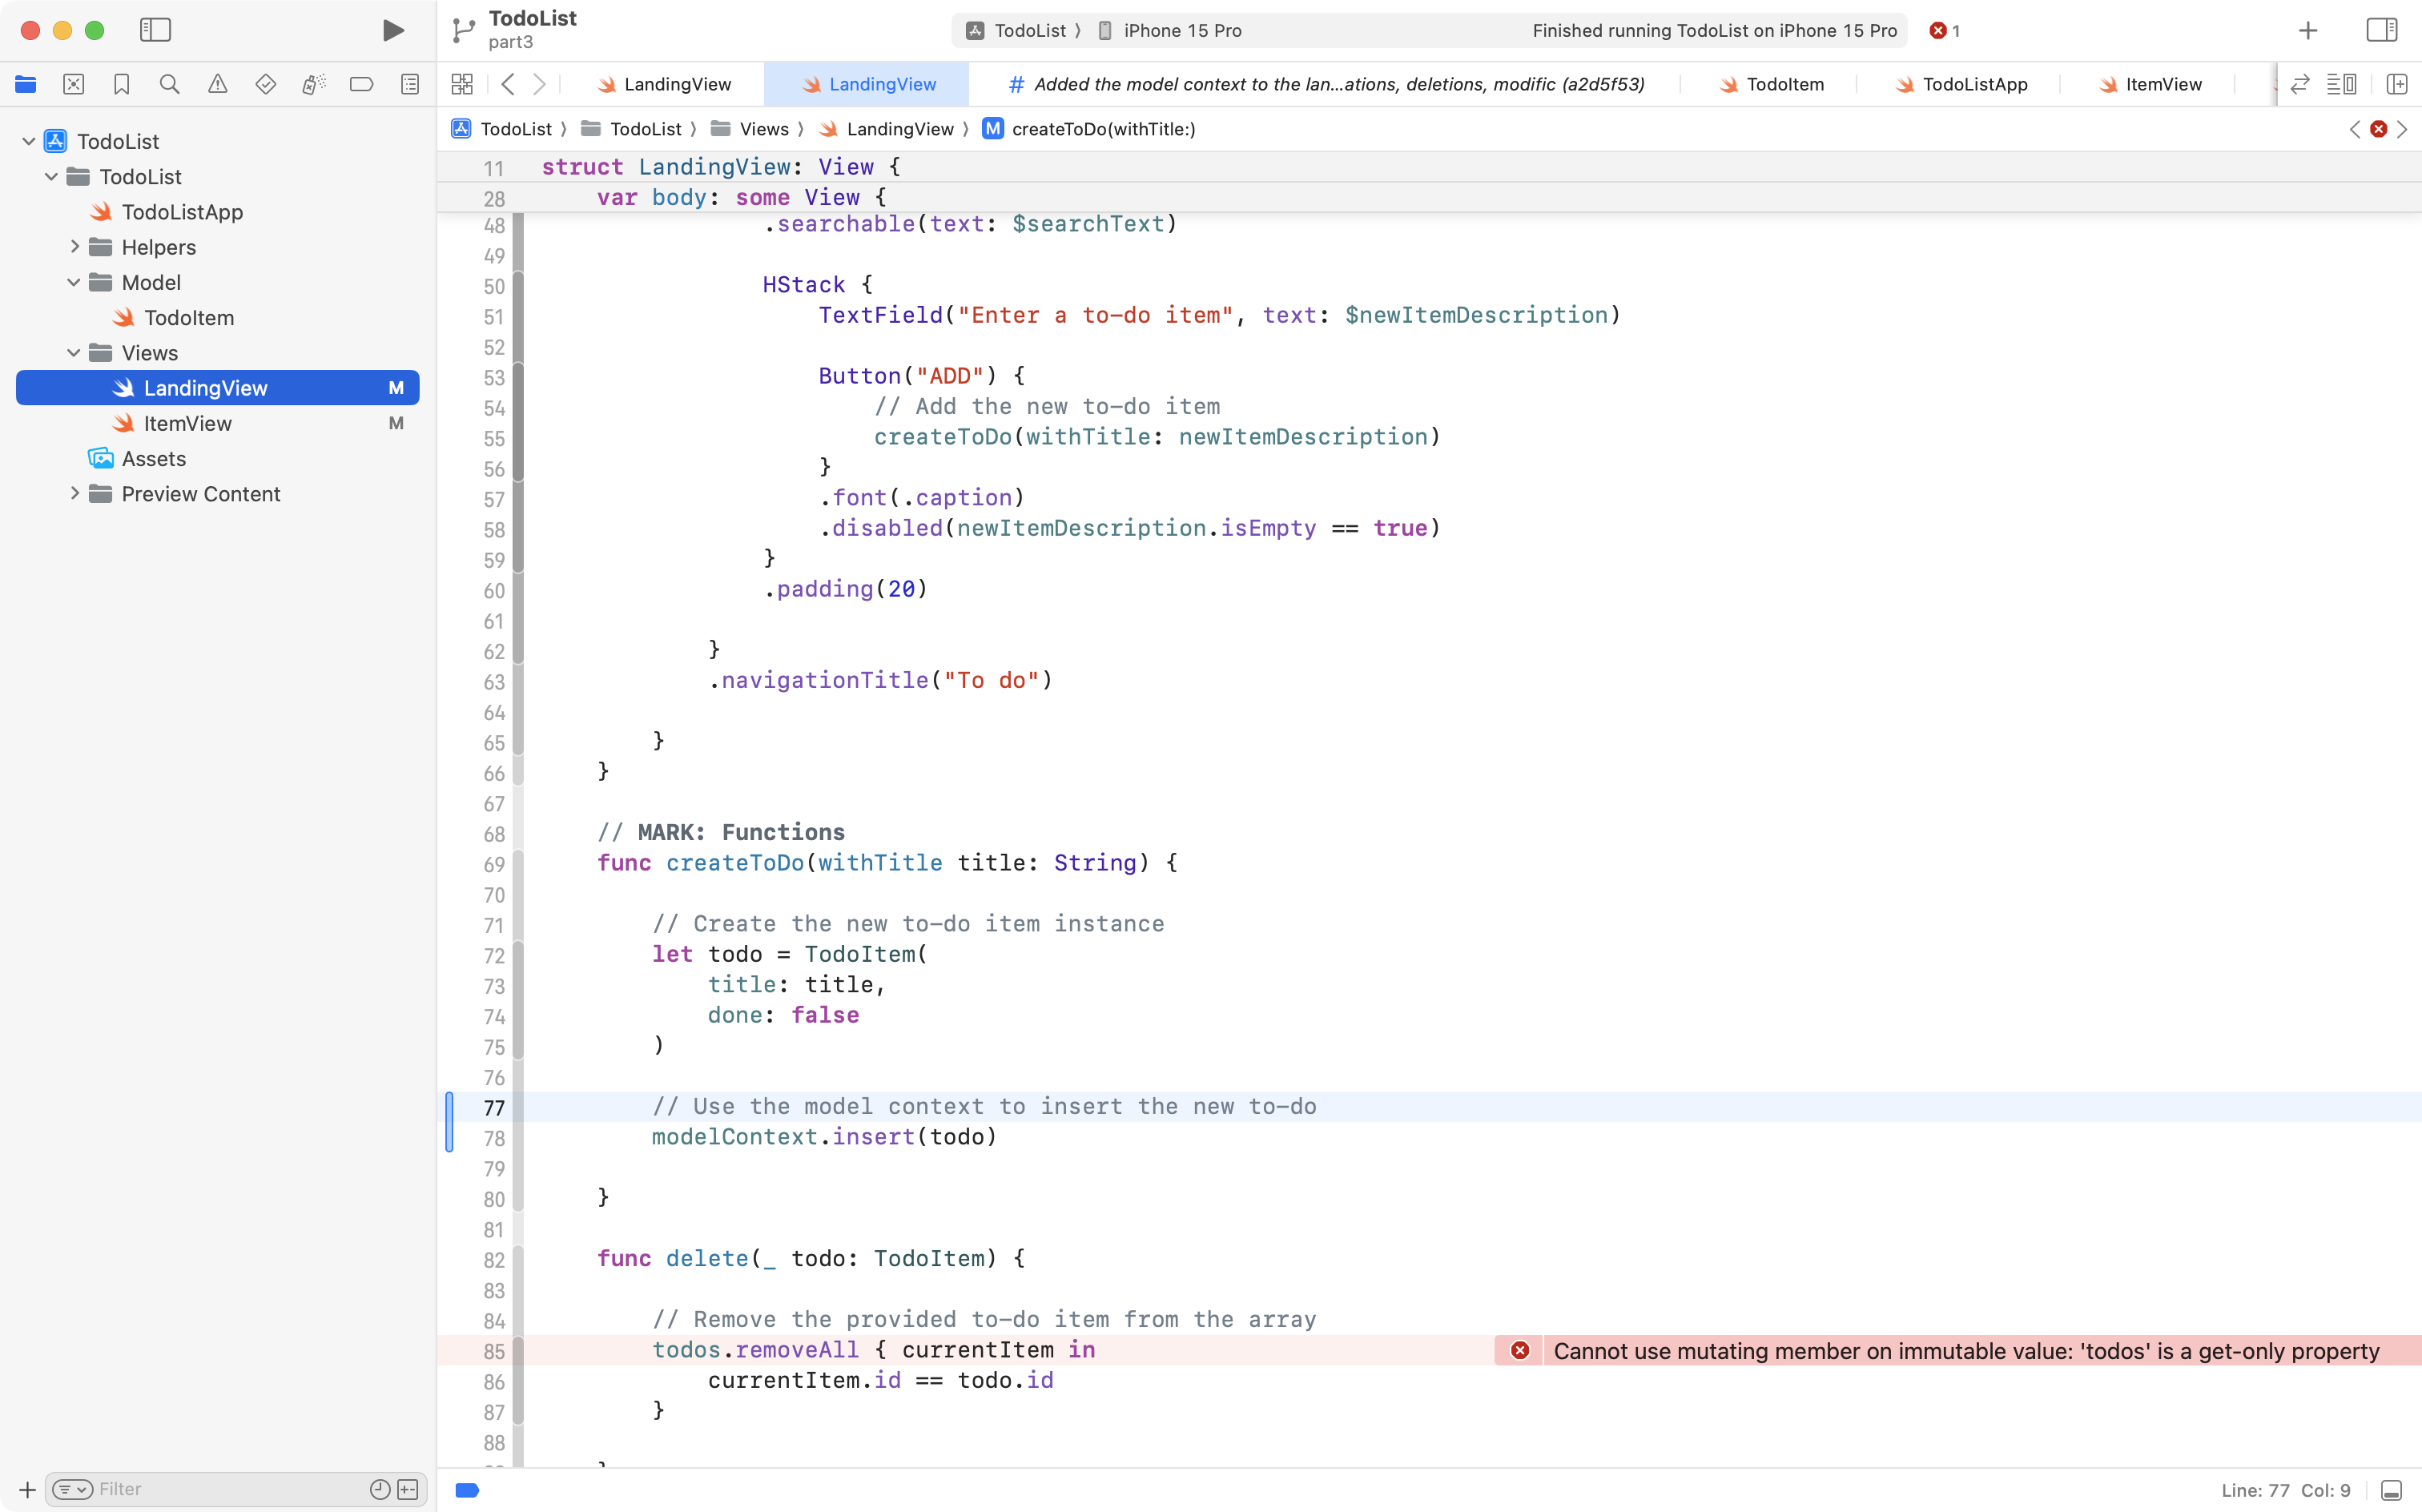
When using SwiftData, the model context must handle all operations that change data. We cannot manipulate the contents of the todos array directly.
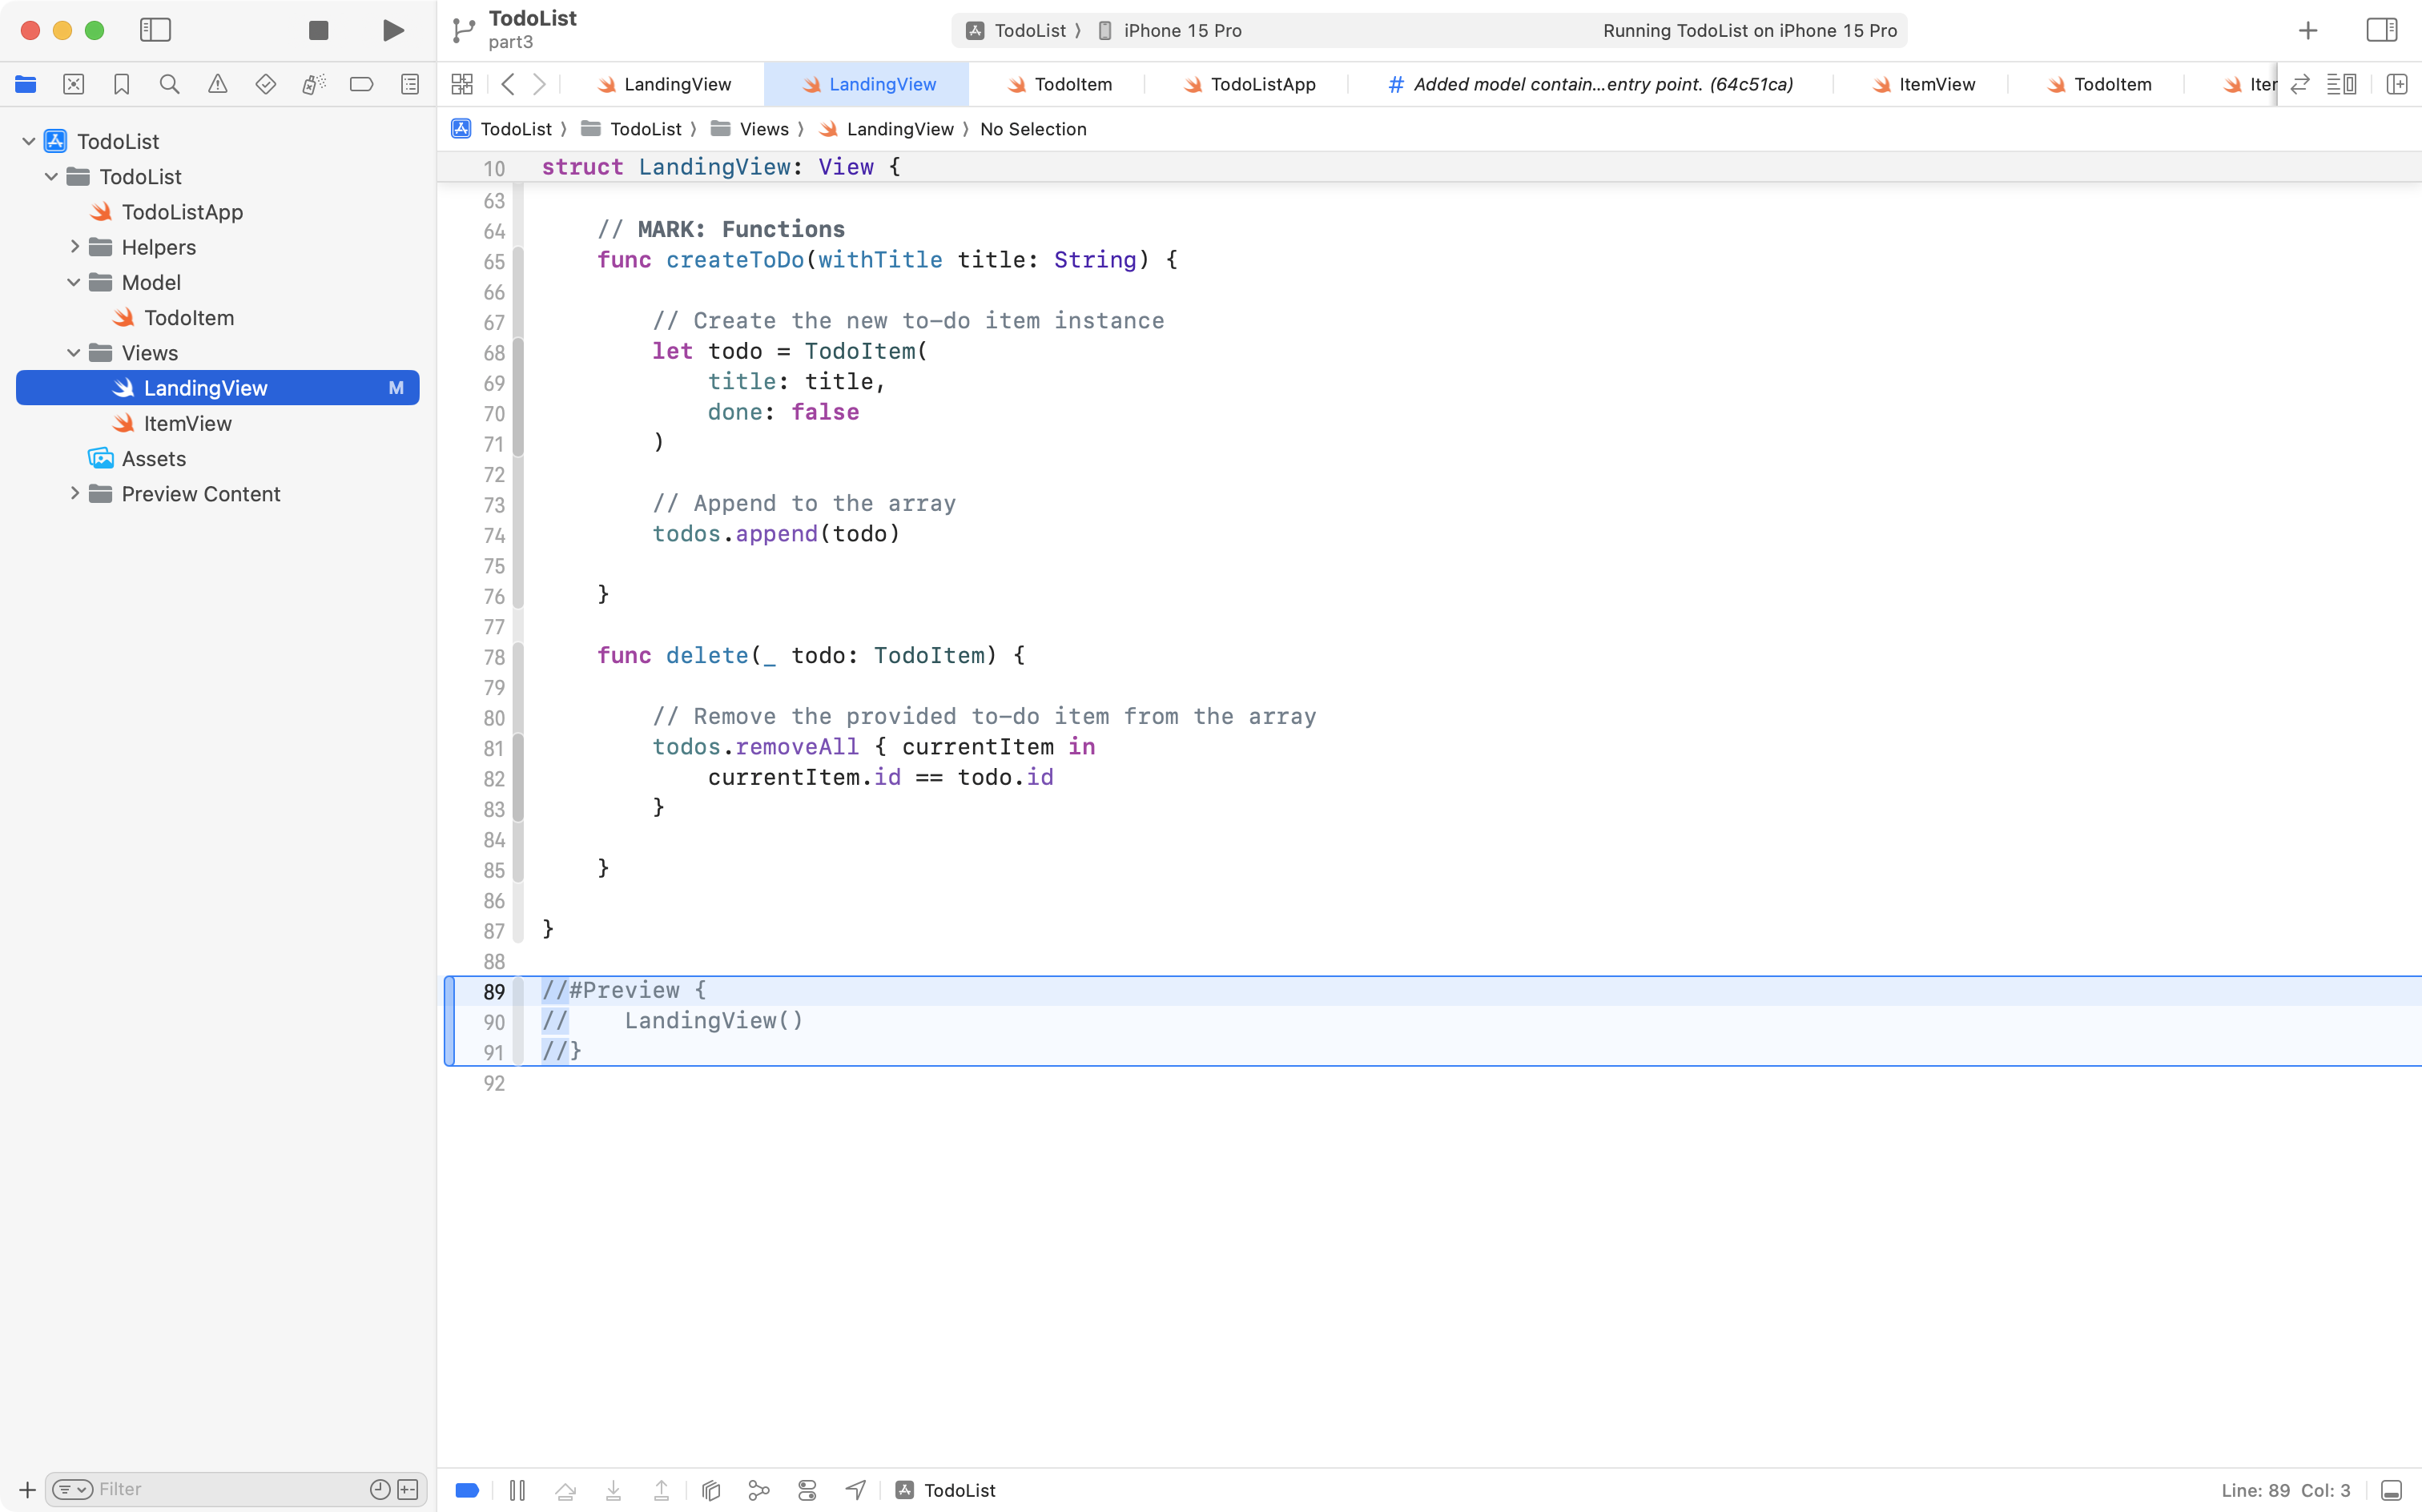
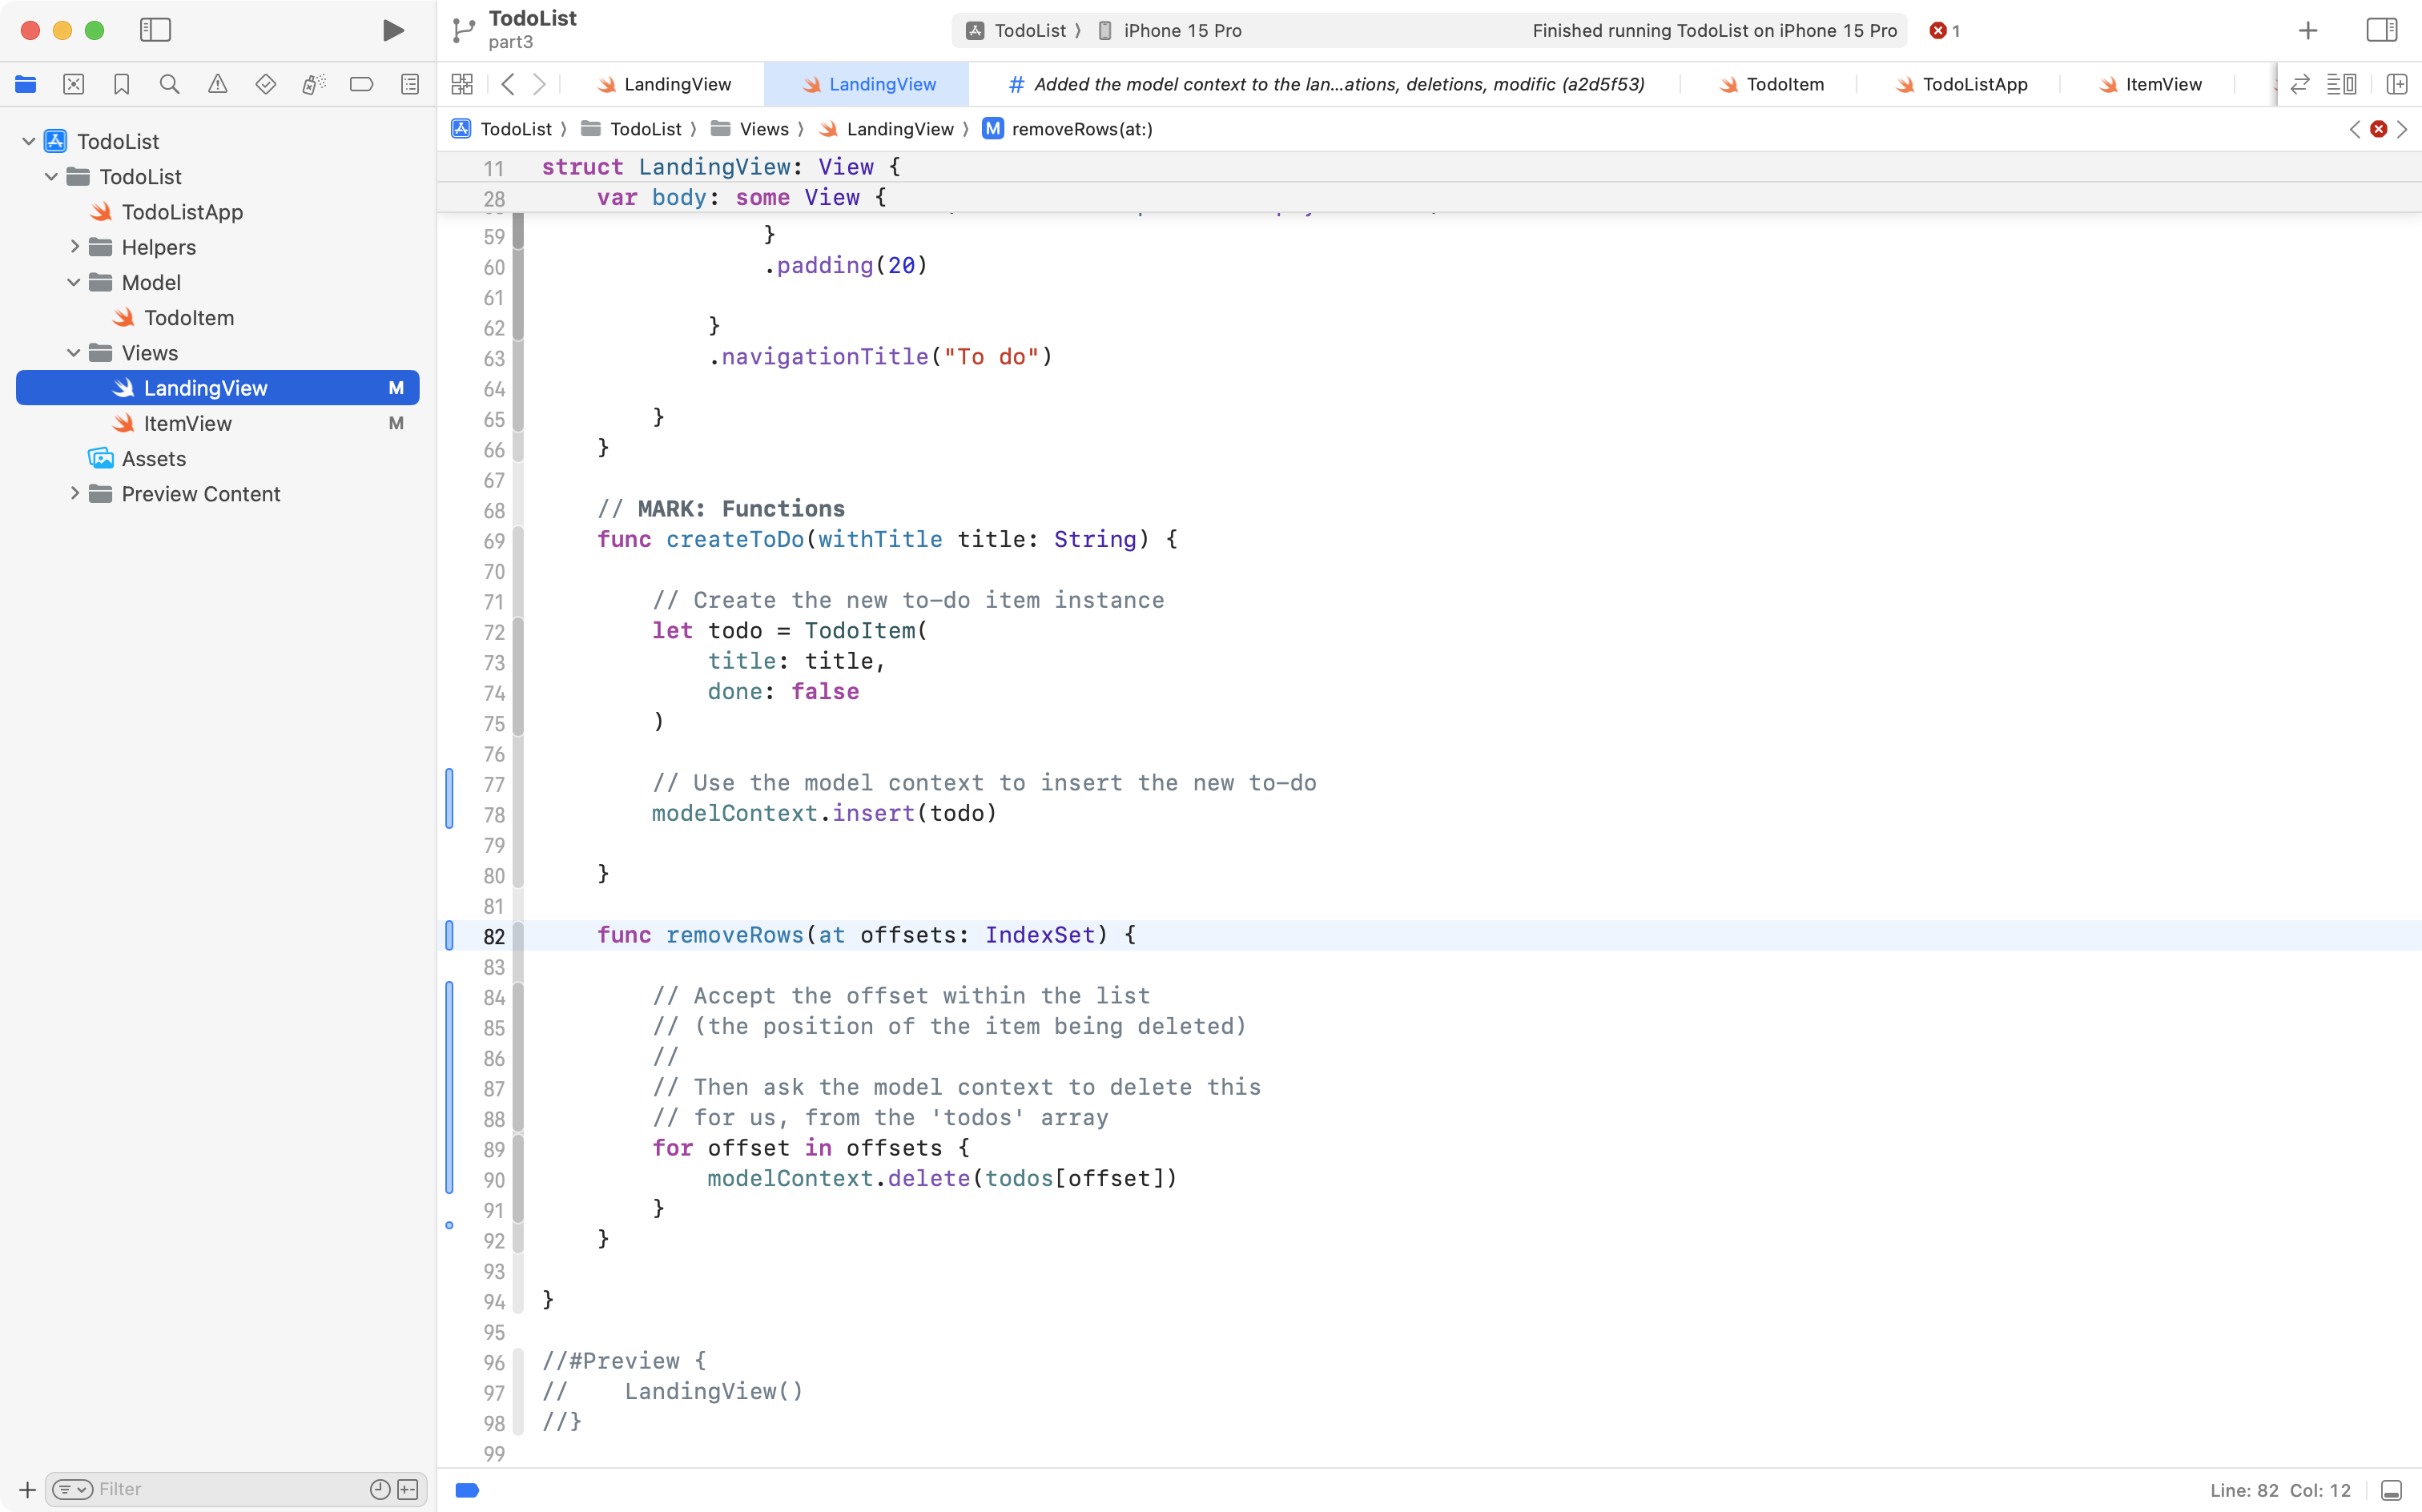
Next, we must change the function that handles deletions.
Again, we cannot directly manipulate the contents of the todos array. We will instead have the model context handle this for us.
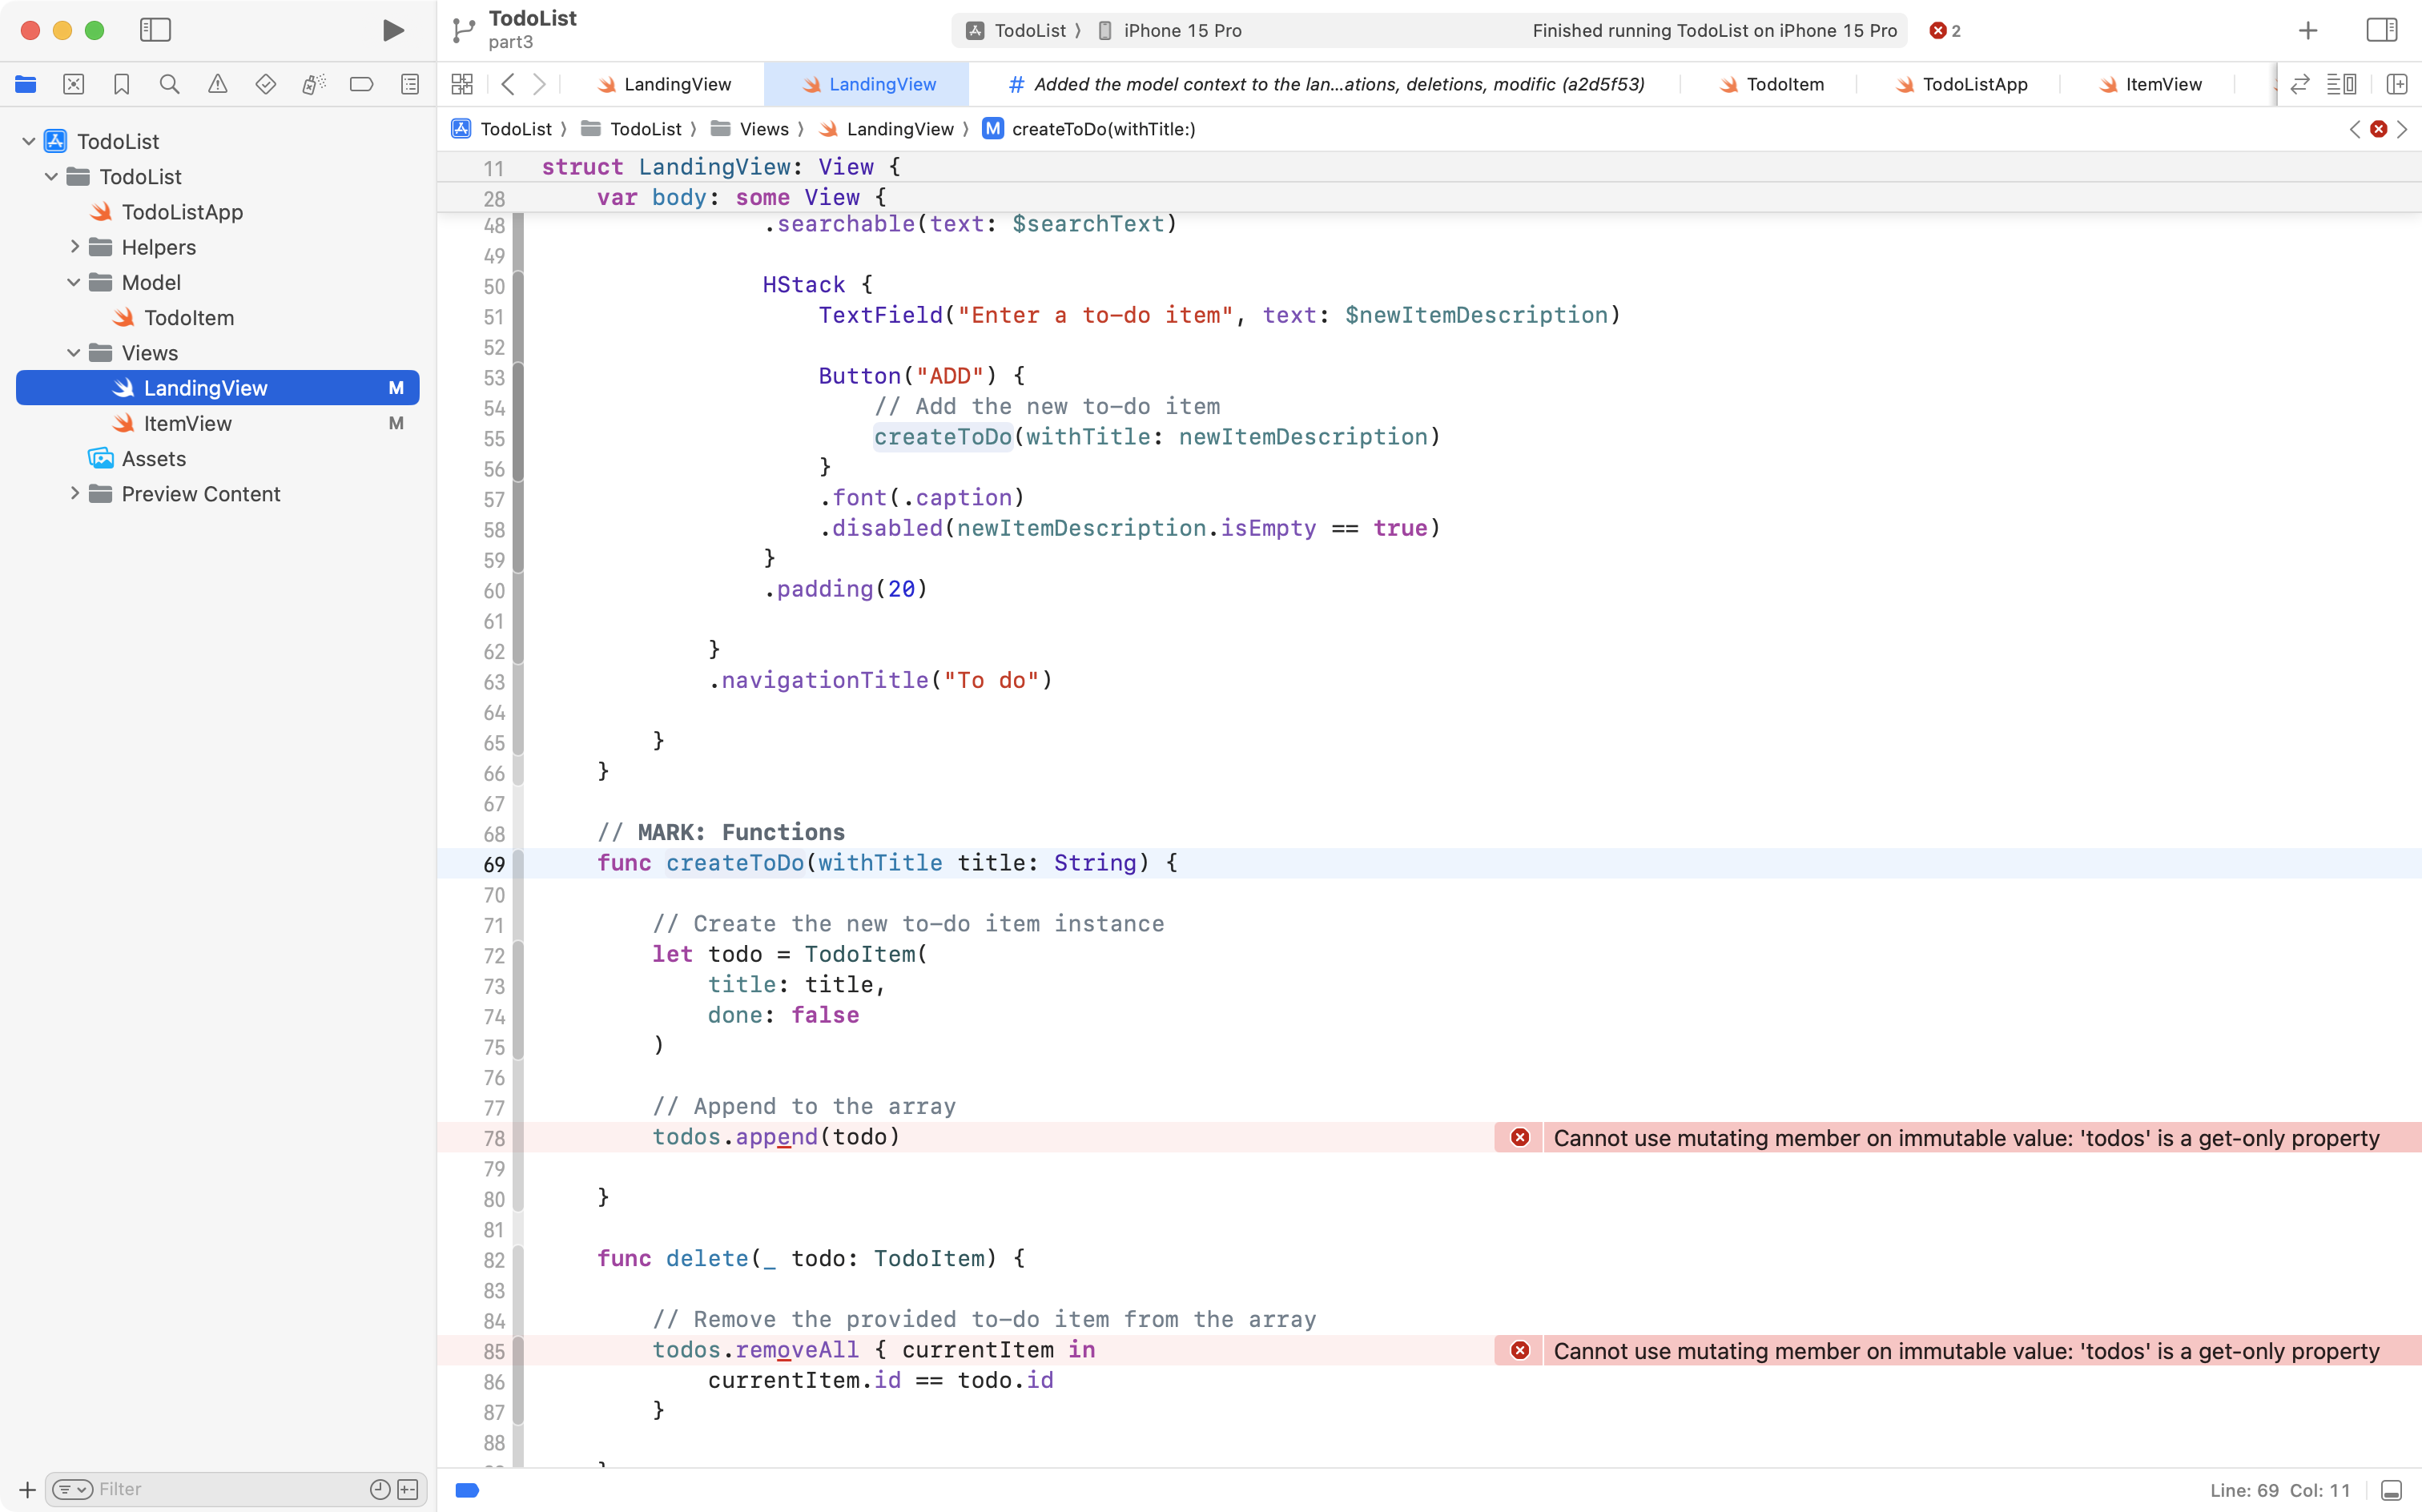
Change the entire function from this:
func delete(_ todo: TodoItem) {

	// Remove the provided to-do item from the array
	todos.removeAll { currentItem in
		currentItem.id == todo.id
	}

}
To this:
func removeRows(at offsets: IndexSet) {

	// Accept the offset within the list
	// (the position of the item being deleted)
	//
	// Then ask the model context to delete this
	// for us, from the 'todos' array
	for offset in offsets {
		modelContext.delete(todos[offset])
	}
}
… like this:
Finally, we need to make an adjustment to the call site for deleting an item.
Rather than manually create a swipe action:
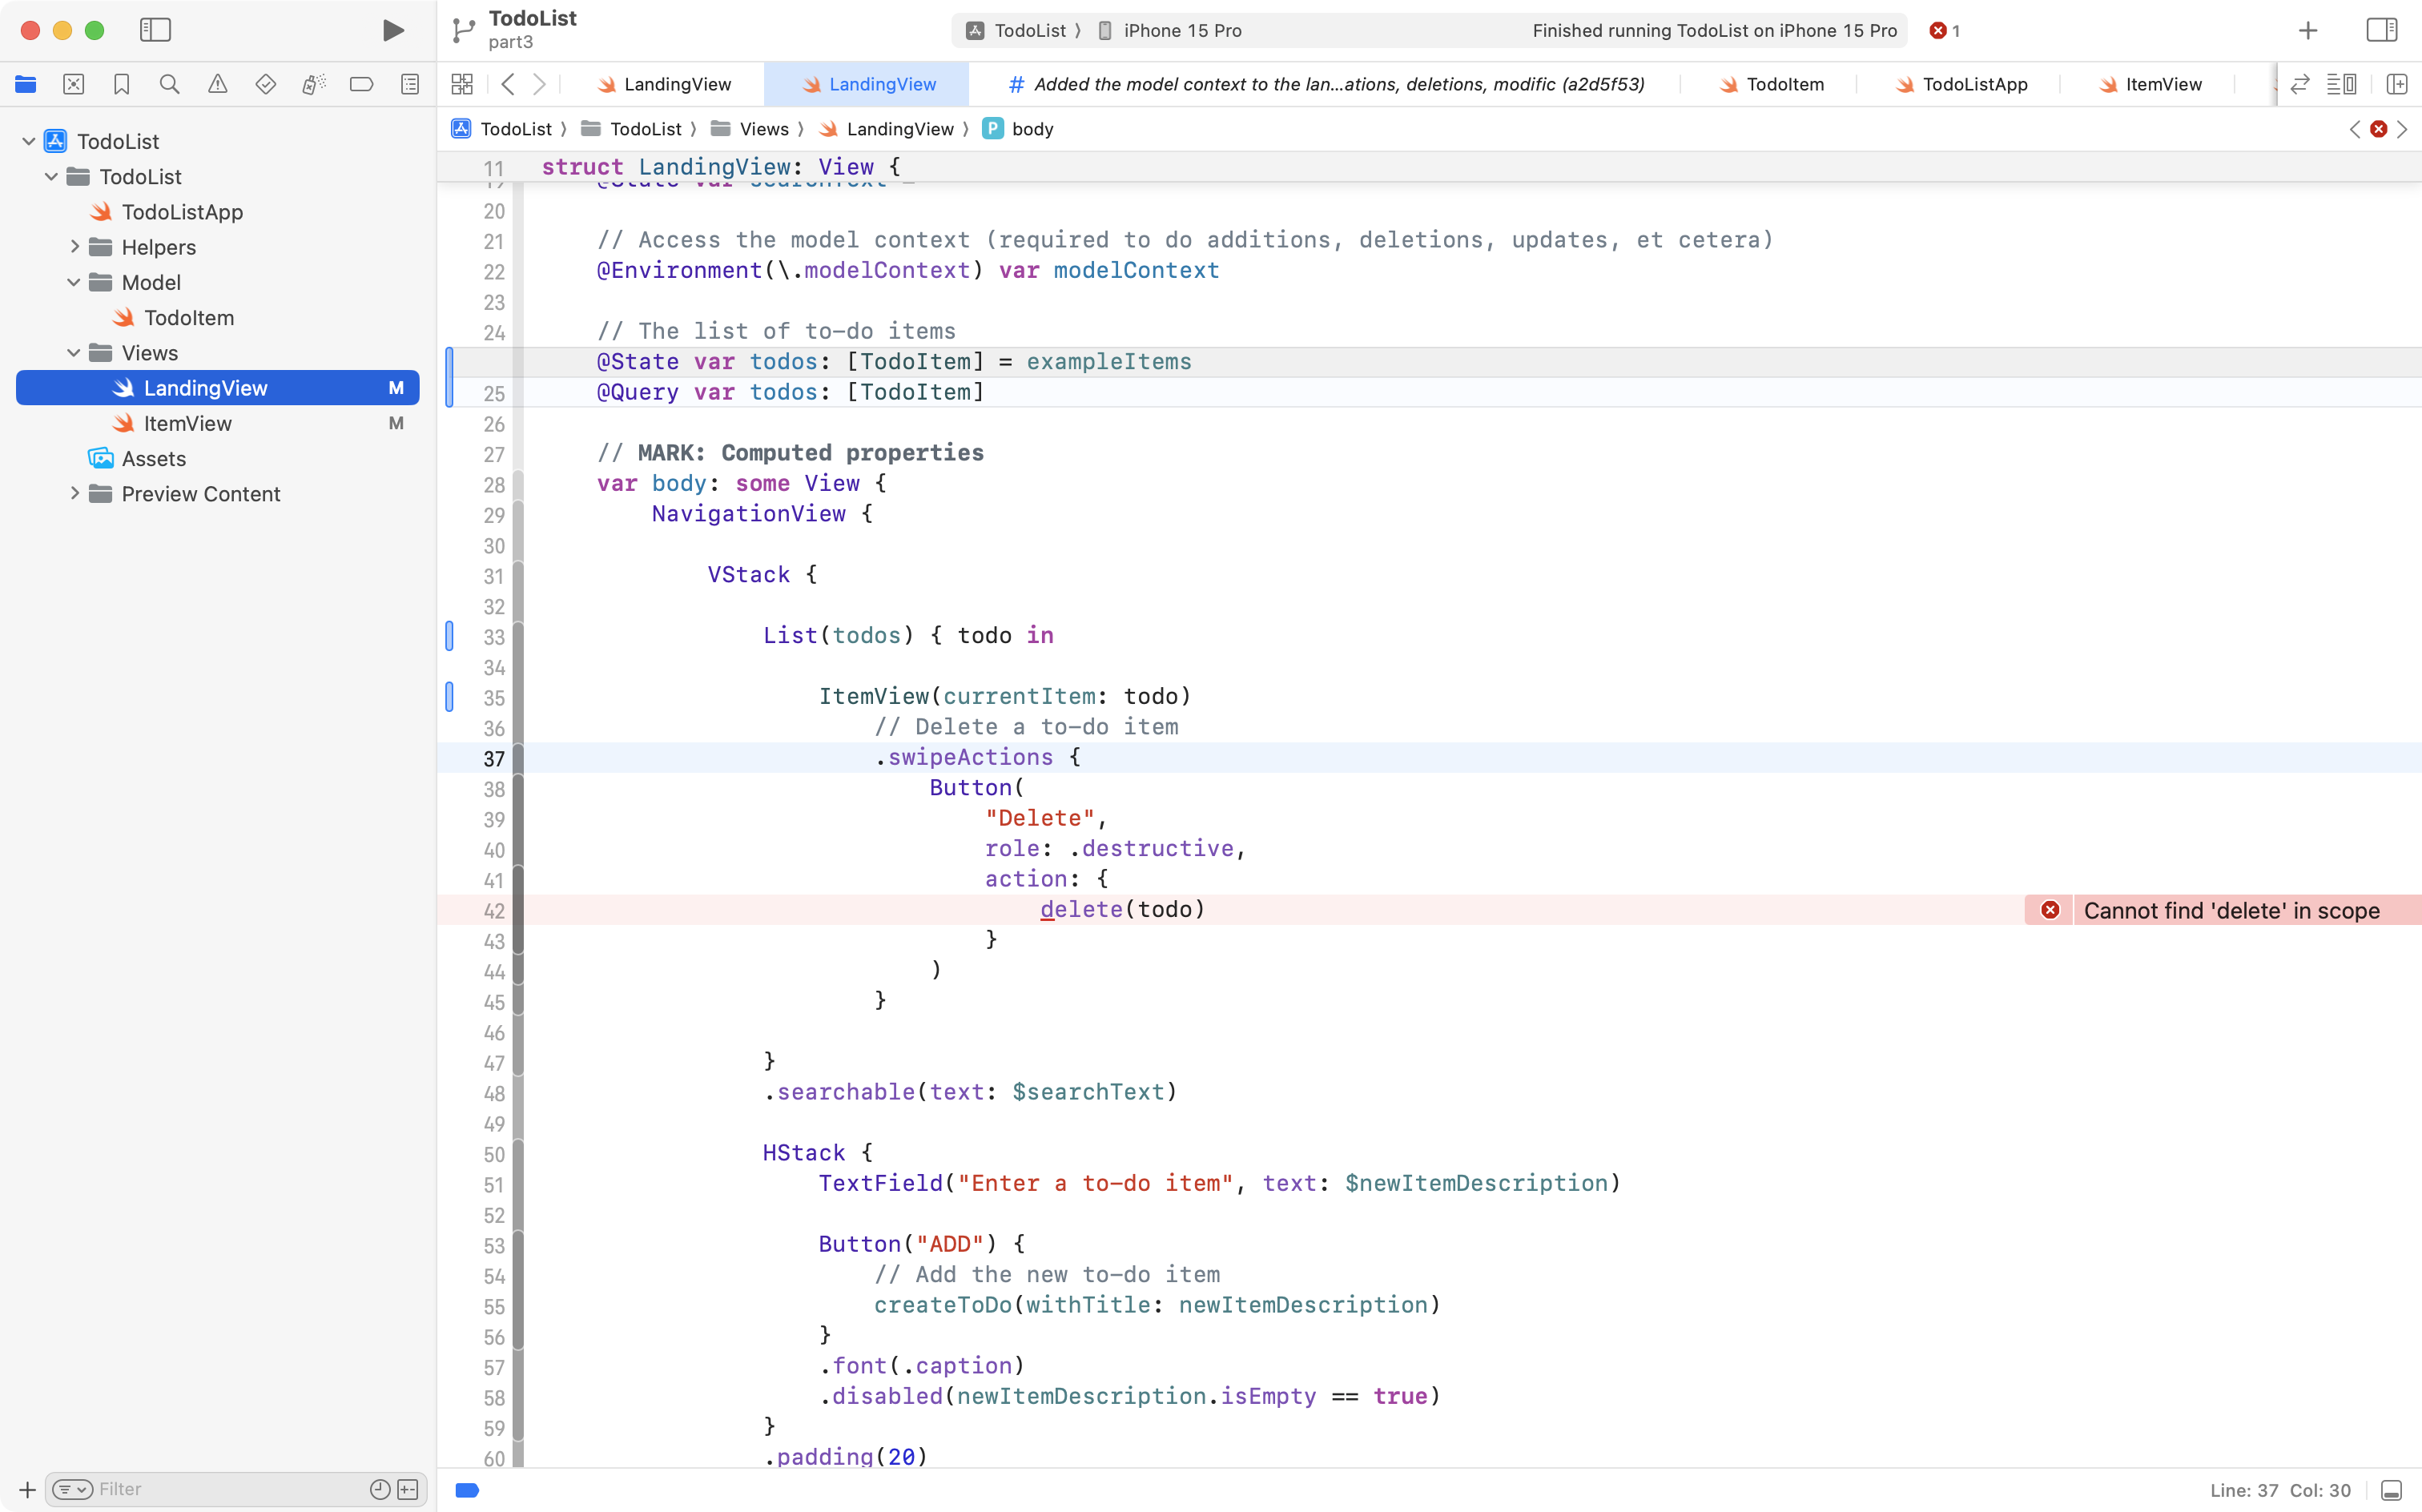
… we must instead use a view modifier specifically designed to handle deletions when using SwiftData.
So, change this code:
List(todos) { todo in

	ItemView(currentItem: todo)
		// Delete a to-do item
		.swipeActions {
			Button(
				"Delete",
				role: .destructive,
				action: {
					delete(todo)
				}
			)
		}

}
.searchable(text: $searchText)
… to this:
List {
	ForEach(todos) { todo in

		ItemView(currentItem: todo)

	}
	.onDelete(perform: removeRows)
}
.searchable(text: $searchText)
… like this:
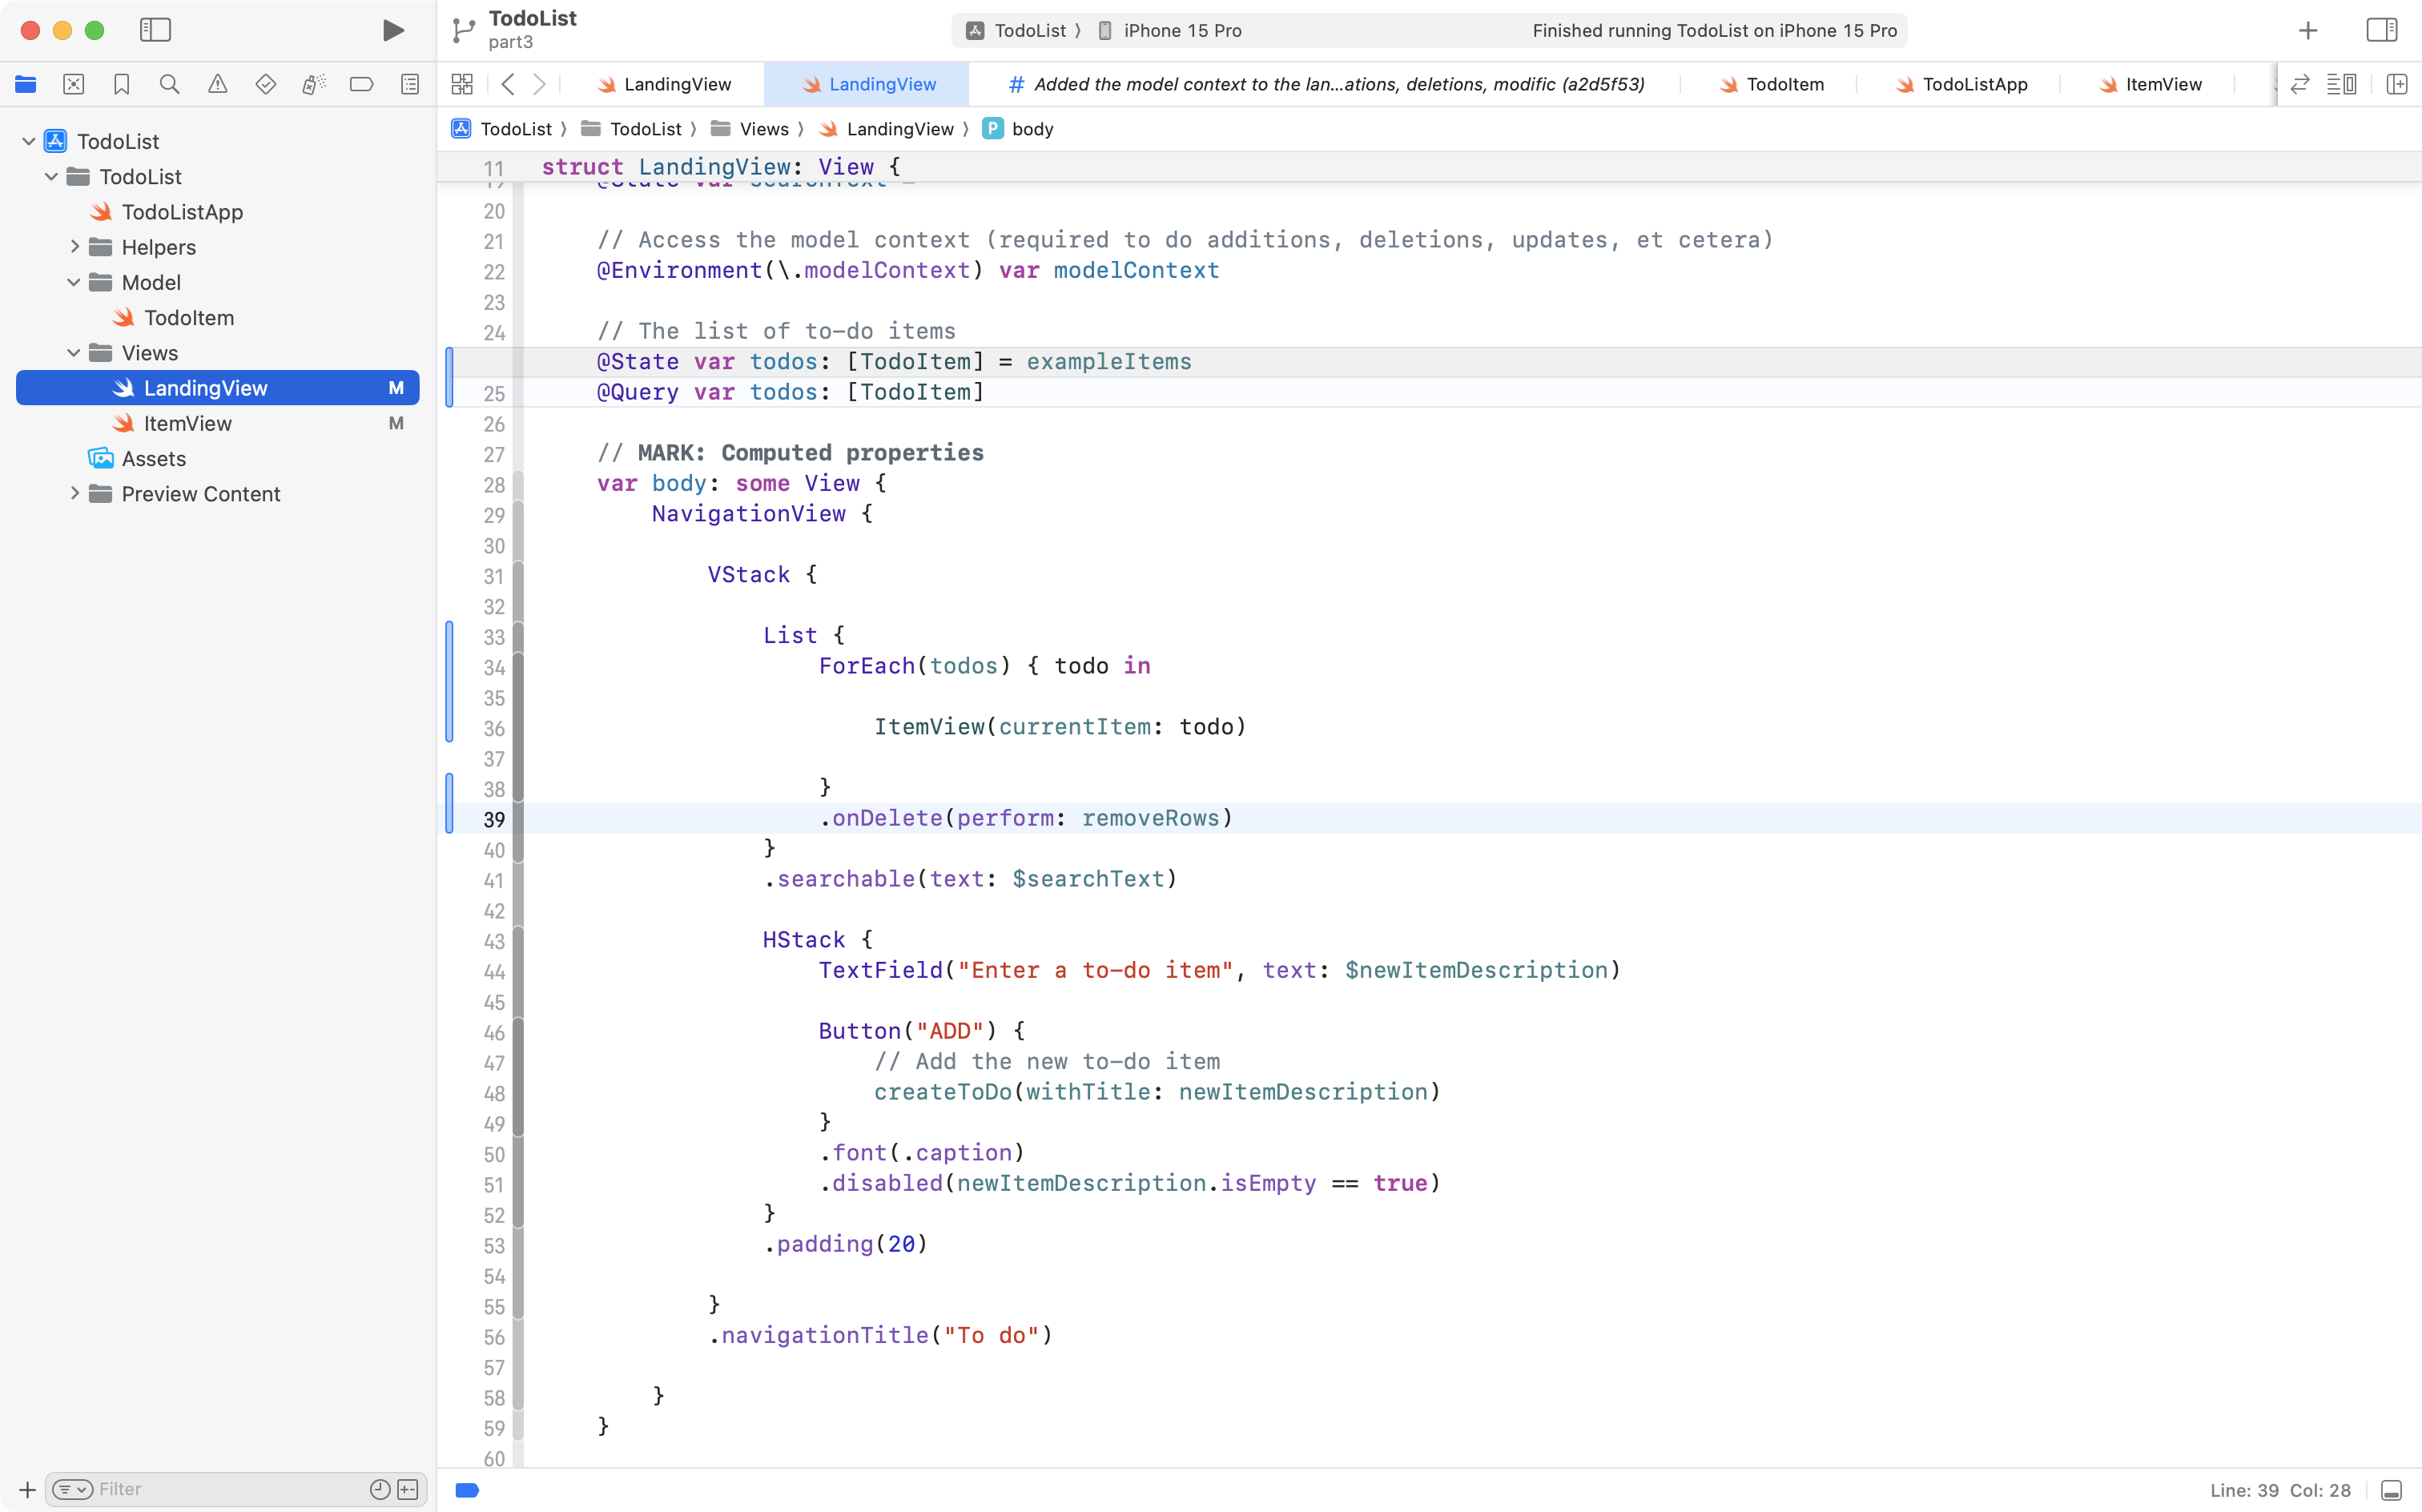
The resulting code is a little cleaner.
Note that we have switched to using a ForEach structure to iterate over the todos array. This is required because .onDelete does not work on a List structure.
Note that the .searchable view modifier remains attached to the List.
At this point, we have made the adjustments necessary for SwiftData to do it’s job for us, by completing these four steps mentioned earlier:
- Adjusted the model
- Created the container
- Added the context
- Made the view use the context to handle CRUD operations
To test this code out, you will need to run the code in the full Simulator app.
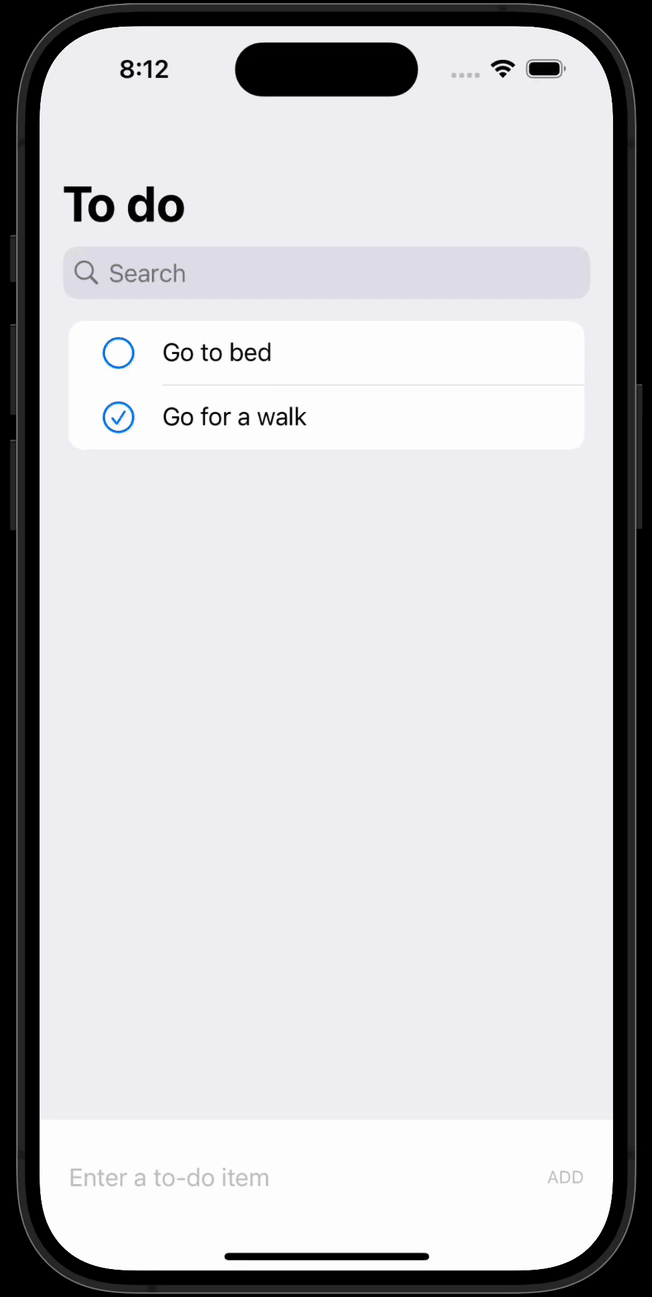
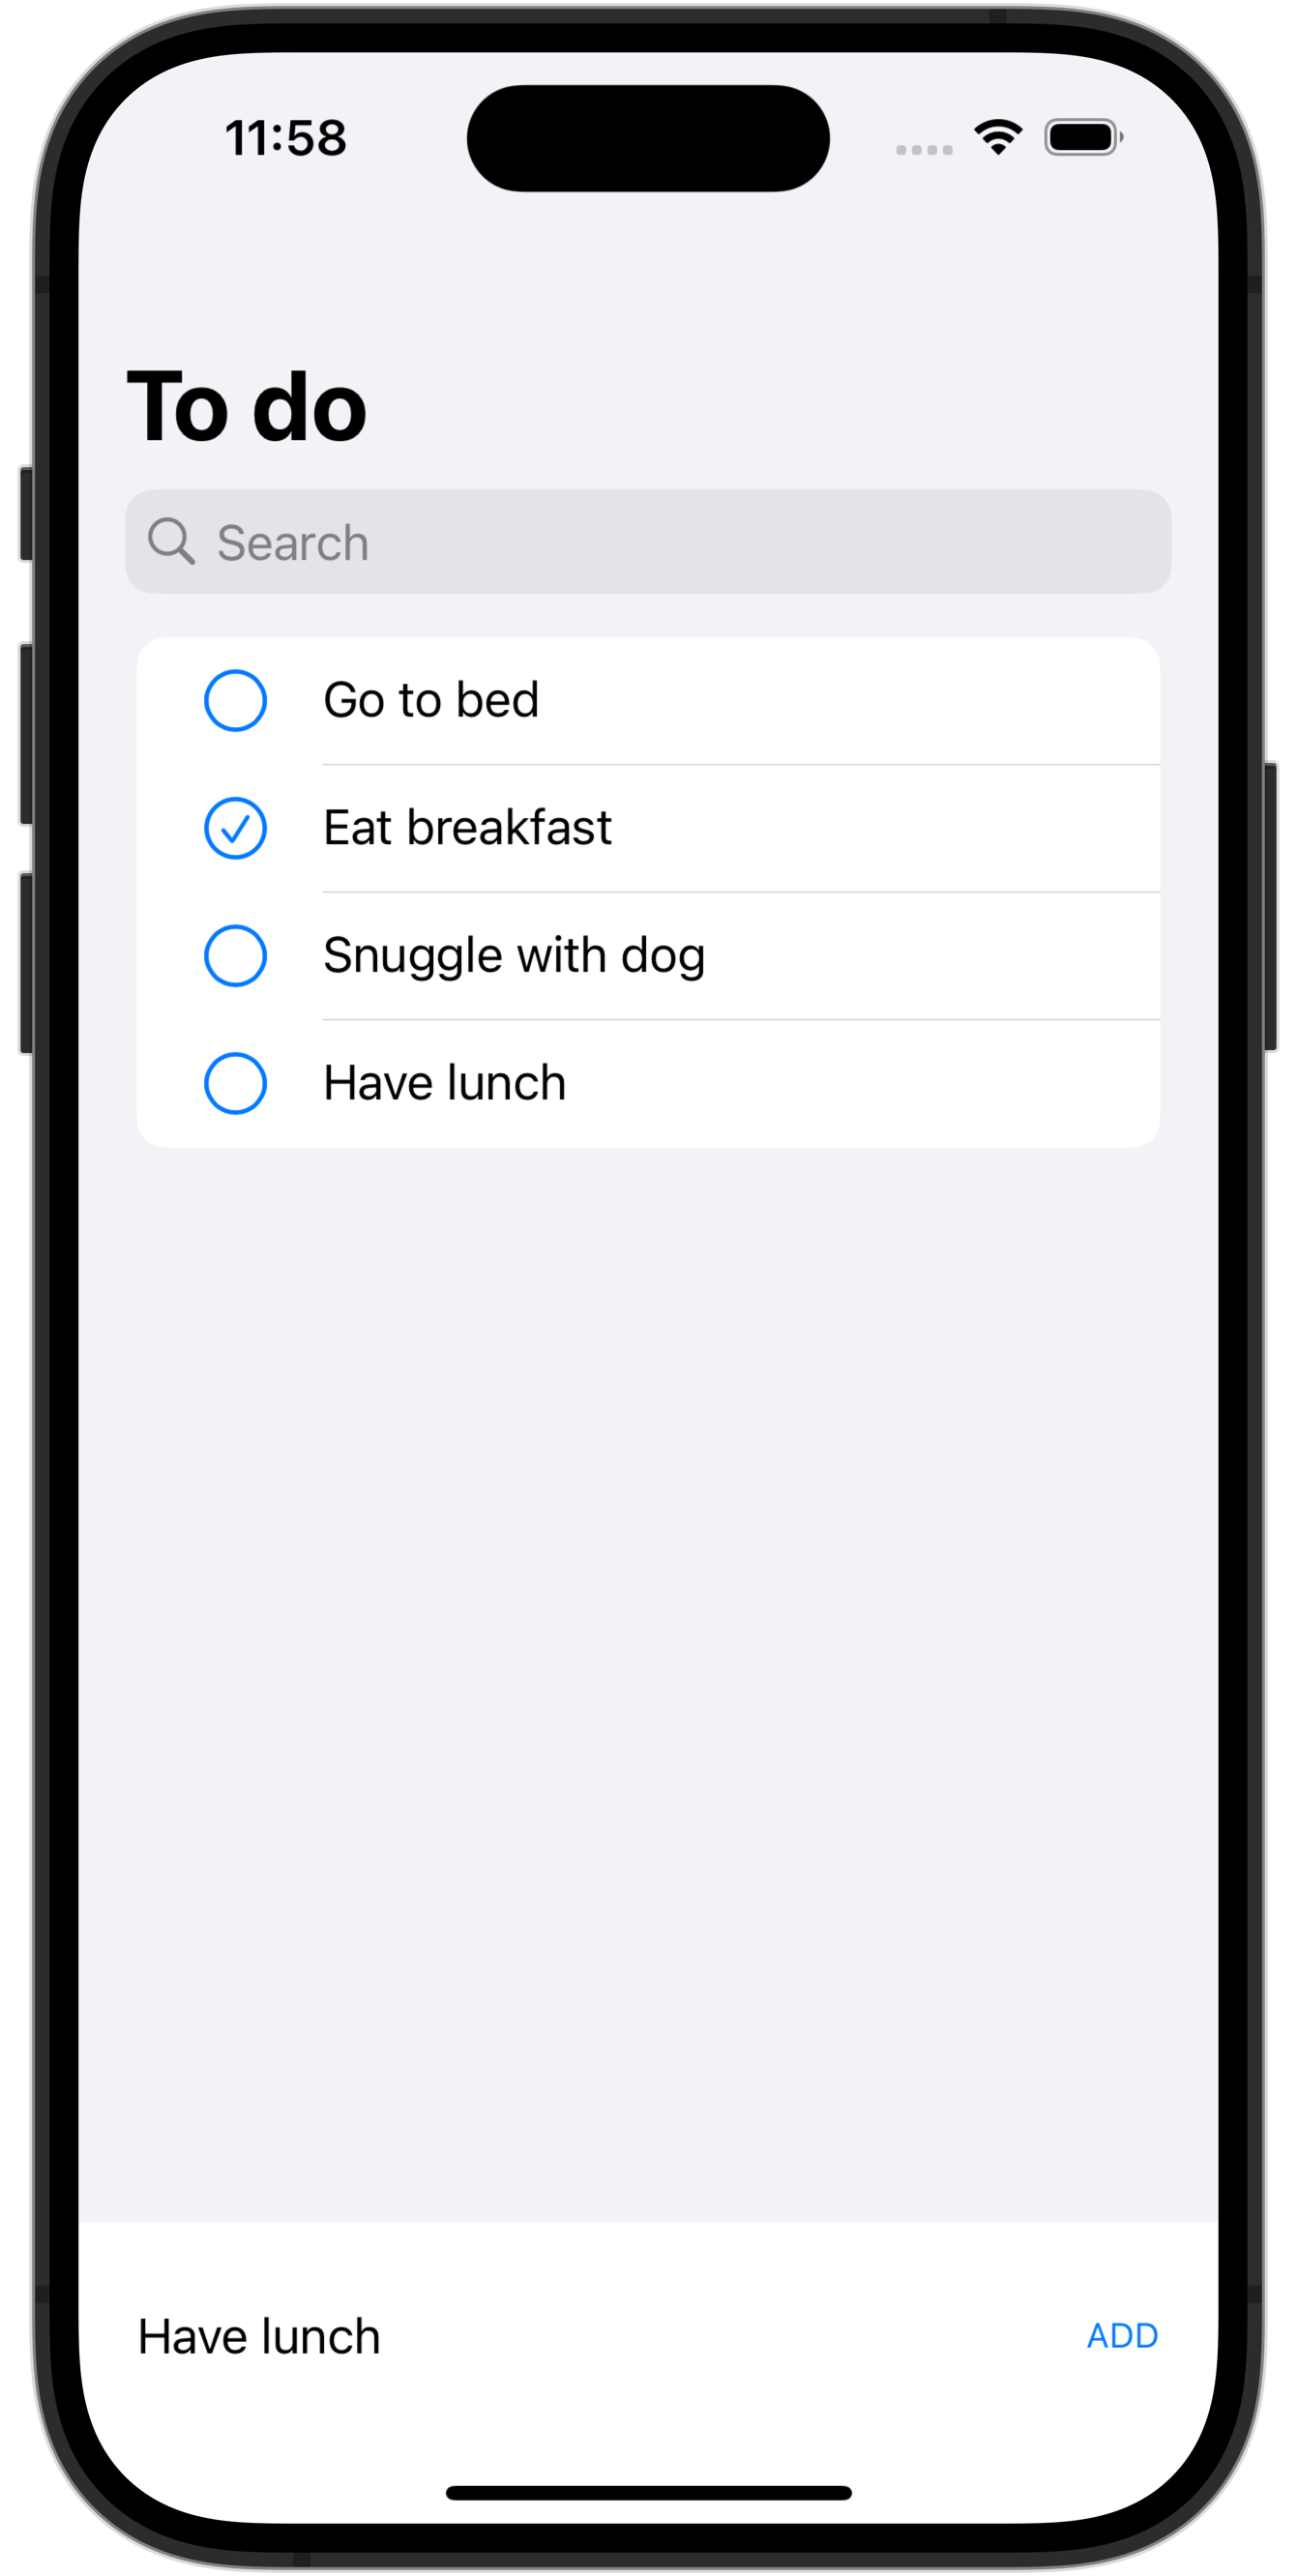
If you force quit the app in the Simulator, notice how the to-do items are still there when you open the app again:
This is clearly huge progress, so please commit and push your work with this message:
Adjusted the view to work with the model context instead of an in-memory array.
Inspecting the database file
As explained above, behind the scenes, SwiftData uses a SQLite database to persist data.
You have had plenty of experience querying a database by now.
Let’s open the database file created by SwiftData within your app so you can poke around inside it.
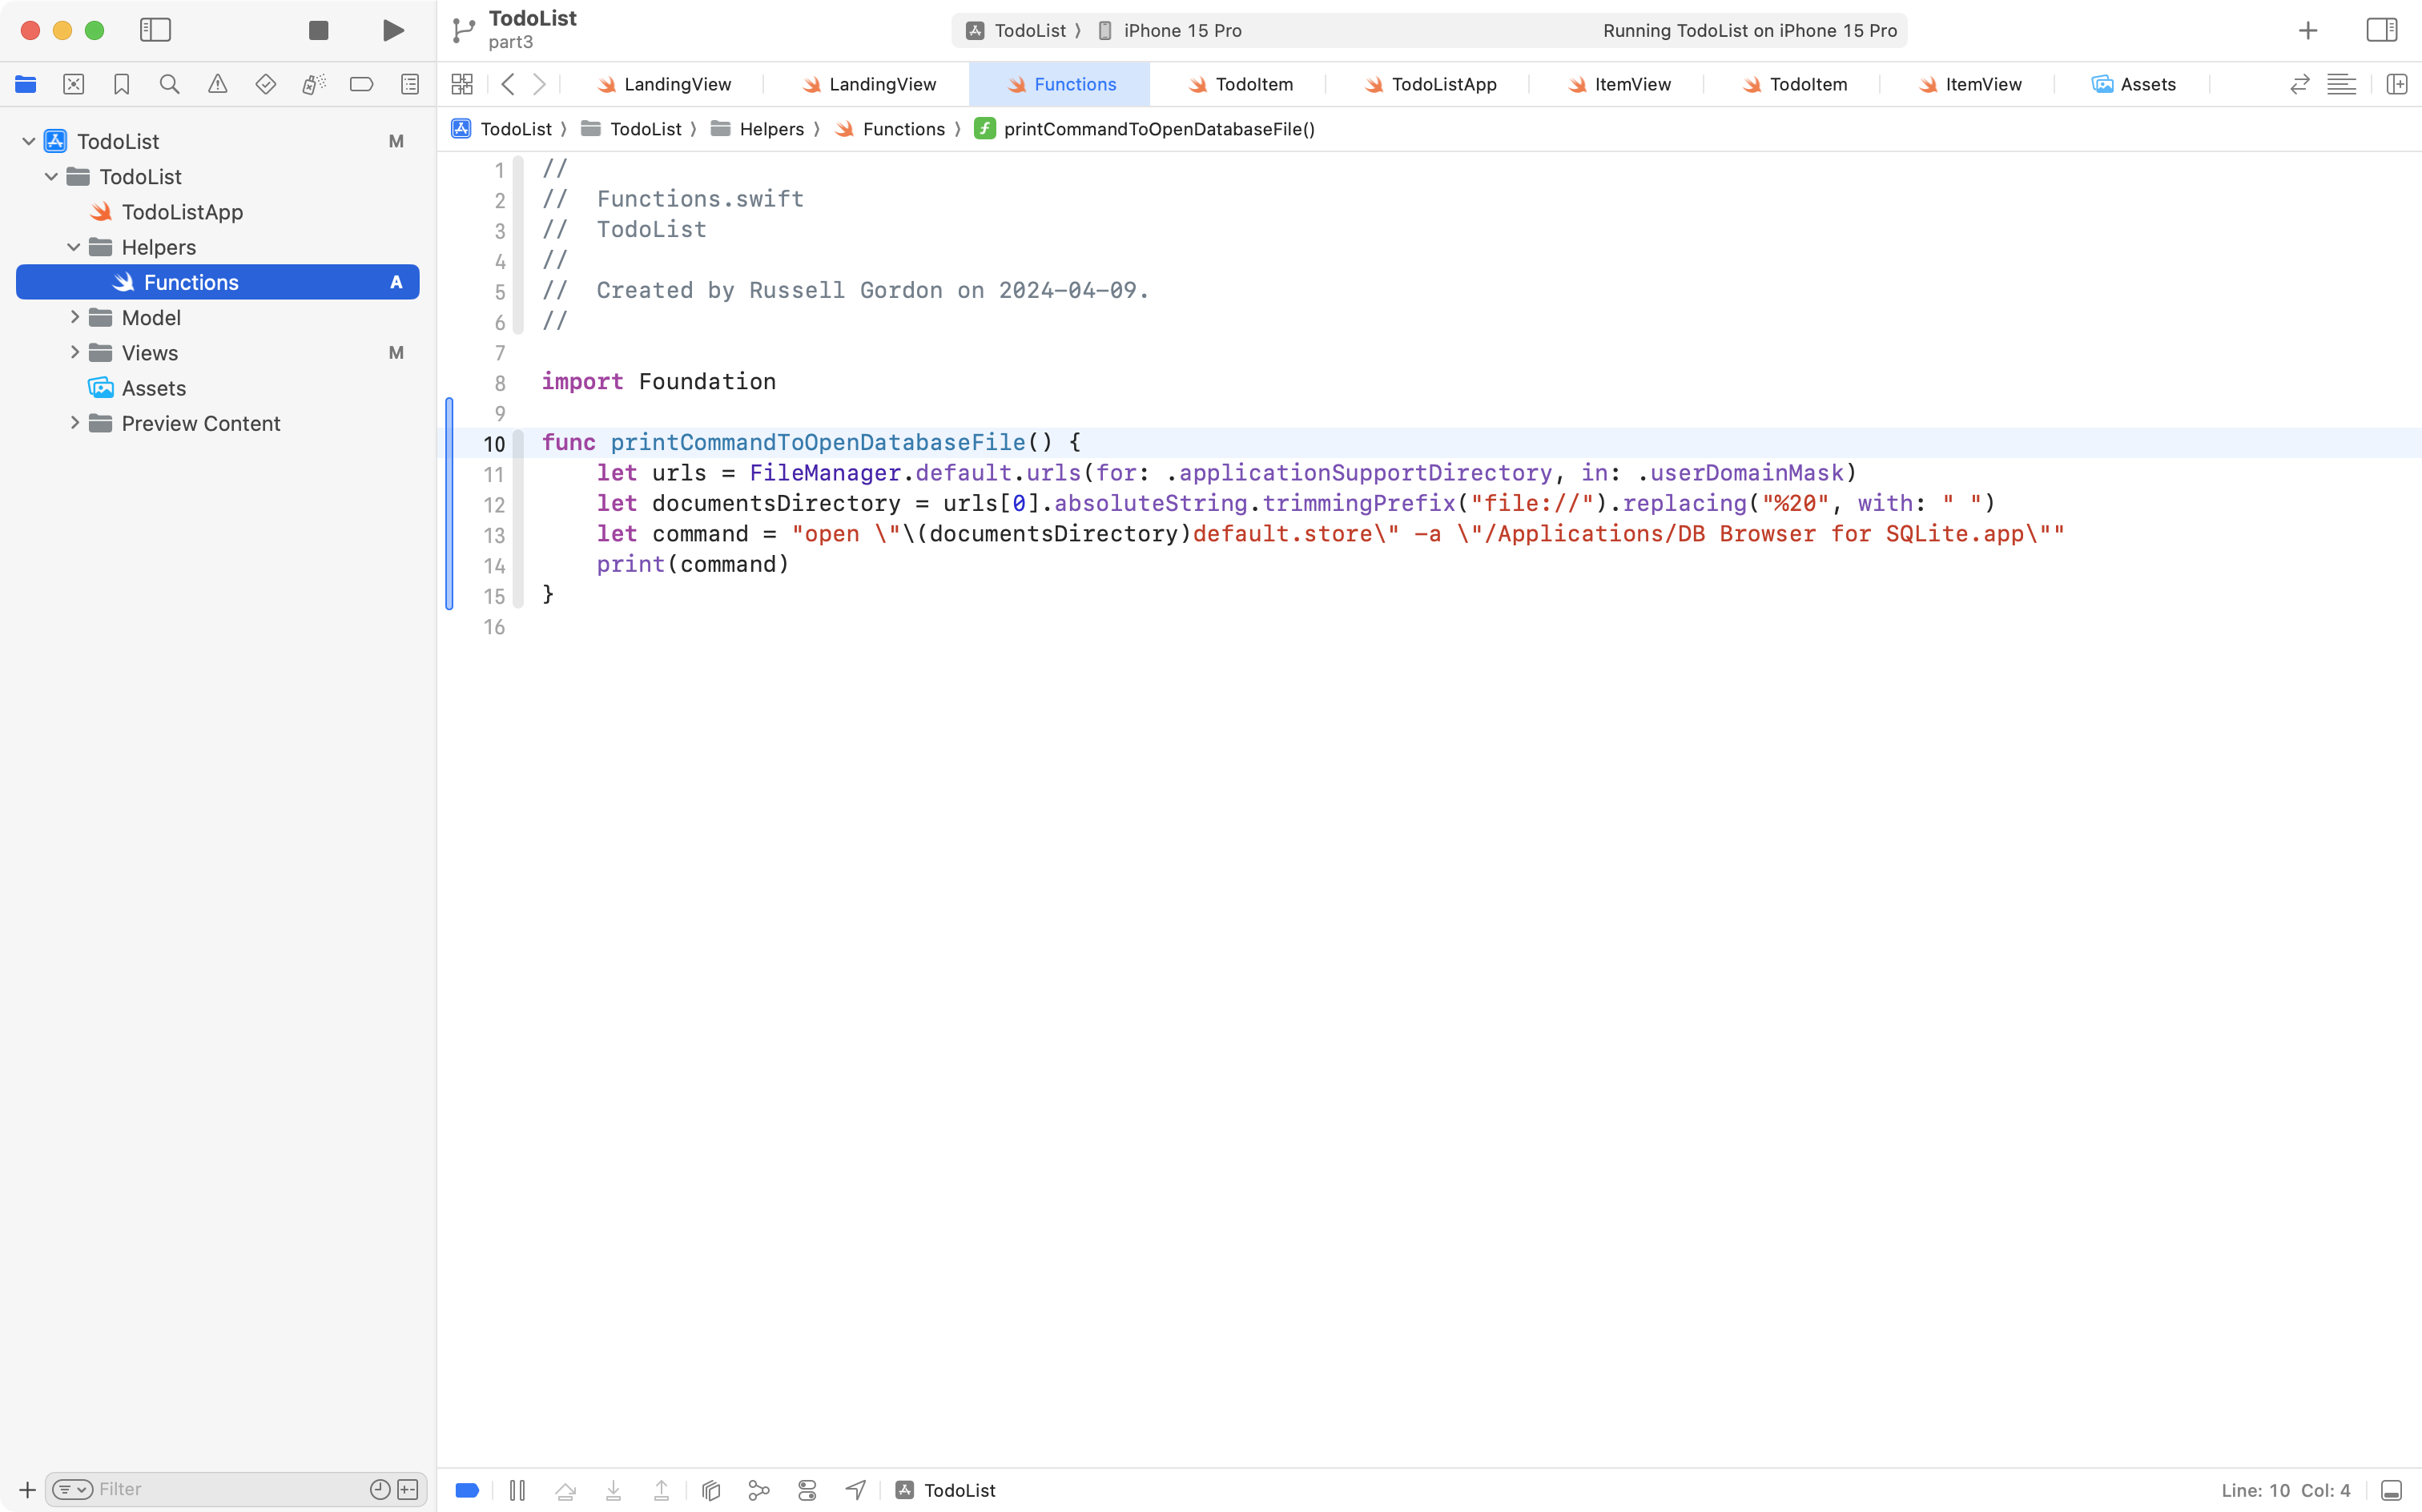
Navigate to the Helpers group in your app, and add a file named Functions.swift.
Then, copy and paste this function into the file:
func printCommandToOpenDatabaseFile() {
    let urls = FileManager.default.urls(for: .applicationSupportDirectory, in: .userDomainMask)
    let documentsDirectory = urls[0].absoluteString.trimmingPrefix("file://").replacing("%20", with: " ")
    let command = "open \"\(documentsDirectory)default.store\" -a \"/Applications/DB Browser for SQLite.app\""
    print(command)
}
…like this:
Next, navigate to the Views group, open LandingView, and fold up the VStack using code folding.
Add the .onAppear view modifier, with the following code:
.onAppear {
	printCommandToOpenDatabaseFile()
}
… like this:
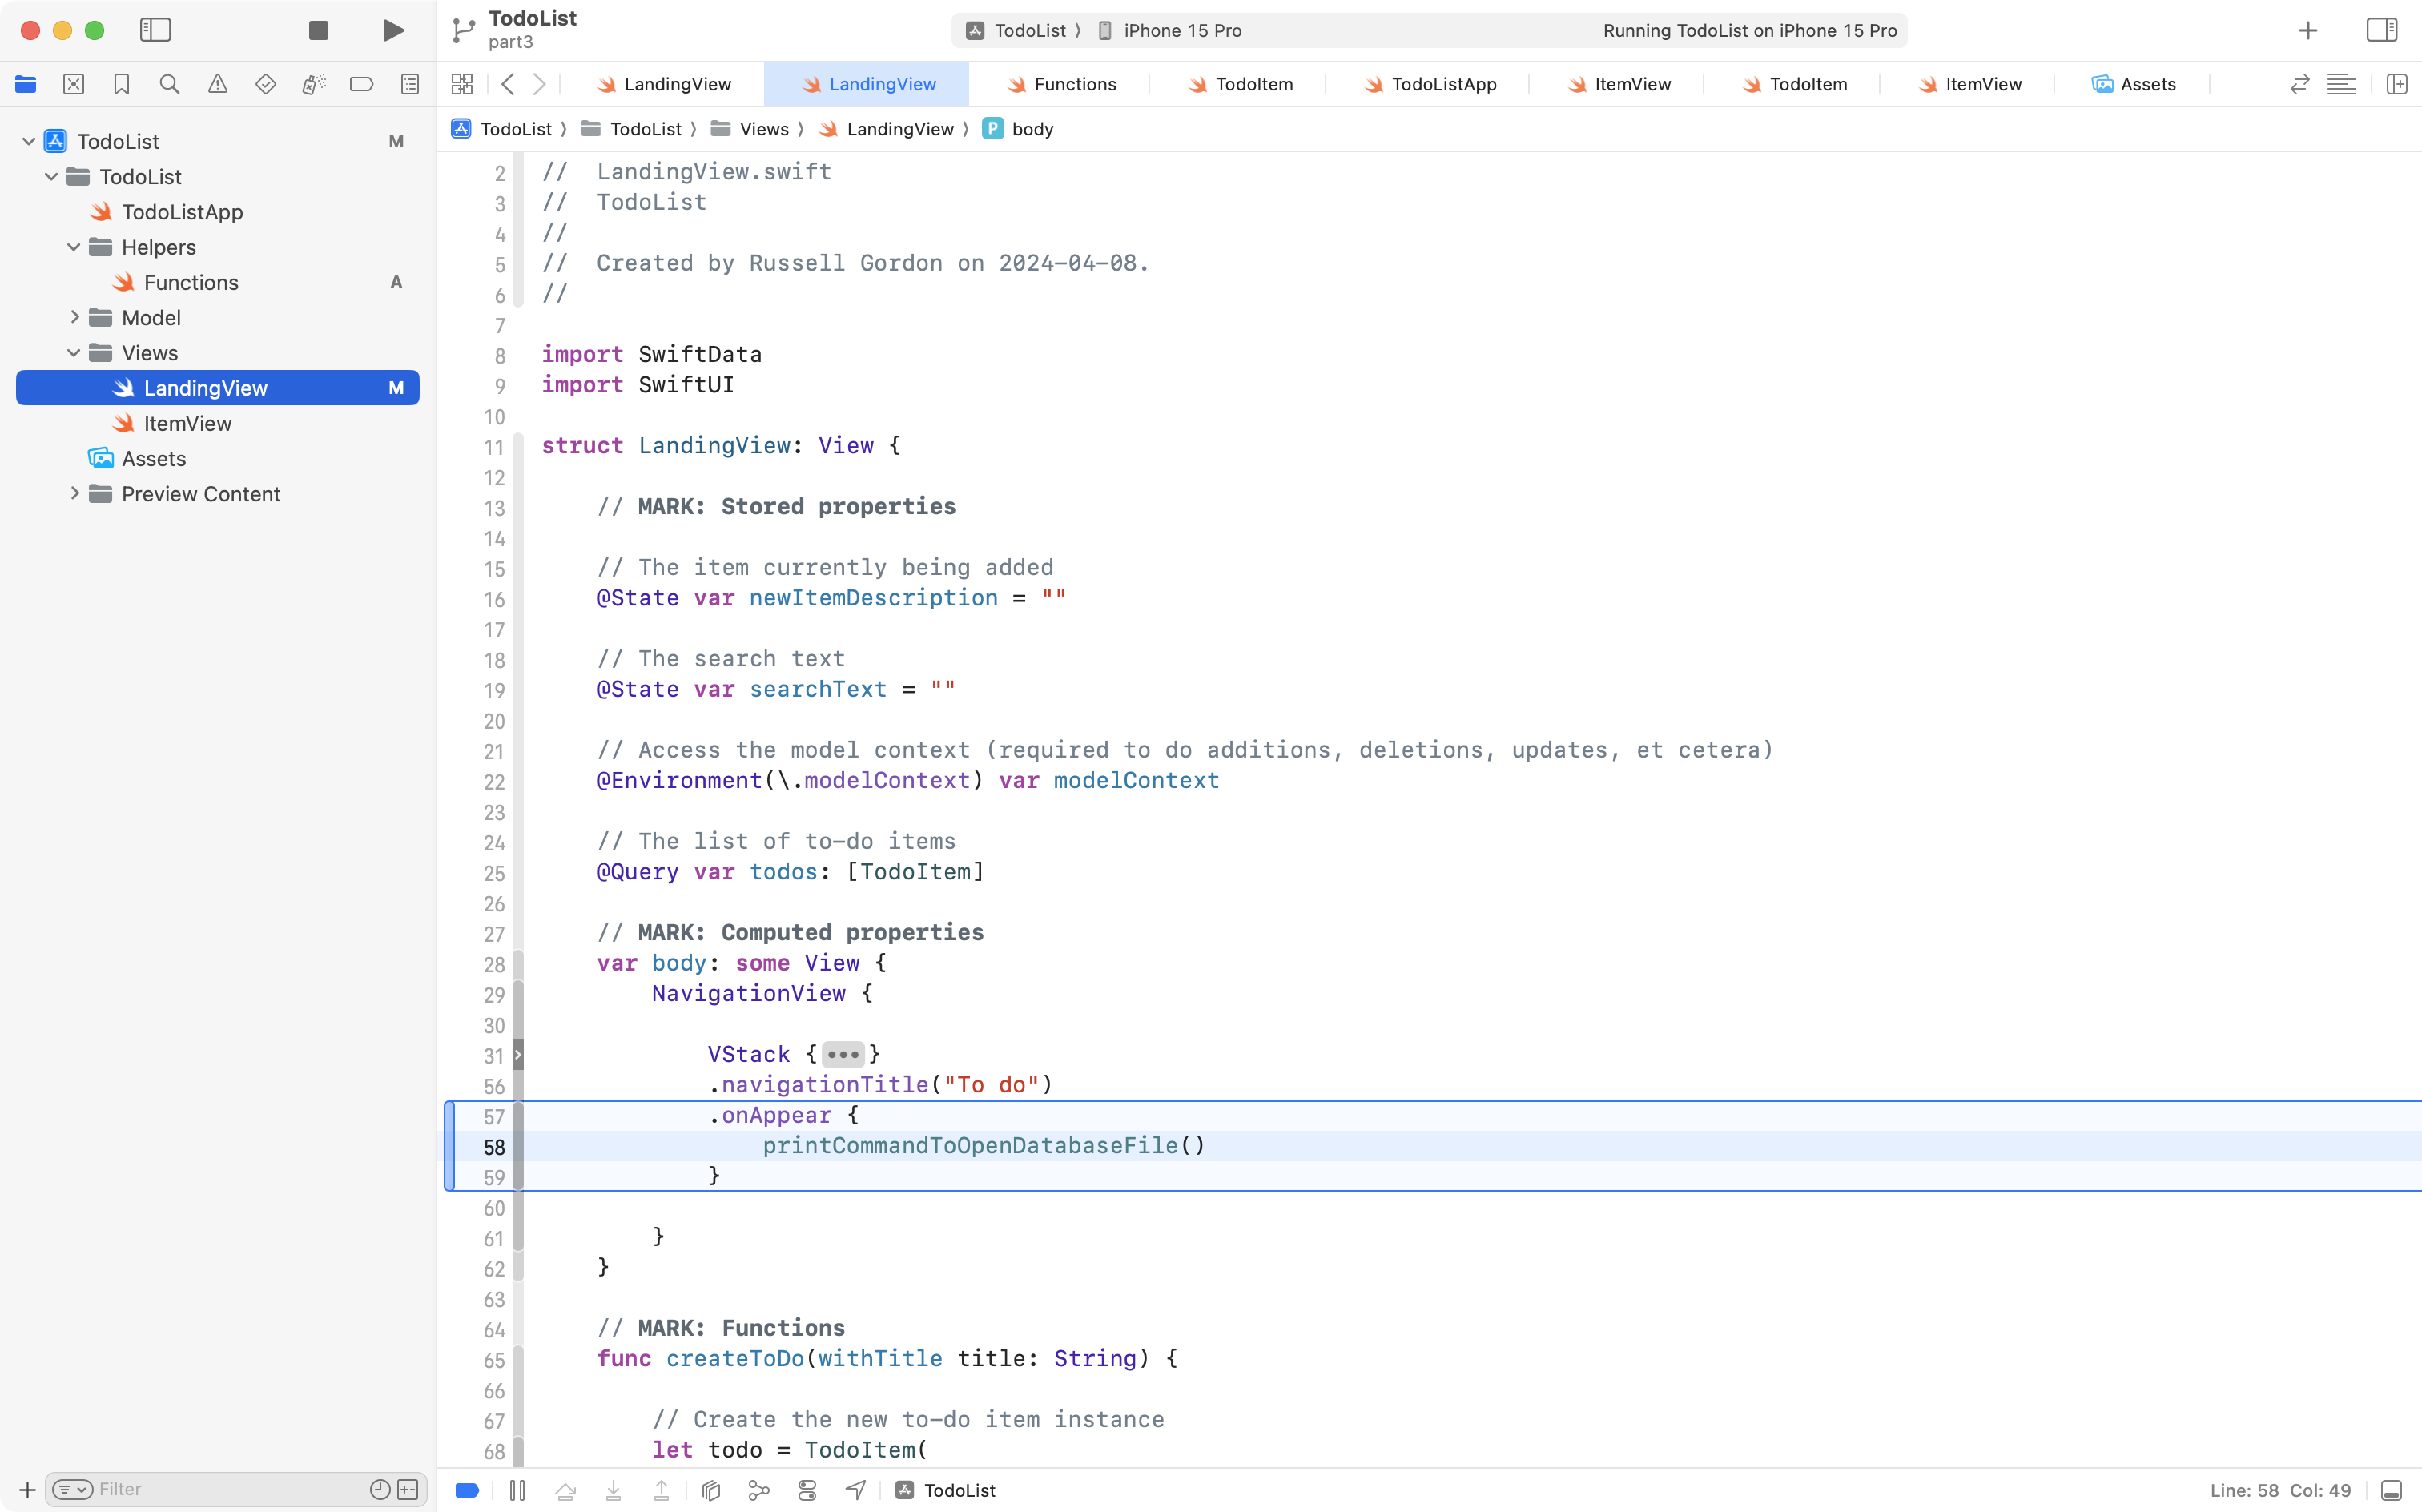
That code will cause the printCommandToOpenDatabaseFile function to run when the LandingView screen appears.
Now run the app in the full simulator, using Command-R.
When the app runs, a command that will let you access the database file will be placed in the debug console in Xcode:
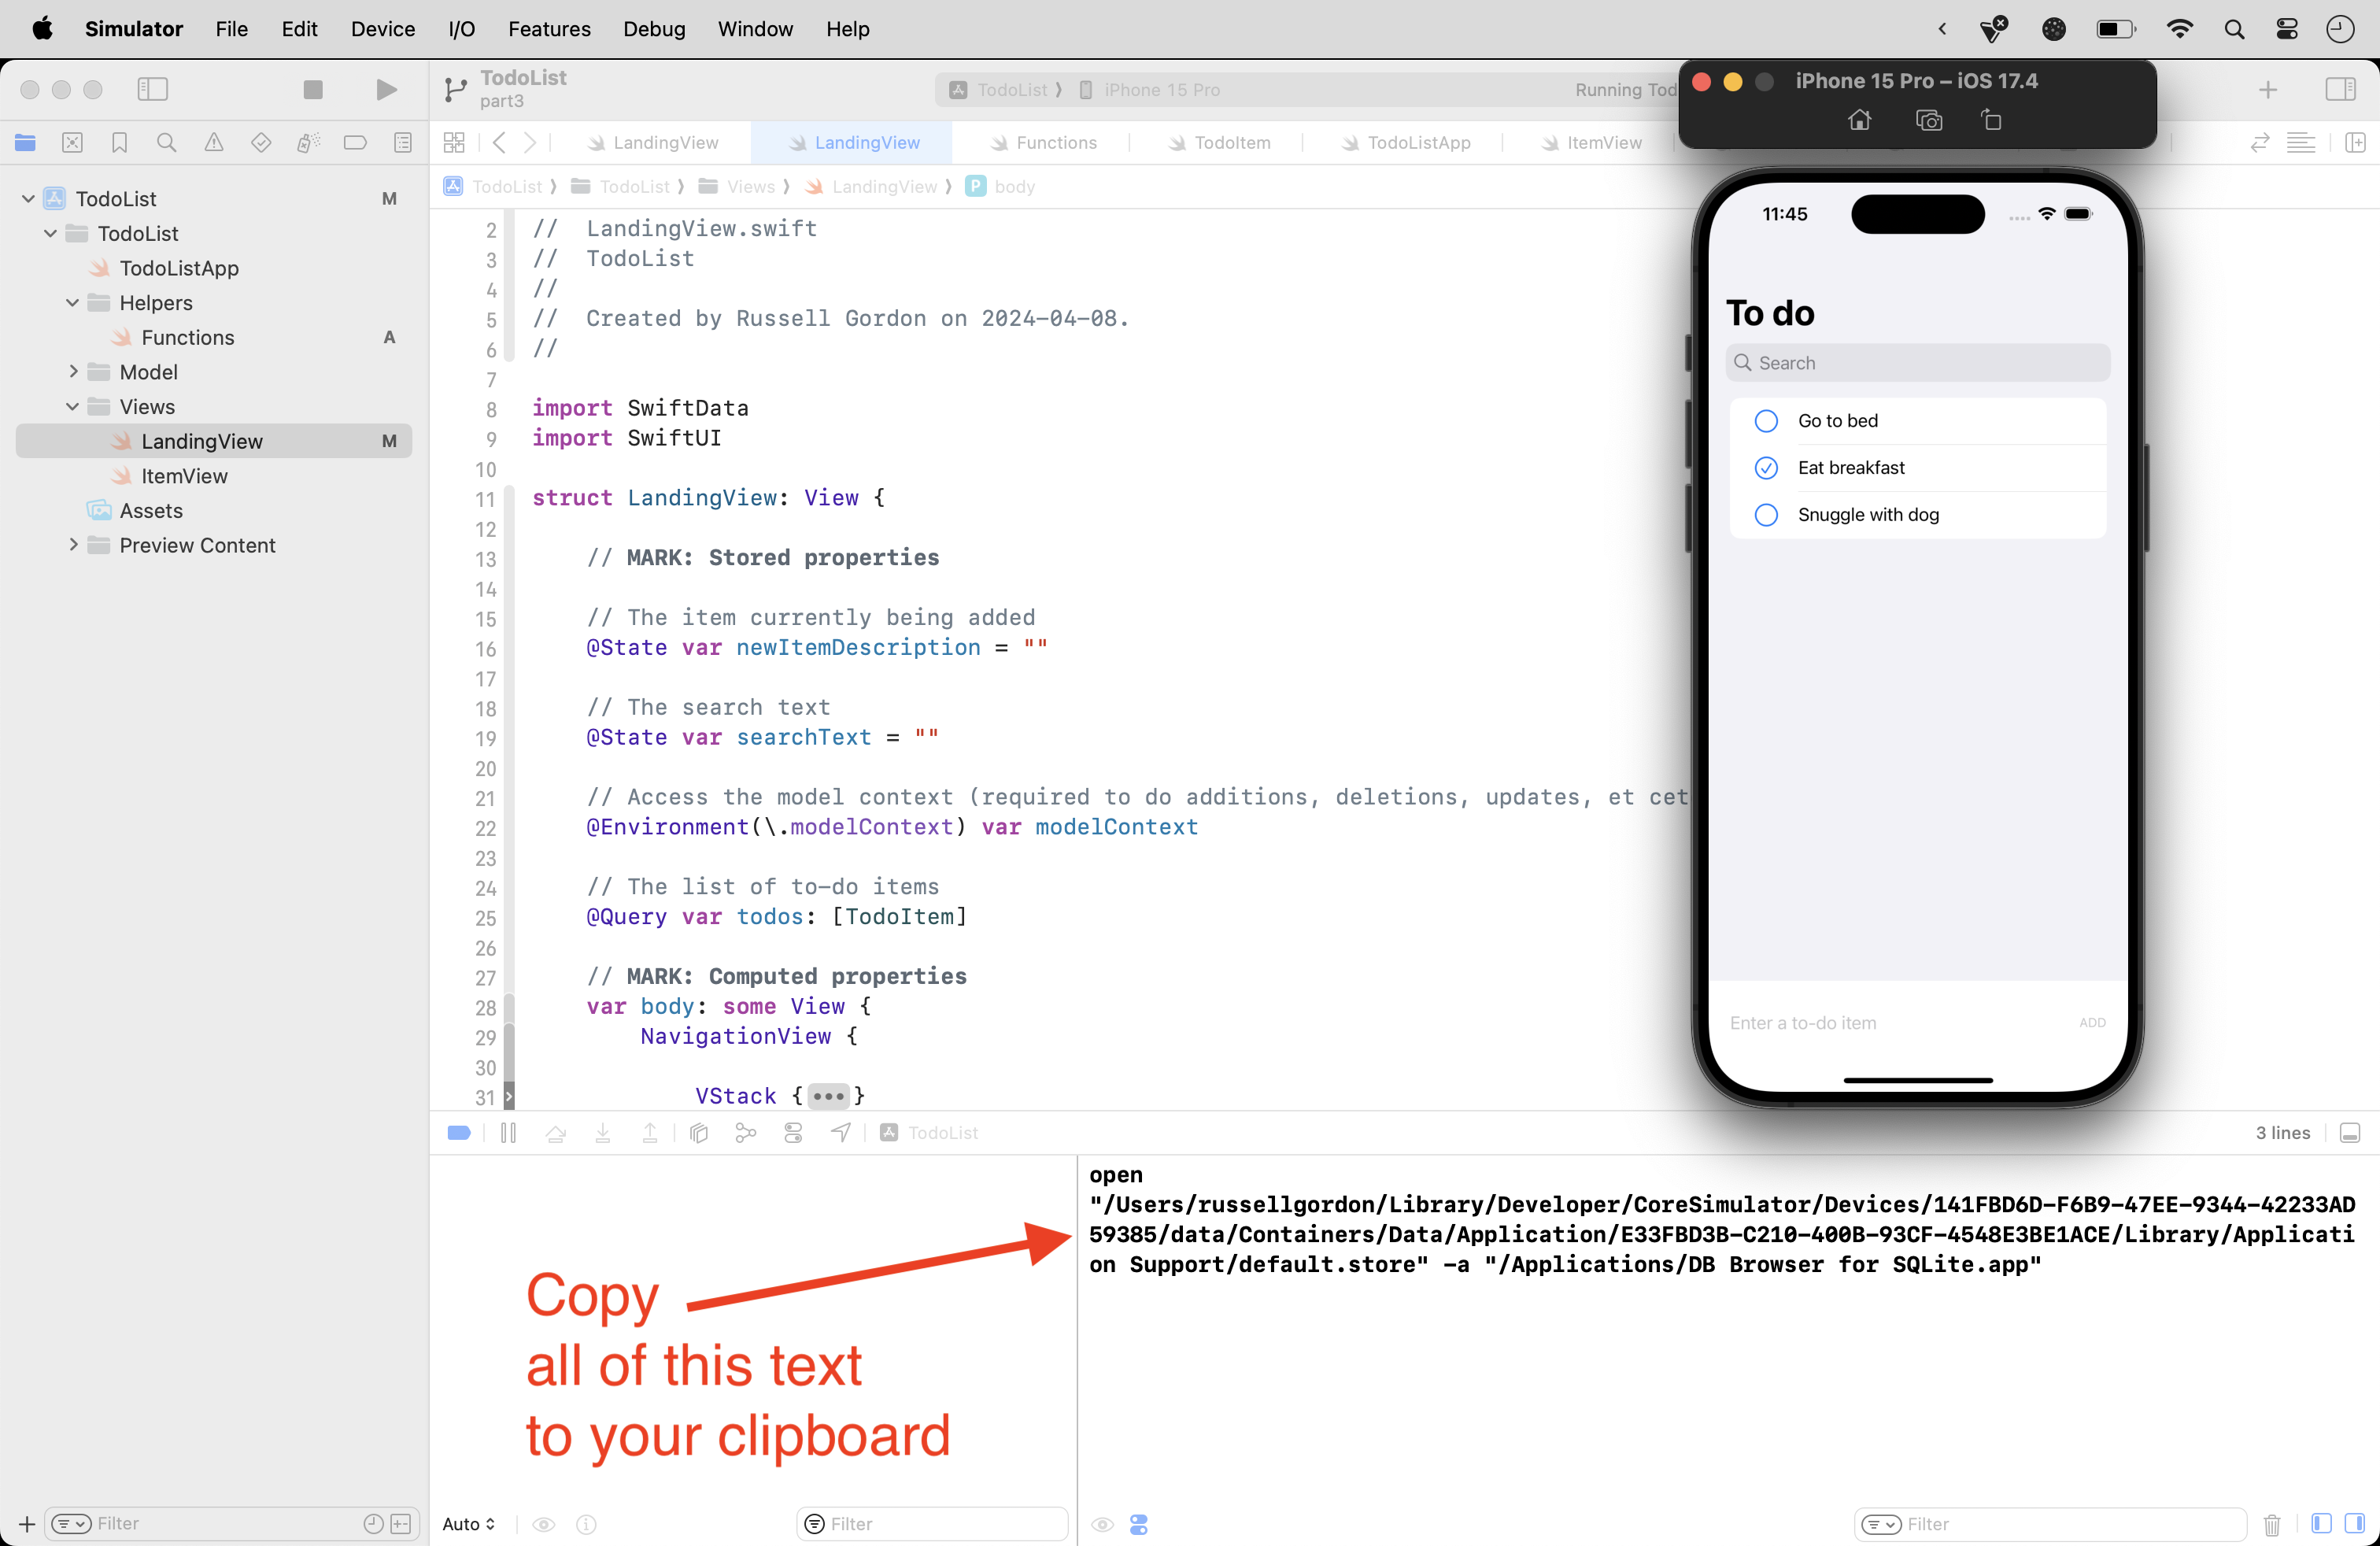
Highlight, then copy that command into your computer’s clipboard using Command-C.
Then, use Spotlight on your Mac to search for and open the Terminal app:
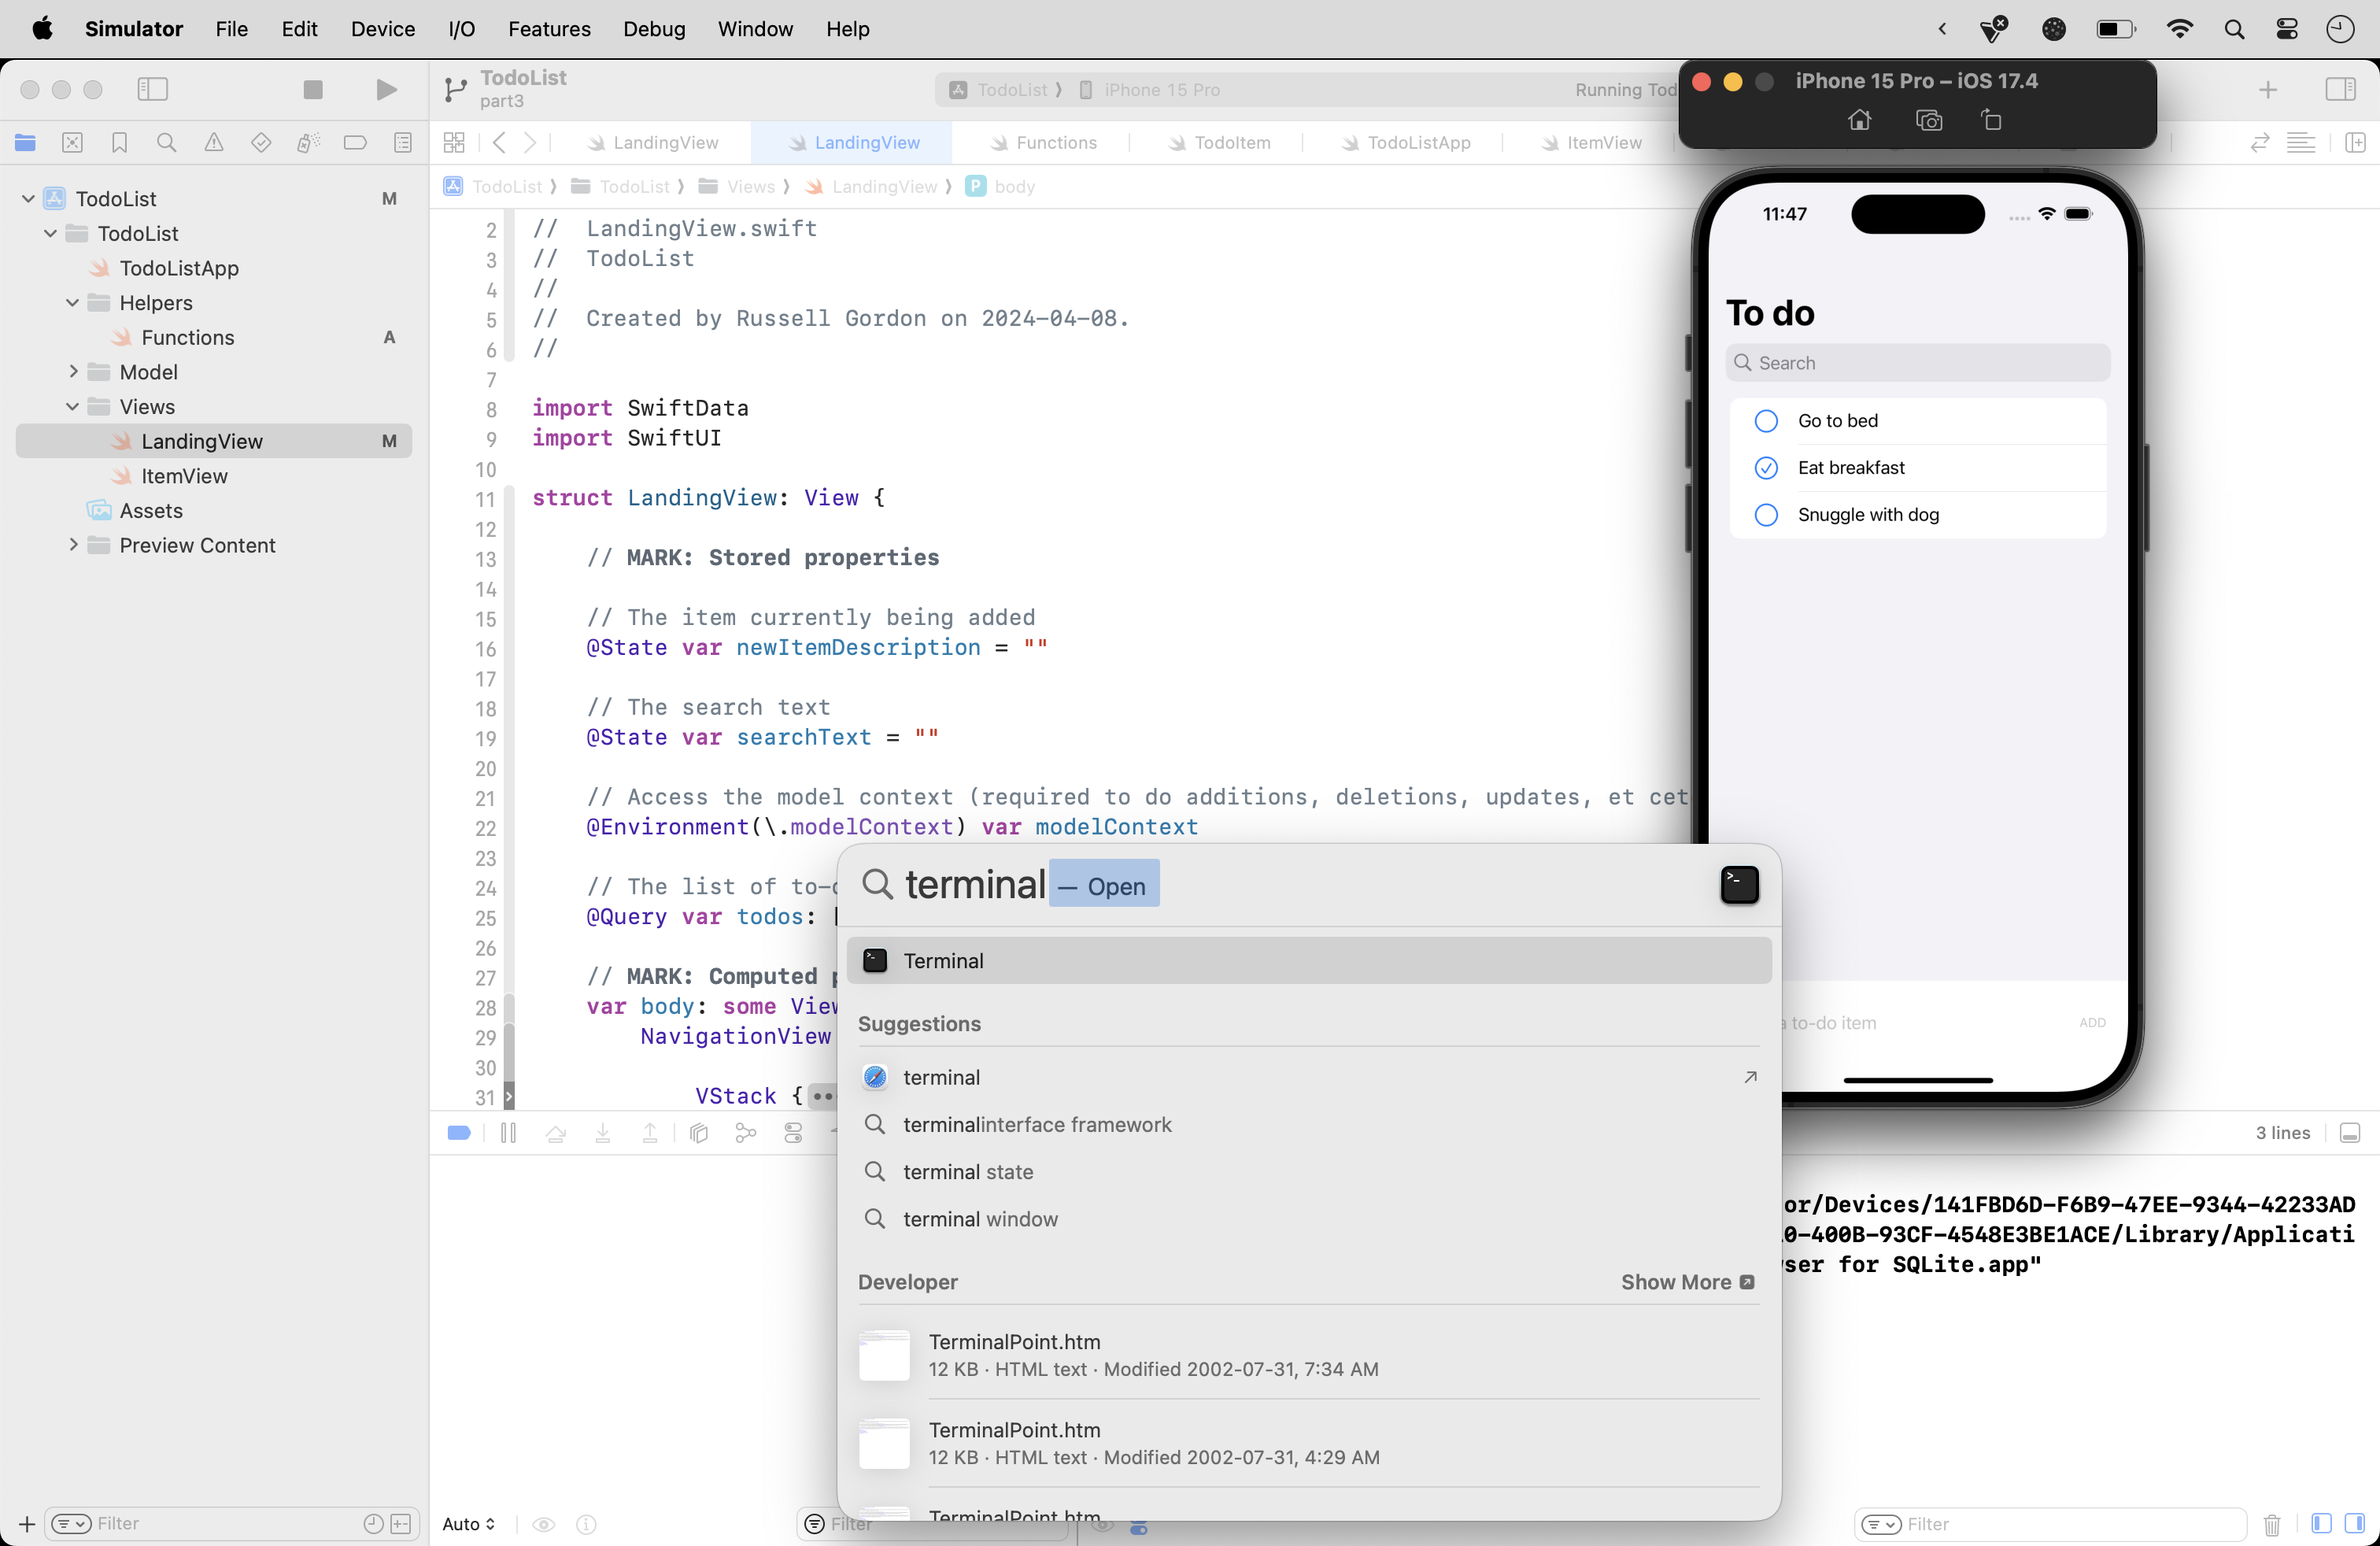
Once Terminal opens, paste the entire command on the command prompt, and press the Return key:
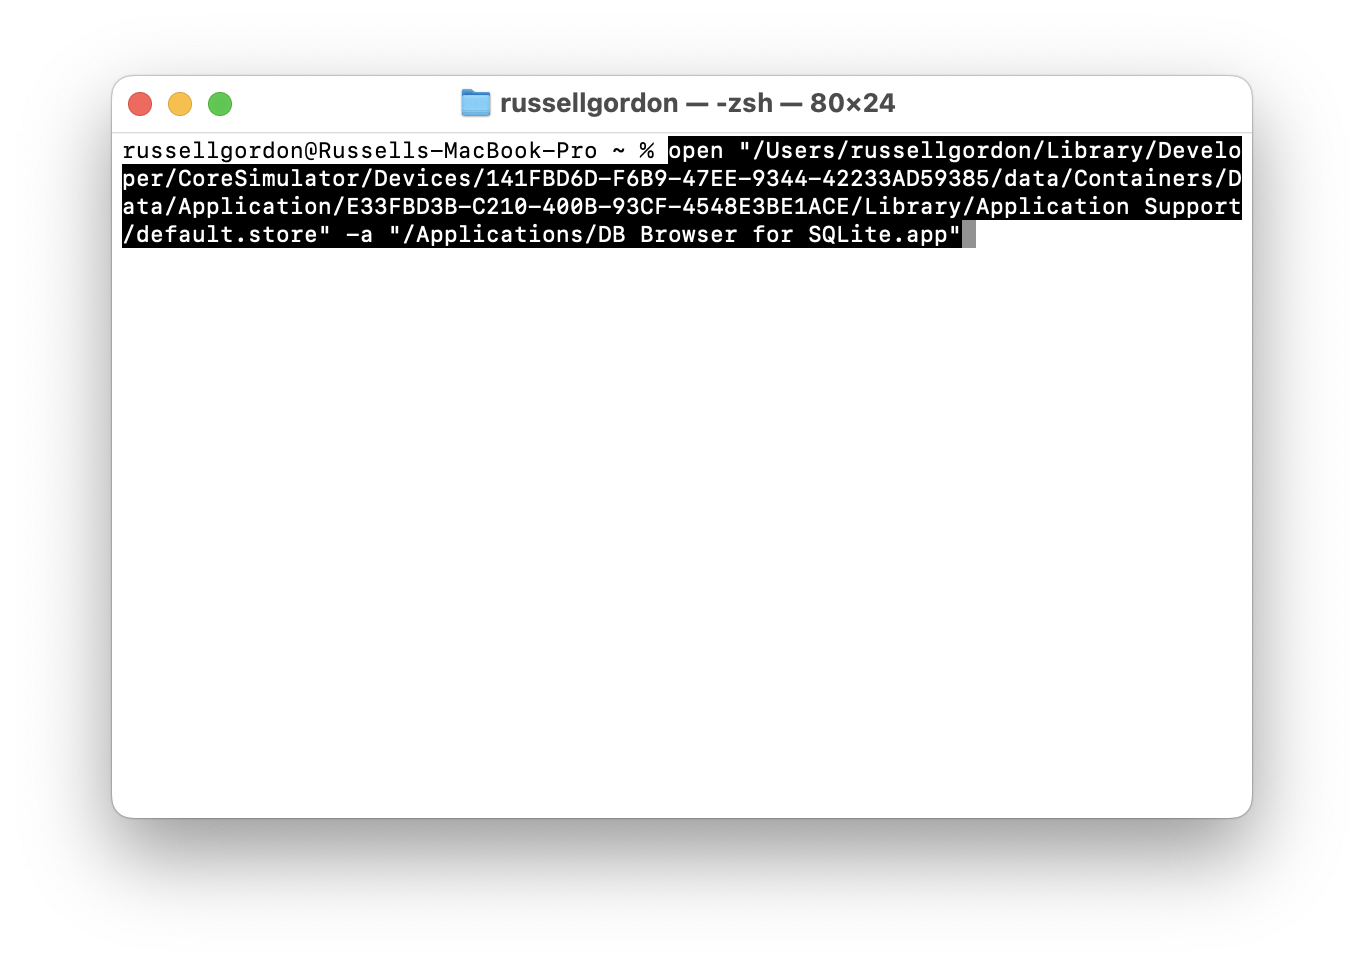
After you press the Return key, you should hopefully see the database created by SwiftData opened in the DB Browser app:

Finally, you can browse the data in the ZTODOITEM table, which corresponds to the TodoItem structure that we created for our model:
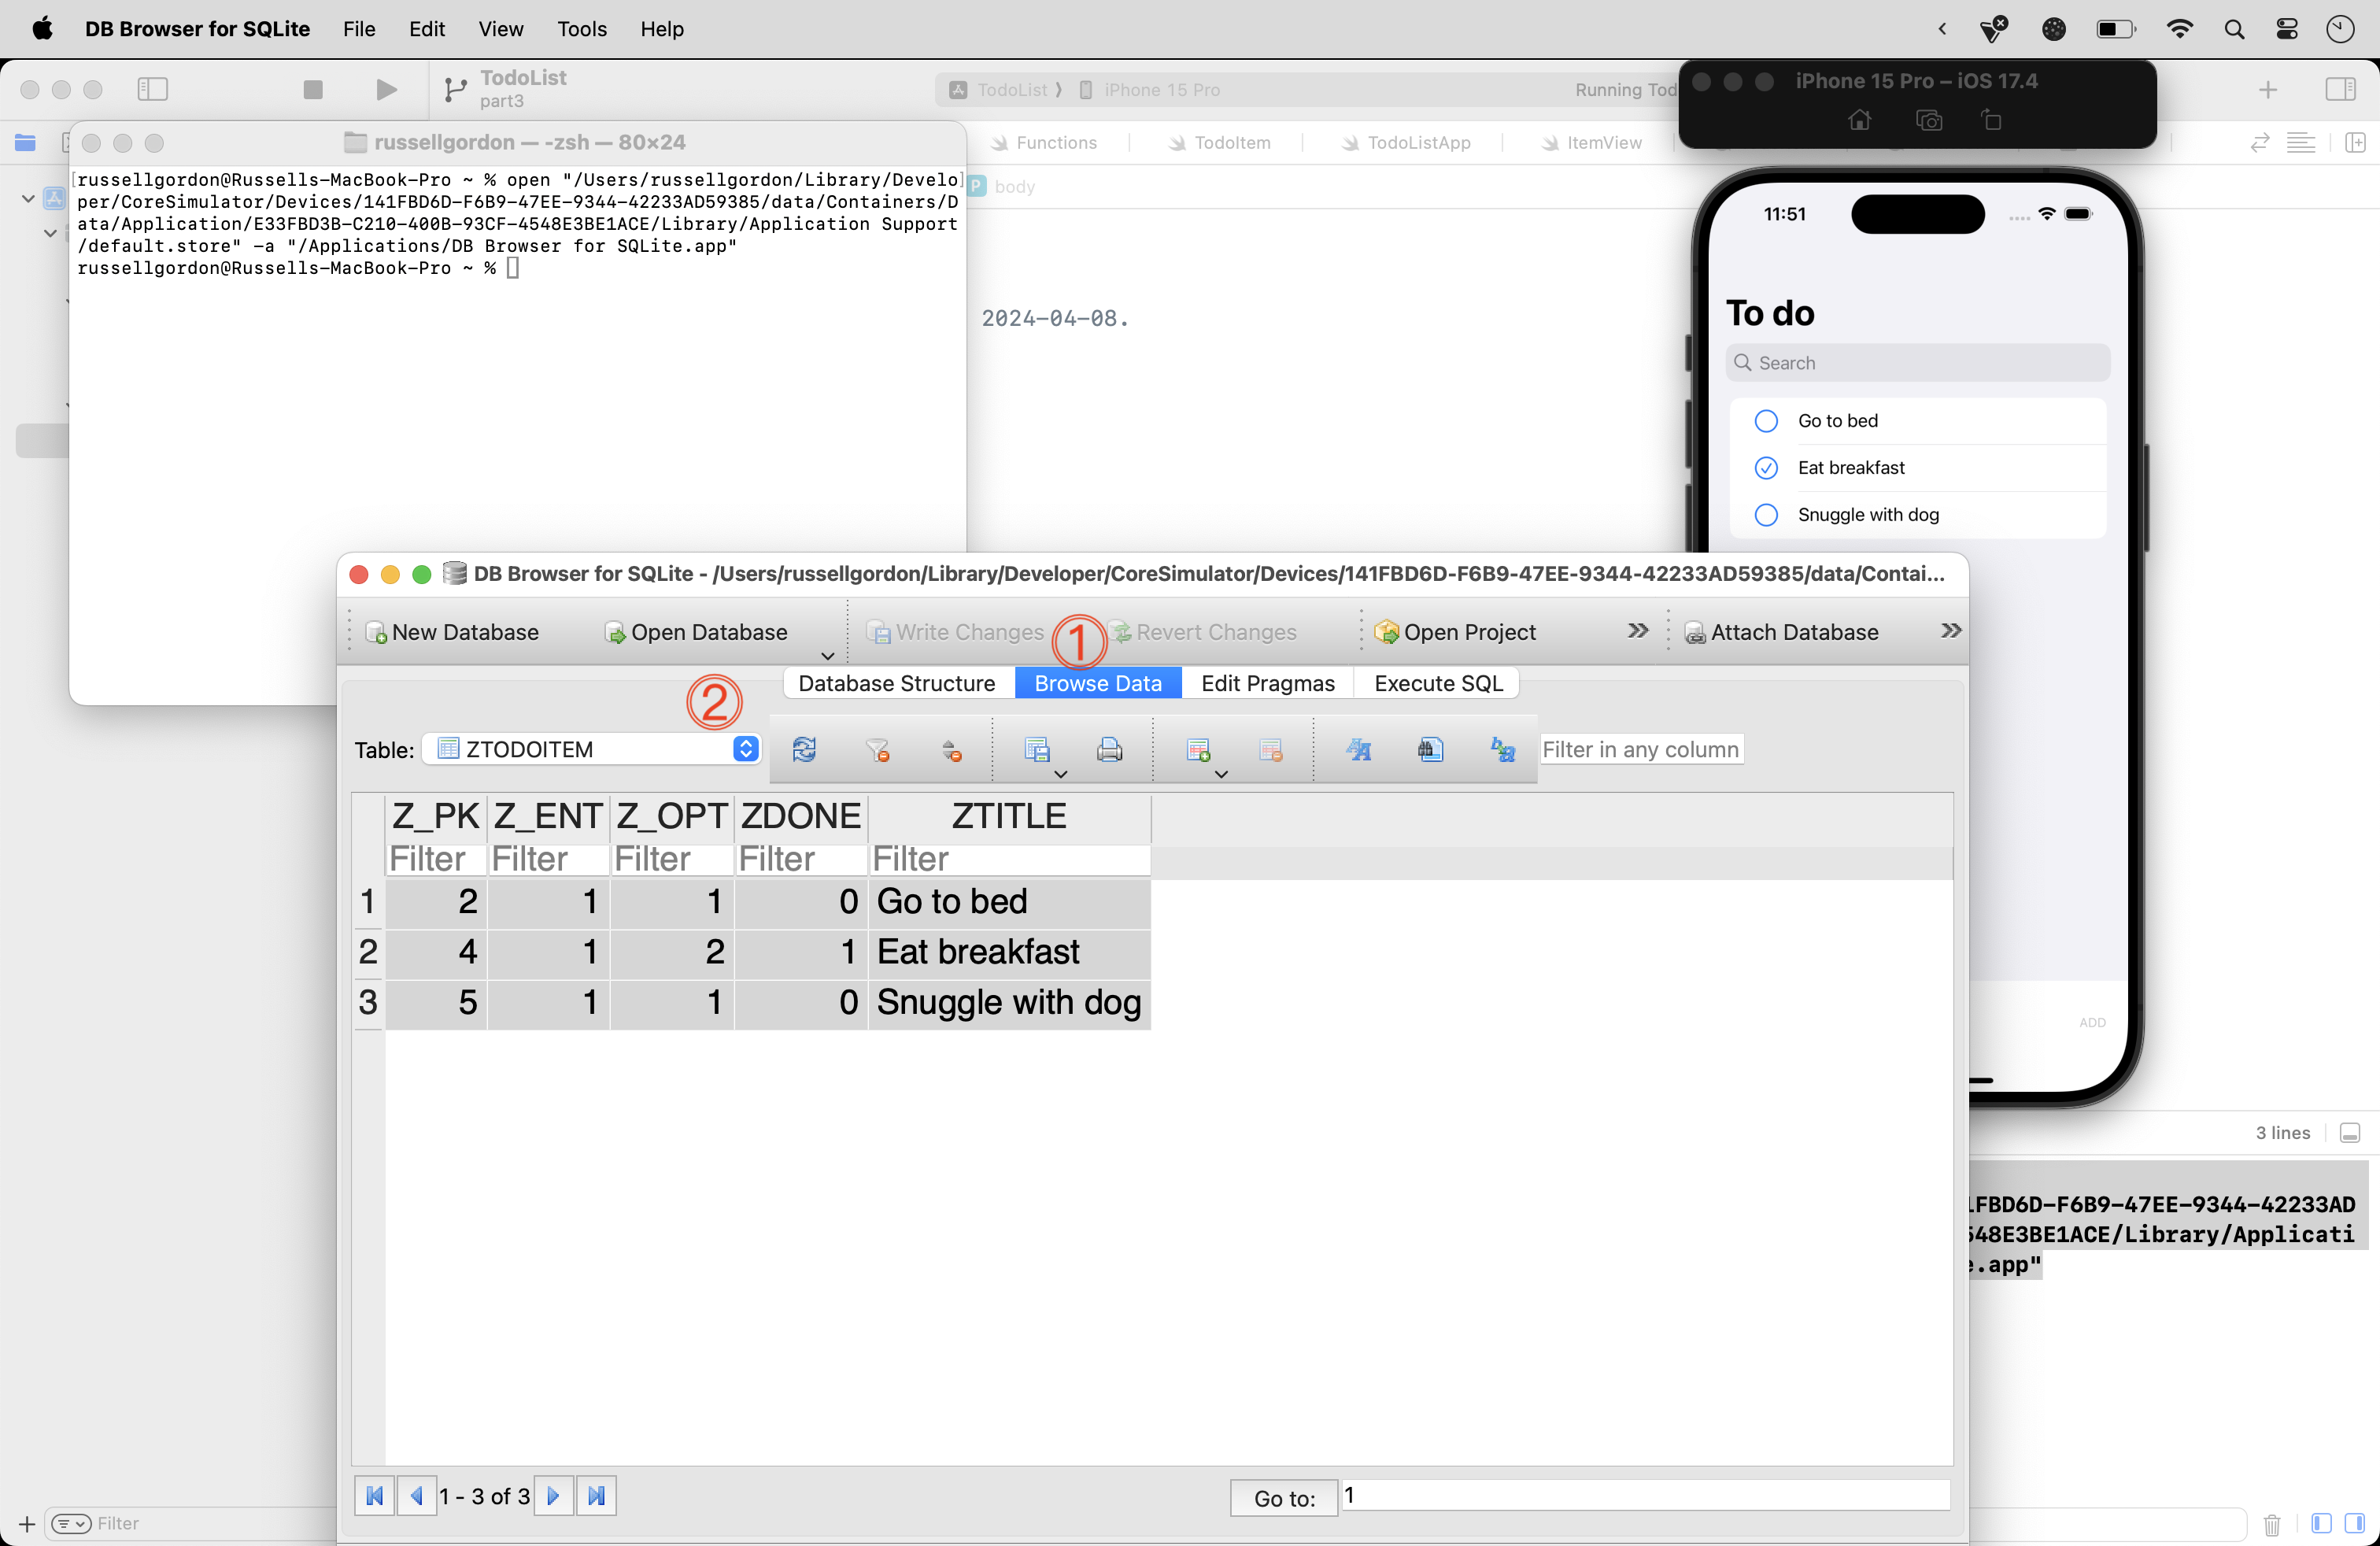
Any to-do items you have entered within your app should be present in the database table shown.
Normally there is no reason to poke around in the database file that SwiftData creates.
Definitely don’t manually change any of the data shown there, as that will likely confuse the SwiftData framework the next time you run your app.
However, it’s useful to see that behind the scenes, SwiftData creates this database file – and to realize that it is nothing that you are not already familiar with.
Commit and push this final code change with the following message:
Added a command to show the location of the database created by the SwiftData framework.
Discussion and Exercise
In the next part of this tutorial, for our next class, you will learn how to re-enable Xcode Previews when using SwiftData.
For now, when using the app, notice how the text of a to-do item remains after a to-do item is added:
Look at the code in the createToDo function and consider the stored properties that are defined for LandingView.
How could you add a single line of code to ensure that the text field, when adding a to-do item, is emptied after a to-do item has been added?
TIP
When you have finished this part of the tutorial, in your next class, you can continue on to part 4.